What Are Zombie Brain Cupcakes?
Zombie Brain Cupcakes are a fun and spooky dessert designed to look like eerie, realistic brains. These cupcakes blend delicious flavors with creative decoration, making them a standout treat for Halloween celebrations. Using colorful frosting and clever piping techniques, they mimic the twisted folds and textures of a brain, creating a thrilling visual effect. Whether homemade or bought from a bakery, these cupcakes add a creepy charm to any party table.
Over the years, Zombie Brain Cupcakes have gained popularity for Halloween parties and themed events. Their playful yet slightly gruesome look perfectly matches the spirit of the holiday. Kids love the fun of eating something that looks spooky but tastes sweet, while adults appreciate the creativity and festive atmosphere they bring. From school parties to adult gatherings, these cupcakes have become a beloved Halloween staple.
Why Choose Zombie Brain Cupcakes for Halloween?
Zombie Brain Cupcakes stand out because of their unique and visually striking design. Unlike traditional Halloween desserts, these cupcakes offer a dramatic and memorable look that immediately grabs attention. Their brain-like swirls and dripping “blood” details create an unforgettable spooky effect that fits perfectly with Halloween’s eerie vibe.
These cupcakes appeal to all ages, making them an excellent choice for mixed groups. Children enjoy the playful, slightly scary design, while adults admire the artistry behind them. Their versatility allows bakers to experiment with flavors and colors, tailoring the cupcakes to different tastes and dietary needs. This combination of fun, flavor, and flair makes Zombie Brain Cupcakes a top pick for Halloween celebrations.
Essential Ingredients for Zombie Brain Cupcakes
To create perfect Zombie Brain Cupcakes, start with a solid cupcake base. Popular flavors include chocolate, vanilla, and red velvet. For a more natural and spooky twist, beetroot-based cupcakes offer vibrant coloring and added moisture. Bakers can choose between pre-made cake mixes or prepare cupcakes from scratch. Homemade recipes give full control over flavor and texture, while mixes save time without sacrificing taste.
The brain frosting forms the centerpiece of this dessert. Buttercream and cream cheese frostings work best due to their smooth texture and piping ability. Coloring the frosting is key to achieving the creepy brain effect. Use pink, red, or green food coloring, which can be either natural or artificial depending on preference. Blending shades adds depth and realism.
Adding decorative elements elevates the spooky vibe. Red gel or strawberry syrup creates a convincing “blood” effect that enhances the brain design. For extra fun, edible glitter adds shine, while candy eyes or plastic spiders introduce playful Halloween details. These finishing touches make the cupcakes more eye-catching and thematic.
Necessary Tools for Making Zombie Brain Cupcakes
Equipping yourself with the right tools ensures a smooth baking and decorating process. Piping bags fitted with round or star tips are essential for crafting the brain’s intricate folds and lines. An offset spatula helps spread the base layer of frosting evenly over each cupcake.
Use cupcake liners to prevent sticking and a sturdy baking tray to hold the cupcakes while baking. Mixing bowls and an electric mixer streamline the preparation of both the cupcake batter and frosting, helping achieve a smooth consistency and even mixing. Having these tools on hand makes decorating easier and the final result more professional.
Preparing the Cupcake Base
Begin by preheating your oven to 350°F (175°C). Line a cupcake tin with paper liners to ensure easy removal and clean presentation. If using a homemade batter, follow the recipe closely, mixing ingredients until smooth and well combined. For chocolate, vanilla, red velvet, or beetroot cupcakes, the mixing process typically involves creaming butter and sugar, adding eggs, and gradually incorporating dry ingredients.
Once your batter is ready, fill each cupcake liner about two-thirds full to allow room for rising. Place the tin in the oven and bake for 18 to 22 minutes. To test doneness, insert a toothpick into the center of a cupcake; it should come out clean or with a few moist crumbs. After baking, transfer cupcakes to a wire rack and allow them to cool completely. Decorating warm cupcakes can cause frosting to melt and lose its shape, so patience is key.
Crafting the Brain Frosting
Start by preparing your frosting base using buttercream or cream cheese frosting. Beat softened butter until creamy before gradually adding powdered sugar, vanilla extract, and a small amount of milk or cream to reach a smooth texture. To achieve the distinctive brain look, divide the frosting into separate bowls for coloring.
Use food coloring to create pink, red, or green shades, adjusting quantities for the desired intensity. Combining colors can add depth and a more realistic appearance. Pay attention to the frosting’s consistency; it should be thick enough to hold shape but soft enough to pipe smoothly. If the frosting is too stiff, add a teaspoon of milk. If it’s too soft, add powdered sugar gradually.
Decorating the Cupcakes
Begin decorating by spreading a thin base layer of frosting on each cupcake using an offset spatula or the back of a spoon. This layer acts as glue, helping the piped brain details stick.
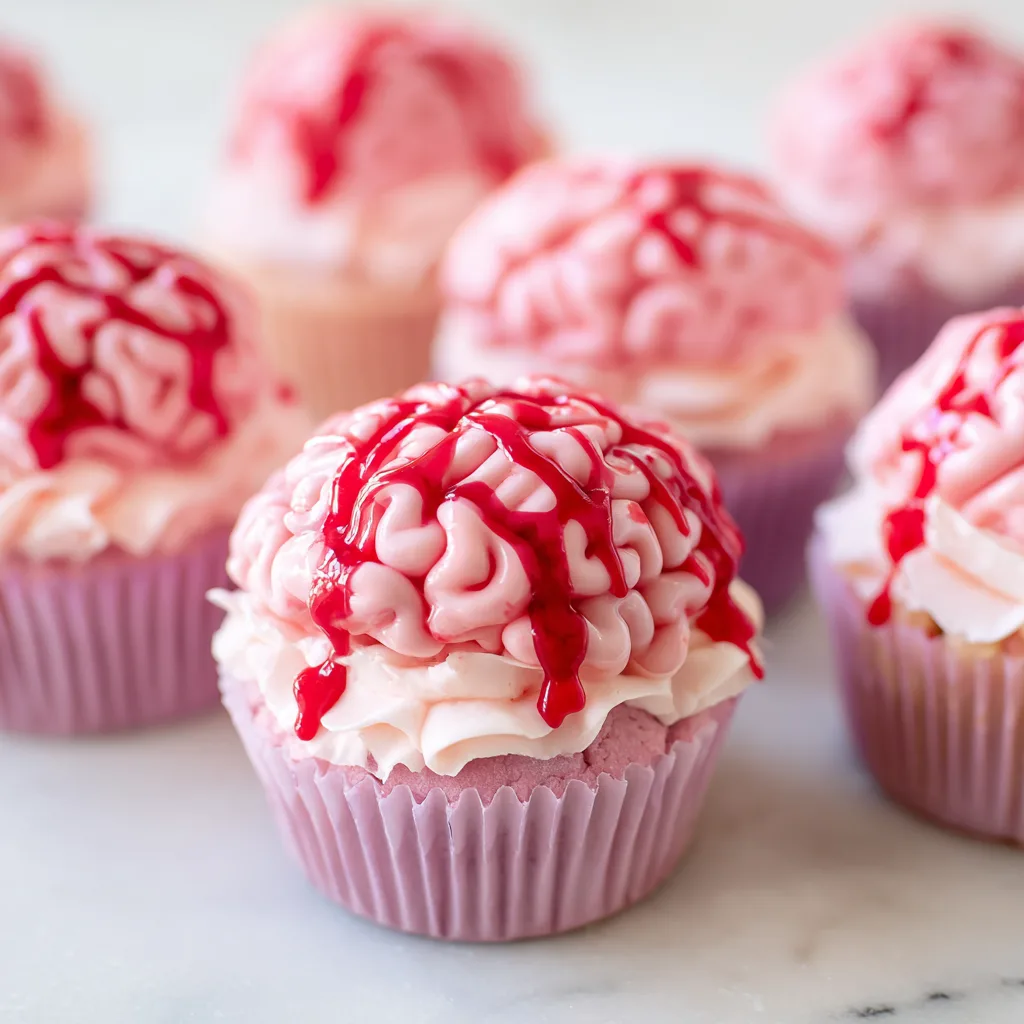
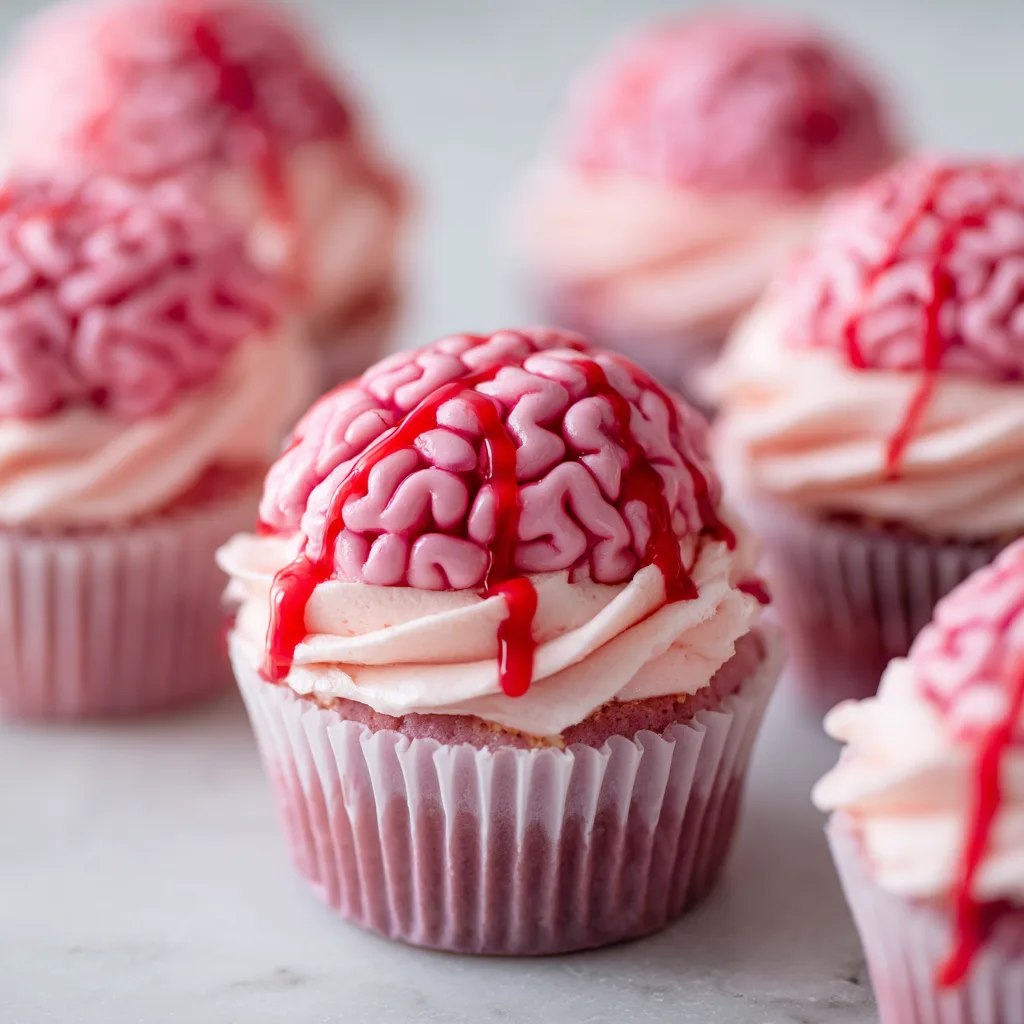
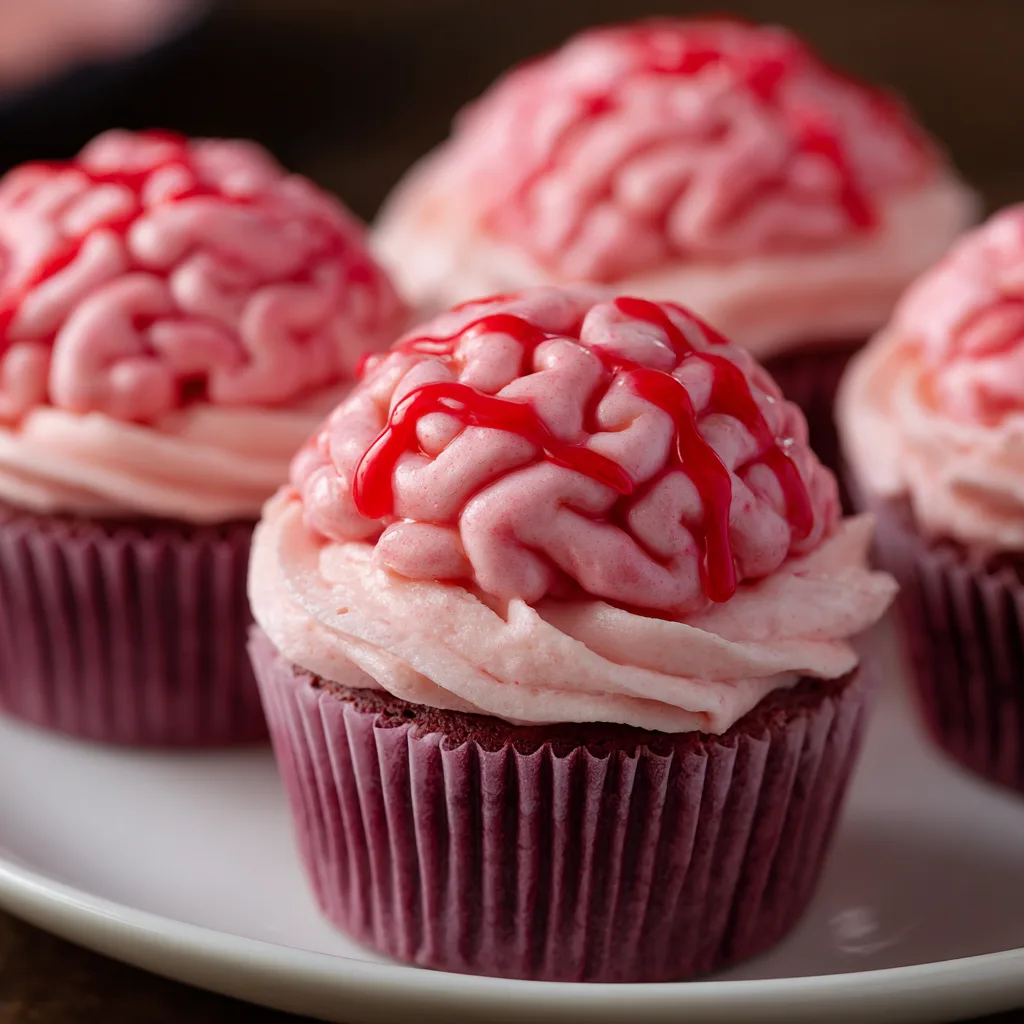
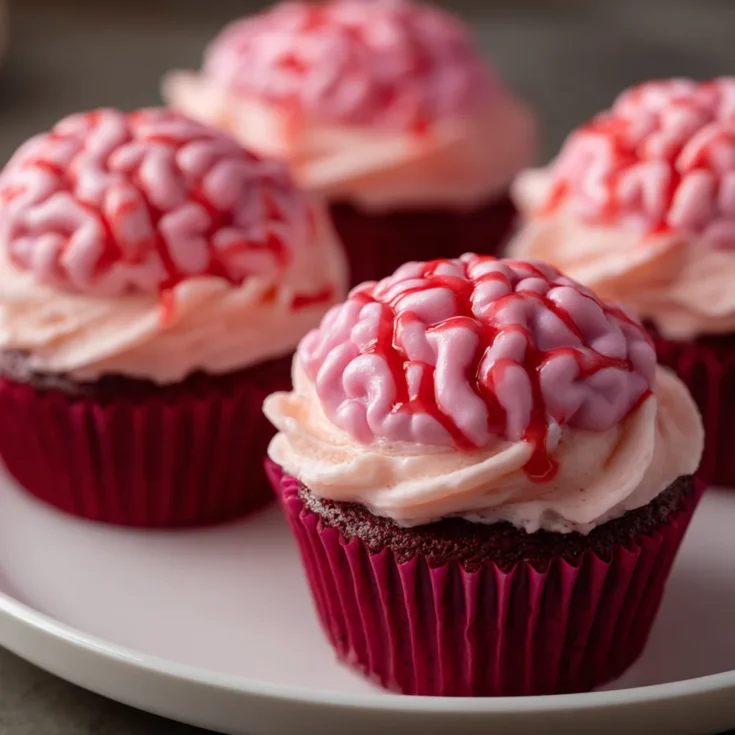
Fit a piping bag with a small round tip and fill it with the colored frosting. Start by piping a single curved line down the center of the cupcake to mimic the brain’s central groove. Then, pipe squiggly, irregular loops on either side of the line to resemble the brain’s folds and convolutions. Keep the lines close but not touching, creating an intricate pattern that looks three-dimensional.
Once the brain design is complete, add a “blood” effect using red gel or strawberry syrup. Drizzle it carefully over the frosting to simulate dripping blood, enhancing the creepy and realistic appearance. This step can be as subtle or dramatic as you like.
Presentation Tips
Display your Zombie Brain Cupcakes on a dark platter or Halloween-themed tray to maximize their spooky impact. Consider adding decorative elements like fake cobwebs, candy spiders, or themed cupcake toppers around the platter for a festive touch.
If you want to keep cupcakes fresh, store them in an airtight container at room temperature for up to two days. Avoid refrigeration if possible, as it can dry out the cupcakes or harden the frosting. For longer storage, freeze the cupcakes without frosting, then thaw and decorate on the day of your event. These tips ensure your cupcakes stay moist and visually appealing for your Halloween celebration.
Flavor Variations to Elevate Zombie Brain Cupcakes
Experimenting with flavors can make your Zombie Brain Cupcakes truly unforgettable. Pumpkin spice offers a warm, autumnal twist that fits perfectly with Halloween vibes. Beetroot adds natural red coloring and an earthy sweetness, enhancing both taste and appearance. For guests with gluten sensitivities, gluten-free cupcake recipes using almond flour or gluten-free blends ensure everyone can enjoy these spooky treats.
Complement your cupcake base with frosting flavors that enhance the overall experience. For example, cream cheese frosting pairs beautifully with pumpkin spice, adding a tangy contrast. Chocolate frosting works well with beetroot cupcakes, deepening the flavor. Don’t hesitate to mix colors and tastes to create a balanced, mouthwatering dessert.
Dietary Considerations for Inclusive Baking
Making Zombie Brain Cupcakes accessible to all requires thoughtful adaptations. Vegan versions replace butter and eggs with plant-based alternatives such as coconut oil and flaxseed meal. Dairy-free frosting can be made using vegan butter or coconut cream. These swaps keep the cupcakes moist and flavorful without compromising texture.
Gluten-free recipes replace wheat flour with rice, almond, or oat flours, providing safe options for those with gluten intolerance. Low-sugar or sugar-free variations use sweeteners like Splenda or erythritol, maintaining sweetness while reducing calories. These alternatives ensure your spooky treats suit diverse dietary needs while staying delicious.
Themed Decorations for a Horror-Filled Dessert Table
Bring your Zombie Brain Cupcakes to life by incorporating popular horror themes like “The Walking Dead” or “Zombie Apocalypse.” Use edible toppers shaped like miniature brains, bones, or zombies to heighten the creep factor. Candy eyes and plastic spiders can also add layers of spooky fun.
Pair cupcakes with other Halloween desserts such as spiderweb cookies or bloody punch to create a cohesive and eye-catching display. Using coordinated colors and props across your dessert table enhances the eerie atmosphere, making your Halloween party unforgettable. These decoration ideas bring theme and flavor together, ensuring your cupcakes stand out.
Common Inquiries About Zombie Brain Cupcakes
How Do You Keep Cupcakes Moist Before Frosting?
To keep cupcakes moist, store them in an airtight container as soon as they cool completely. Avoid refrigerating cupcakes before frosting, as cold air can dry them out. Wrapping cupcakes individually in plastic wrap also helps lock in moisture. If you’re not frosting them immediately, consider placing a slice of bread inside the container—its moisture helps keep the cupcakes soft.
Can These Cupcakes Be Made in Advance?
Yes, you can prepare cupcakes a day or two ahead. Bake and cool them completely, then store in an airtight container at room temperature. For longer storage, freeze unfrosted cupcakes in a freezer-safe bag. Thaw them fully before decorating to preserve texture and taste. Once frosted, it’s best to consume cupcakes within two days for optimal freshness.
What Kind of Icing Is Best for Decorating?
Buttercream and cream cheese frostings both work well but offer different results. Buttercream holds its shape longer and pipes more cleanly, making it ideal for intricate brain designs. Cream cheese frosting has a tangier flavor but can be softer and more prone to melting. For detailed piping, buttercream generally offers better control and durability.
How Do You Achieve the Brain-Like Appearance?
The brain effect relies on piping technique. Use a small round piping tip to create a center groove down the cupcake. Then pipe squiggly, curved lines on each side, mimicking the brain’s folds. Keep lines close and irregular to enhance realism. Adding red gel or syrup drizzled over the frosting completes the effect by simulating dripping blood. Practicing piping on parchment paper beforehand can help perfect the design.
Prep Time:
30 minutes
Cook Time:
20 minutes
Total Time:
20 minutes
Ingredients
-
1 box chocolate cake mix (or ingredients for homemade cake)
-
1 cup butter (softened)
-
4 cups powdered sugar
-
2 tbsp milk
-
1 tsp vanilla extract
-
Red and green food coloring
-
Strawberry syrup or red gel for "blood" effect
Instructions
Preheat oven to 350°F (175°C) and line a cupcake tin with liners.
Prepare cake mix according to package instructions and fill cupcake liners.
Bake for 18-20 minutes, then cool completely on a wire rack.
Beat butter until creamy. Gradually add powdered sugar, milk, and vanilla extract until smooth.
Divide frosting into two portions; color one red and the other green.
Frost cupcakes with a thin layer of red frosting as a base.
Using a piping bag with a round tip, pipe a center line and squiggly lines on each cupcake to mimic a brain.
Drizzle strawberry syrup or red gel over frosting for a "blood" effect.
Notes
Blend pink and red food coloring for a more realistic brain appearance.
Ensure cupcakes are fully cooled before decorating to avoid melting the frosting.