
Introduction to Jack Skellington Oreo Pops
What Are Jack Skellington Oreo Pops?
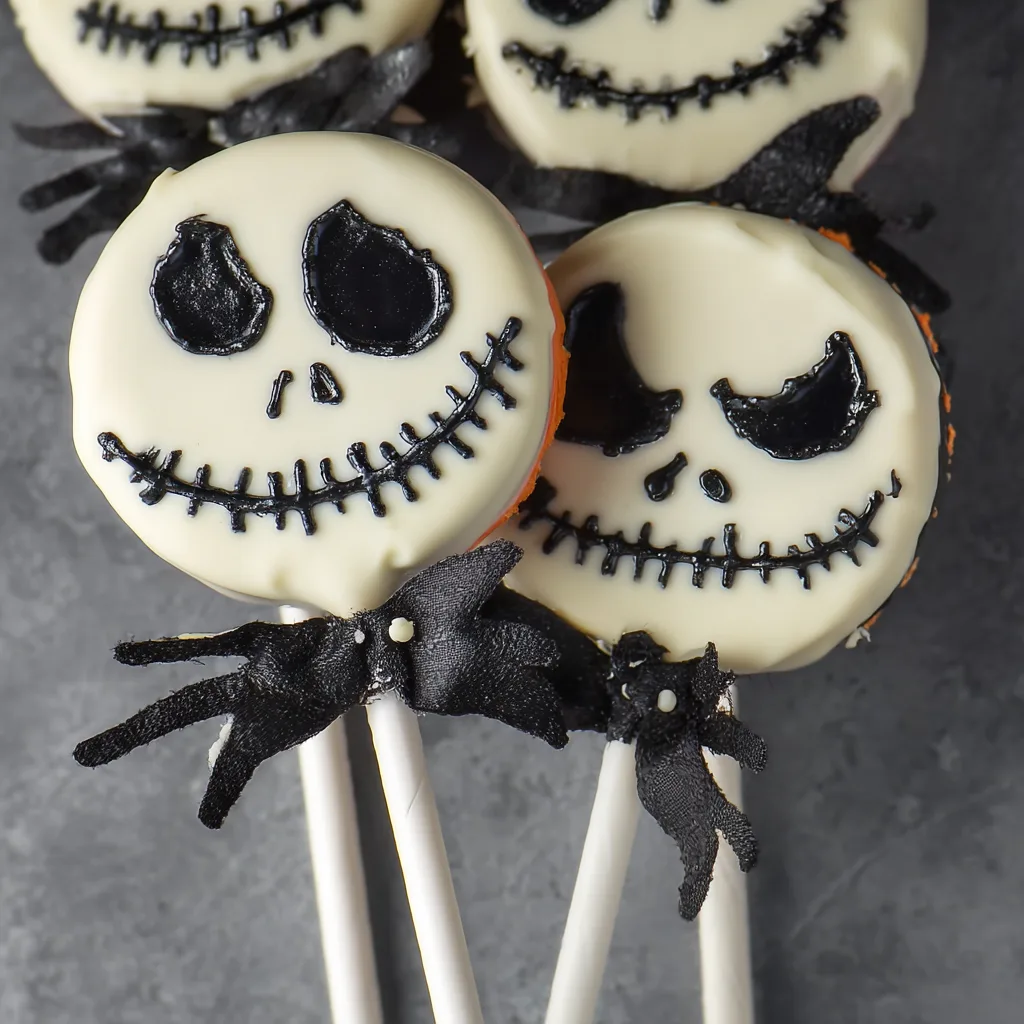
Jack Skellington Oreo Pops are charming, spooky treats that combine classic Oreos with creative decoration inspired by the iconic character from The Nightmare Before Christmas. These bite-sized desserts transform simple cookies into festive pops that capture Jack’s skeletal face with crisp white coating and detailed black icing. They offer a playful twist on traditional Halloween snacks, making them perfect for parties or fun at home. By turning Oreos into pops, you get a delicious, handheld treat that’s both visually impressive and easy to enjoy.
Why They’re Perfect for Halloween
These Oreo pops appeal to both kids and adults because they blend familiar flavors with fun, spooky designs. Kids love the sweet, creamy texture, while adults appreciate the nostalgic nod to a beloved Halloween movie. Plus, the treats are incredibly simple to customize. You can change the colors, add extra decorations, or even swap out Oreos for gluten-free options. Their quick assembly and impressive look make Jack Skellington Oreo Pops a crowd-pleaser at any Halloween gathering. Whether you’re hosting a party or looking for an easy seasonal dessert, these pops fit the bill perfectly.

Essential Ingredients for Jack Skellington Oreo Pops
Oreo Cookies: Double Stuff or Regular?
Choosing the right Oreos sets the foundation for your Jack Skellington pops. Double Stuff Oreos provide extra cream filling, making it easier to insert sticks without breaking the cookies. They also add a creamier bite, which many find irresistible. Regular Oreos work well too, but the thinner filling may make pops a bit more fragile. For added festive flair, seasonal Halloween-themed Oreos with orange or black filling can enhance your treats’ spooky look. These variations bring fun colors and surprise flavors that elevate the Halloween spirit.
White Chocolate Coating: Candy Melts or White Chocolate Chips?
The white coating forms Jack’s iconic pale face, so smoothness and consistency matter. Candy melts offer convenience—they melt evenly and hold their shape well once cooled. White chocolate chips can work but require careful melting to avoid burning. Adding coconut oil to either option helps achieve a silky, glossy finish. This blend thins the chocolate, making it easier to dip the Oreos and creating a sleek, professional look. The right coating transforms your pops from homemade to show-stopping.
Black Royal Icing: Detailing Jack’s Face
Royal icing delivers precise black details that bring Jack’s expression to life. Its thick yet smooth texture allows for controlled piping of eyes, nose, and mouth. If you prefer a simpler method, edible black markers offer a quick and mess-free alternative for decorating. Both options ensure your pops capture the character’s signature skeletal grin. Using high-quality, food-safe coloring ensures sharp, vibrant lines that won’t fade or smudge.
Lollipop Sticks or Paper Straws: Picking the Perfect Holder
Sturdy sticks are essential for handling and displaying your Oreo pops. Lollipop sticks are the classic choice, available in various lengths and thicknesses. Paper straws offer an eco-friendly alternative and come in festive patterns, adding extra charm to your treats. Whichever you choose, make sure they fit securely into the Oreo without cracking the cookie. The right stick supports your creation and completes the presentation.
Optional Decorative Elements: Adding the Final Touches
To make your Jack Skellington Oreo Pops truly stand out, consider adding black ribbons tied around the sticks. These simple additions add elegance and a festive vibe. You can also attach small chocolate bats or other Halloween-themed embellishments for extra flair. These decorative touches personalize your treats, making them perfect for parties or gifts. With these ingredients and materials ready, you’re set to create spooky and delightful Oreo pops that impress every guest.
How to Make Jack Skellington Oreo Pops
Preparing the Oreo Pops: Inserting Lollipop Sticks
Start by carefully inserting lollipop sticks into the center cream filling of each Oreo cookie. Gently wiggle the stick halfway through the cookie to avoid cracking it. If the cookies feel fragile or you notice any cracks, place the Oreos in the refrigerator for 15 to 20 minutes to chill. Chilling firms the cream filling, helping the sticks stay in place more securely during the dipping process. This step ensures your Oreo pops hold together well while you decorate and serve them.
Melting the White Chocolate Coating: Microwave vs. Double Boiler Methods
To create Jack’s signature white face, melt your white chocolate or candy melts carefully. Using a microwave, heat the chocolate in 20-second intervals, stirring thoroughly after each burst. This prevents burning and ensures even melting. Alternatively, use a double boiler by placing a heatproof bowl over simmering water. Stir the chocolate continuously until smooth. Whichever method you choose, add about two teaspoons of coconut oil during melting. This addition thins the chocolate, making it easier to coat the Oreos smoothly and creating a glossy finish that hardens beautifully.
Dipping and Setting: Techniques for a Smooth Coating
Hold each Oreo by the stick and dip it into the melted white chocolate. Fully submerge the cookie, then gently tap the stick on the bowl’s edge to remove excess coating. This tapping helps achieve an even layer without clumps. Place the coated Oreos upright on a parchment-lined tray to dry. For best results, refrigerate the tray for at least 30 minutes, allowing the coating to harden completely. Avoid stacking or touching the pops until fully set, preventing smudges or cracks.
Decorating the Pops: Drawing Jack’s Face and Adding Final Touches
Once the white chocolate coating is firm, decorate Jack Skellington’s face with black royal icing or edible markers. For icing, use a piping bag with a small round tip to draw precise eyes, nose, and Jack’s iconic skeletal smile. If you prefer a simpler method, carefully draw the facial features using a fine-tipped edible black marker. These details bring your Oreo pops to life. To finish, add optional decorations like black ribbons tied around the sticks or small chocolate bats glued with a dab of melted chocolate. These touches enhance the spooky theme and make your treats party-ready.
By following these detailed steps, you create perfect Jack Skellington Oreo Pops that impress both in appearance and taste. Each phase from preparation to decoration contributes to a fun, festive treat your guests will love.
Enhancing Your Jack Skellington Oreo Pops
Flavor Variations: Exploring New Tastes
Give your Jack Skellington Oreo Pops a unique twist by experimenting with different Oreo flavors. Mint Oreos add a refreshing note, while peanut butter Oreos bring a rich, nutty taste that contrasts nicely with the sweet coating. You can also infuse your white chocolate coating with flavor extracts like vanilla, almond, or even orange. These subtle hints add depth to the treat without overpowering the classic Oreo flavor, making each pop a delightful surprise.
Dietary Adjustments: Catering to Special Needs
If you or your guests have dietary restrictions, don’t worry—these pops can adapt easily. Use gluten-free Oreo alternatives to accommodate gluten sensitivities. For vegan-friendly versions, choose dairy-free white chocolate or candy melts and verify that your Oreos and decorative items are free from animal products. These adjustments ensure everyone can enjoy the spooky treats without sacrificing flavor or fun.
Presentation Ideas: Showcasing Your Creations
Display your Jack Skellington Oreo Pops creatively to impress guests at any Halloween event. Arrange them upright in a decorated Styrofoam block or in jars filled with black or orange candy to keep them stable. Wrap individual pops in clear cellophane tied with black ribbons for a polished look. These wrapped pops also make fantastic party favors or gifts, spreading the Halloween spirit beyond your own celebration.
Troubleshooting Common Issues: Quick Fixes
Chocolate coatings can crack if not tempered or cooled properly. To prevent this, avoid rapid temperature changes; let your dipped pops set in the refrigerator gradually. If cracks appear, gently re-dip the affected Oreo in melted chocolate to smooth the surface. Decorations can smudge if applied too soon or handled roughly. Always wait until the coating fully hardens before decorating. For icing, pipe slowly and let it dry completely before moving or packaging the pops. Following these tips keeps your treats looking flawless and professional.

Frequently Asked Questions
How Long Do Jack Skellington Oreo Pops Last?
Jack Skellington Oreo Pops stay fresh for up to one week when stored properly. Keep them in an airtight container at room temperature to maintain crispiness. Avoid humid or warm places, as moisture can soften the cookie and cause the chocolate coating to sweat. For longer storage, refrigerate the pops in a sealed container. Before serving, allow them to reach room temperature to regain their best texture and flavor.
Can I Make These Pops in Advance?
Yes, you can prepare Jack Skellington Oreo Pops ahead of time. After decorating, store them in an airtight container to prevent exposure to air and humidity. If you want to make them even earlier, freezing is an option. Wrap each pop individually in plastic wrap or parchment paper, then place them in a freezer-safe bag. Thaw in the refrigerator overnight and bring to room temperature before serving. This method helps preserve freshness and decoration quality.
Where Can I Find the Ingredients?
Most ingredients for Jack Skellington Oreo Pops are available at local grocery stores. Oreos and white chocolate or candy melts usually appear in the cookie and baking aisles. Specialty items like black royal icing or edible markers may require a visit to craft stores or baking supply shops. Online retailers offer a convenient alternative, especially for seasonal or hard-to-find decorations. If you can’t find black royal icing, use a black edible marker as a reliable substitute.
Are There Any Safety Tips for Making These Treats?
Always handle melted chocolate with care, as it can become very hot. Use microwave-safe bowls and heat in short intervals to avoid burns. When piping royal icing or using edible markers, ensure you work on a stable surface to prevent spills or smudges. Keep utensils and hands clean to maintain hygiene. Following these precautions ensures your Jack Skellington Oreo Pops turn out delicious and safe to enjoy.
Jack Skellington Oreo Pops – Spooky Halloween Treats

These delightful and spooky Oreo pops capture Jack Skellington’s iconic face in a fun, festive treat. Perfect for Halloween parties, they combine creamy Oreos with smooth white chocolate and detailed black decorations.
Ingredients
- 12 Oreo cookies (Double Stuff recommended for sturdiness)
- 2 cups white chocolate chips or candy melts
- 2 teaspoons coconut oil (to smooth the chocolate)
- ½ cup black royal icing or edible black marker (for facial details)
- 12 lollipop sticks or paper straws
- Optional: black ribbons, small chocolate bats, or other Halloween decorations
Instructions
Notes
