
Best Ever Hot Italian Sub Sliders Baked to Perfection: Your New Weeknight Go-To!
Oh, these Hot Italian Sub Sliders Baked to Perfection! They take me straight back to my college days, huddled with friends around a tiny kitchen table during a torrential downpour. We were craving something warm, hearty, and utterly satisfying, but with minimal fuss. One of my roommates, a genius at transforming humble ingredients, pulled together this incredible dish. It was an instant hit, quickly becoming our go-to for impromptu gatherings and cozy movie nights. The smell of garlic butter and melting cheese filled our small apartment, making even the gloomiest day feel bright.
Since then, this recipe has been a constant in my life, evolving into a true family favorite. It’s the ultimate easy dinner solution when you need comfort food fast, or a fantastic crowd-pleaser for game day or a casual get-together. Every time I serve these, I’m met with happy sighs and requests for “just one more.” It’s truly a tried-and-tested recipe that delivers big on flavor with minimal effort.
These sliders are incredibly versatile, perfect for busy weeknights, effortless entertaining, or simply when you’re craving something deliciously cheesy and savory. Get ready to add this amazing Hot Italian Sub Sliders Baked to Perfection recipe to your permanent rotation!

Why You’ll Love This Recipe
❤️ Here’s why these Hot Italian Sub Sliders are about to become your new obsession:
- Effortless & Quick: From prep to plate in under 40 minutes! These sliders are designed for busy weeknights when you need a delicious meal on the table without spending hours in the kitchen. Just assemble, bake, and enjoy.
- Crowd-Pleasing Perfection: Whether it’s a casual family dinner, a game day party, or a potluck, these sliders disappear fast! They’re universally loved by kids and adults alike, making them an ideal choice for any gathering. The pull-apart nature makes serving a breeze.
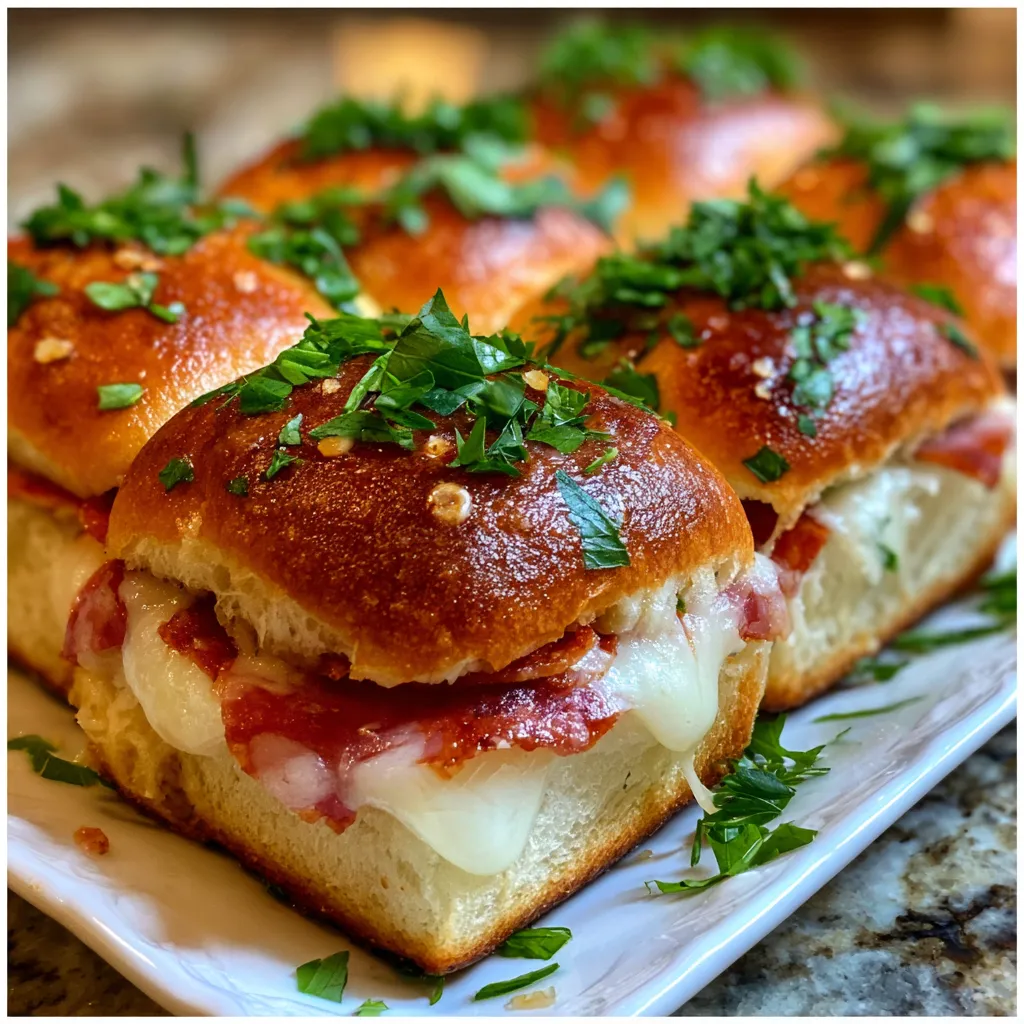
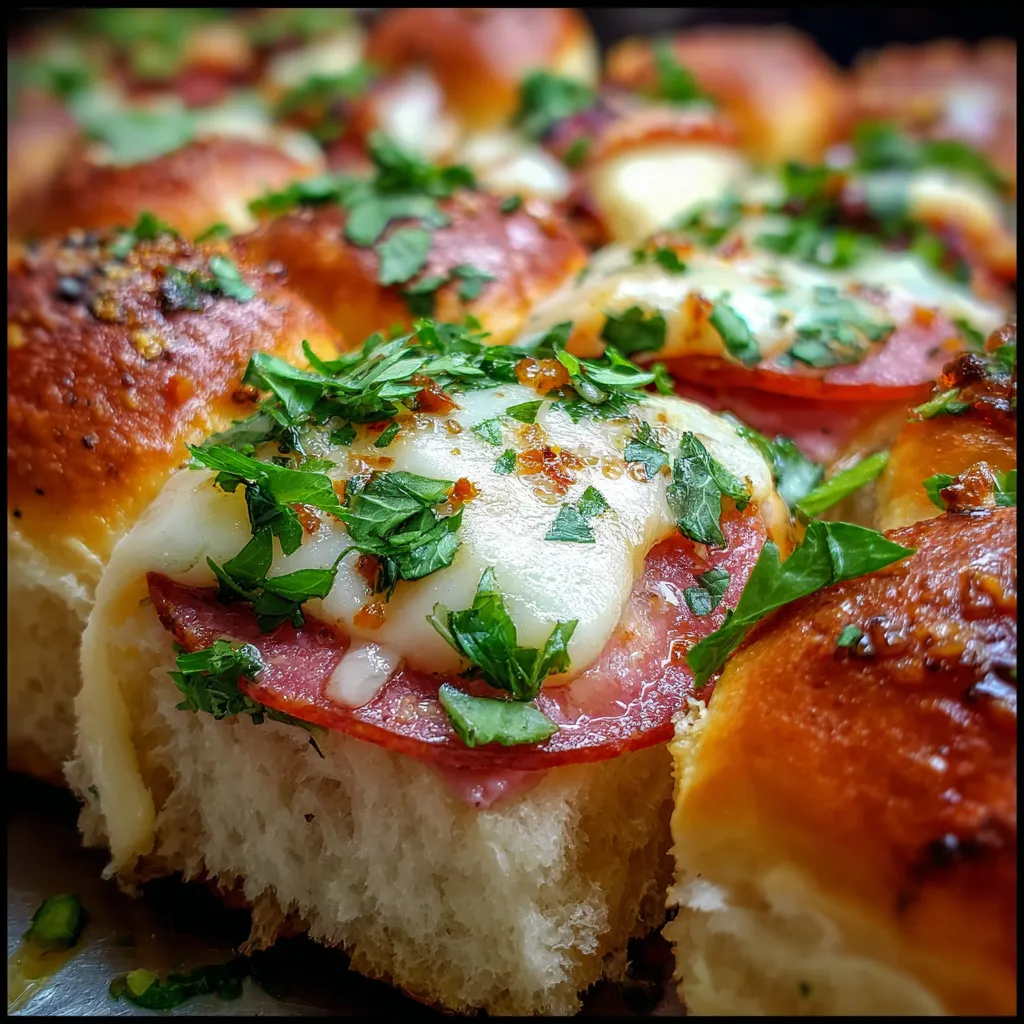
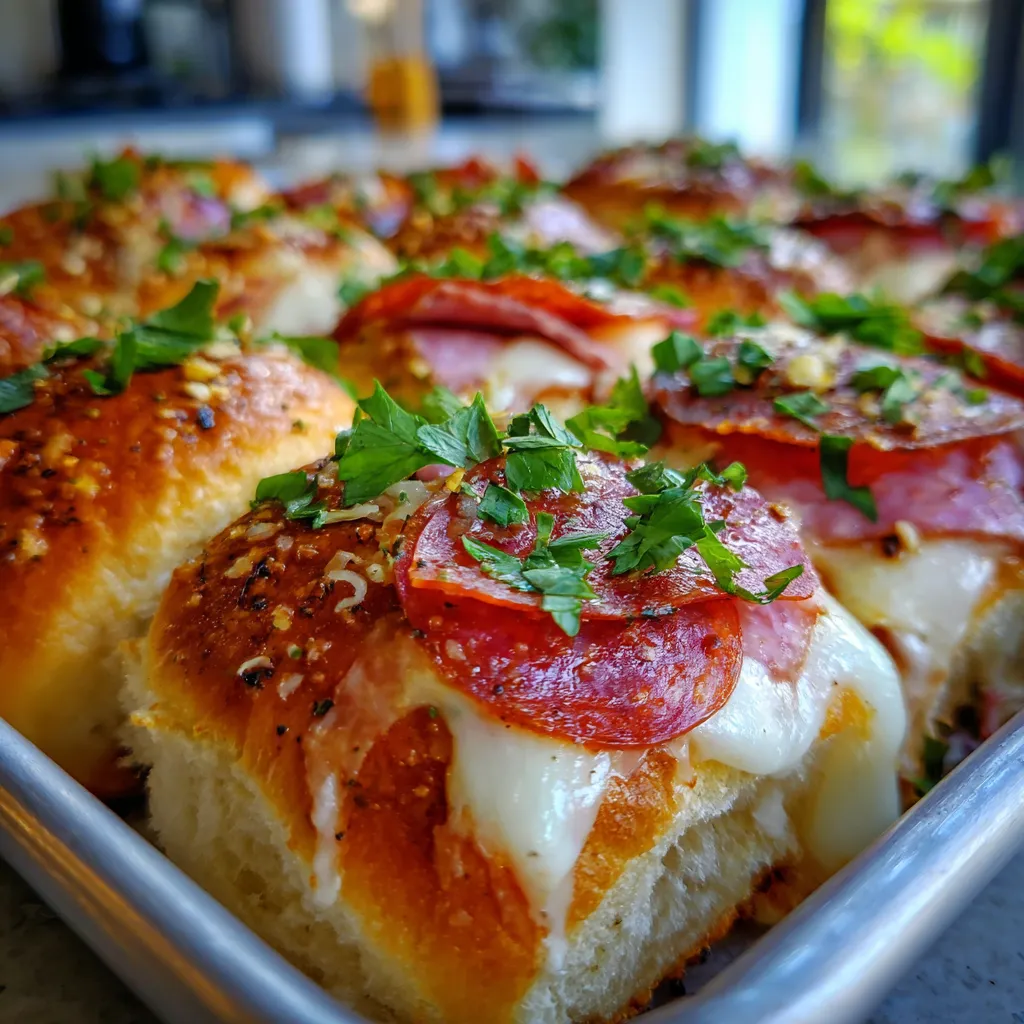
- Irresistible Flavor Bomb: Layers of savory deli meats, gooey melted cheese, and a punchy garlic butter topping baked into sweet Hawaiian rolls create an explosion of flavor in every bite. The combination of salty, sweet, and savory is truly addictive.
- Customizable to Your Liking: The beauty of sliders is their versatility! Easily swap out meats, add your favorite veggies, or experiment with different cheeses. Make them spicier, milder, or vegetarian—the possibilities are endless for personalizing your perfect sub.
- Minimal Cleanup: Baked in a single dish, cleanup is remarkably simple. Spend less time scrubbing pots and pans and more time enjoying your delicious creation with loved ones. It’s a win-win!
- Perfect Make-Ahead Option: You can assemble these sliders ahead of time, cover them, and refrigerate until you’re ready to bake. This makes them fantastic for meal prep or stress-free entertaining, allowing you to enjoy your guests instead of being stuck in the kitchen.
- Budget-Friendly: Using common deli meats and pantry staples, this recipe is surprisingly economical. It feeds a crowd without breaking the bank, making it a smart choice for delicious, satisfying meals on a budget.
What You Need for These Amazing Sliders
You only need a few simple pantry staples and fresh deli ingredients for this recipe! The magic truly happens when these humble components come together in the oven. Check the full printable recipe card below for detailed measurements and a complete list.
Expert Tips
💡 Unlock the full potential of your Hot Italian Sub Sliders with these pro tips:
- Choose Quality Deli Meats: While any deli meats will work, opting for higher quality ham, salami, and pepperoni can significantly elevate the flavor profile. Ask your deli counter to slice them thinly for better layering and distribution of taste.
- Don’t Skip the Garlic Butter: The melted butter, minced garlic, and Italian seasoning concoction is the secret sauce here! It infuses the rolls with incredible aroma and flavor, creating that irresistible golden, slightly crispy top. Brush generously, ensuring every roll gets some love.
- Pre-slice Your Rolls: Before assembling, gently slice the entire slab of Hawaiian rolls horizontally in half. This makes layering the ingredients much easier and keeps the sliders intact for a beautiful presentation and even baking. A serrated knife works best for this.
- Layering is Key: For the best balance in every bite, layer your cheeses and meats evenly. Start with a layer of provolone on the bottom half of the rolls, then the meats, and finish with mozzarella on top. This creates a gooey, flavorful barrier.
- Cover for Moistness, Uncover for Crispness: Bake the sliders covered with foil initially to ensure the cheese melts perfectly and the rolls stay moist. Then, remove the foil for the last 5-10 minutes to allow the tops to brown beautifully and become slightly crisp. Keep an eye on them to prevent burning!
- Add a Touch of Heat: If you love a little kick, sprinkle some red pepper flakes over the cheese before baking, or mix them into the garlic butter. For an extra layer of flavor and heat, you can also add a thin layer of pickled jalapeños or banana peppers.
- Let Them Rest: Like many baked dishes, letting the sliders rest for 5-10 minutes after baking allows the cheese to set slightly, making them easier to pull apart and serve without a cheesy mess. It also prevents burning your mouth!
- Serve with Sides: While delicious on their own, these sliders pair wonderfully with a simple green salad, a cup of tomato soup, or some extra marinara sauce for dipping. A side of crispy potato chips also makes for a classic pairing.
- Use a Pastry Brush: A silicone pastry brush is your best friend for evenly distributing that glorious garlic butter mixture over the tops of the rolls. Make sure to get into all the crevices for maximum flavor.
- Experiment with Cheese: Don’t limit yourself to just provolone and mozzarella! Other fantastic melting cheeses like Swiss, mild cheddar, or even a smoked gouda can add unique twists to the flavor profile.
Variations & Substitutions to Suit Every Taste
One of the best things about these Hot Italian Sub Sliders is how adaptable they are! Feel free to get creative and tailor them to your family’s preferences or dietary needs.
- Make it Spicy: Add extra red pepper flakes, a dash of hot sauce to the butter, or a layer of thinly sliced jalapeños or pepperoncini before baking.
- Add Veggies: Sautéed bell peppers and onions, thinly sliced mushrooms, or even a layer of spinach can be tucked in for extra flavor and nutrients. Just make sure they’re not too watery.
- Cheese Please! Experiment with other melty cheeses like Swiss, Colby Jack, or a sharp white cheddar. A sprinkle of Parmesan cheese on top before baking also adds a nice savory crust.
- Different Meats: Swap out the Italian deli meats for roasted turkey and ham for a classic “Cuban-style” slider, or use roast beef and provolone for a “Philly-inspired” version. Sliced cooked chicken or even leftover pot roast could work!
- Vegetarian Option: Omit the meat and instead layer with roasted red peppers, marinated artichoke hearts, spinach, sun-dried tomatoes, and a mix of provolone and mozzarella.
- Gluten-Free: Use your favorite gluten-free slider buns or dinner rolls. Ensure all other ingredients (deli meats, seasonings) are also certified GF.
- Keto-Friendly: While the Hawaiian rolls aren’t keto, you can adapt the concept by using bell pepper halves as “buns” or creating an open-faced baked sub on a low-carb cloud bread or fathead dough base. Focus on the meats, cheeses, and a robust garlic butter.
- Herb Twist: Instead of traditional Italian seasoning, try a blend of fresh herbs like chopped basil, oregano, and thyme mixed into the butter for a brighter flavor.
Storage & Freezing Tips for Leftovers
While leftovers are rare, here’s how to store these delicious sliders:
- Refrigeration: Place any leftover sliders in an airtight container and refrigerate for up to 2-3 days.
- Reheating: For best results, reheat leftover sliders in the oven or air fryer at 300°F (150°C) for about 10-15 minutes, or until warmed through and the cheese is melty again. Microwaving is an option, but the rolls might become soft.
- Freezing: I don’t typically recommend freezing fully baked sliders as the texture of the bread can become soggy upon thawing. However, you can assemble them (without the butter topping), wrap them tightly in plastic wrap and then foil, and freeze for up to 1 month. Thaw overnight in the fridge, then add the butter topping and bake as directed.
Frequently Asked Questions About Hot Italian Sub Sliders
Q: Can I assemble these sliders the night before?
A: Absolutely! This is one of their best features for entertaining. Assemble the sliders as directed, but hold off on adding the garlic butter topping. Cover them tightly with plastic wrap and refrigerate overnight. Before baking, let them sit at room temperature for about 15-20 minutes, then brush with the melted garlic butter and bake as usual. This makes for super easy party prep!
Q: What kind of rolls are best for sliders?
A: Hawaiian sweet rolls (like King’s Hawaiian) are definitely my top recommendation. Their slight sweetness perfectly complements the savory meats and cheese, and their soft, pillowy texture holds up beautifully when baked. However, any dinner rolls or even mini brioche buns will work in a pinch!
Q: My sliders look a little dry on top. What went wrong?
A: This usually means the garlic butter wasn’t applied generously enough, or they were baked uncovered for too long. Ensure you really coat the tops and sides of the rolls with the butter mixture. Also, remember to cover with foil for the initial baking phase to trap moisture, only removing it for the last few minutes to achieve that golden crust.
Q: Can I use different cheeses?
A: Definitely! While provolone and mozzarella are classic Italian sub choices, feel free to experiment. Swiss, white cheddar, fontina, or even a blend of Italian cheeses would be delicious. Just choose good melting cheeses for that perfect gooey texture.
Q: What are good sides to serve with these sliders?
A: These sliders are quite hearty, so a simple, fresh side works best. A crisp green salad with a vinaigrette, a light coleslaw, a bowl of tomato soup, or even a side of potato chips are all excellent choices. For dipping, a warm marinara sauce is always a hit!
Ready to Make Your Own Hot Italian Sub Sliders?
There you have it! A recipe that’s as full of flavor as it is easy to make. These Hot Italian Sub Sliders Baked to Perfection are truly a game-changer for quick dinners, casual entertaining, or just satisfying that craving for something incredibly delicious. They’re warm, cheesy, savory, and downright addictive.
Don’t wait to try this family-approved recipe. When you do, be sure to tag me on social media – I love seeing your creations! And don’t forget to Pin this recipe for later so you always have this amazing idea at your fingertips!
Hot Italian Sub Sliders: Easy Baked Recipe for Crowds
Ingredients
- 1 (12-count) package Hawaiian sweet rolls
- 8 oz thinly sliced deli ham
- 8 oz thinly sliced hard salami
- 4 oz thinly sliced pepperoni
- 6 slices provolone cheese
- 1 cup shredded mozzarella cheese
- 1/2 cup unsalted butter, melted
- 2 cloves garlic, minced
- 1 tbsp Dijon mustard (optional, for extra tang)
- 1 tbsp Italian seasoning
- 1/2 tsp red pepper flakes (optional, for heat)
- 1 tbsp fresh parsley, chopped (for garnish)
Instructions
- Step 1 Preheat oven to 350°F (175°C). Lightly grease a 9x13 inch baking dish.
- Step 2 Using a serrated knife, carefully slice the entire slab of Hawaiian rolls in half horizontally, keeping them connected. Place the bottom half in the prepared baking dish.
- Step 3 Layer half of the provolone cheese slices over the bottom rolls. Arrange the ham evenly over the provolone, followed by the salami and then the pepperoni.
- Step 4 Top the deli meats with the remaining provolone cheese, then sprinkle generously with the shredded mozzarella.
- Step 5 Carefully place the top half of the Hawaiian rolls over the cheese and meats.
- Step 6 In a small bowl, whisk together the melted butter, minced garlic, Dijon mustard (if using), Italian seasoning, and red pepper flakes (if using).
- Step 7 Pour and brush the butter mixture evenly over the tops of the rolls, ensuring to get into the crevices. Cover the baking dish tightly with aluminum foil.
- Step 8 Bake for 20 minutes, then remove the foil and bake for another 5-10 minutes, or until the tops are golden brown and the cheese is bubbly and melted.
- Step 9 Let the sliders rest for 5 minutes before slicing into individual sliders and serving. Garnish with fresh chopped parsley if desired.
