
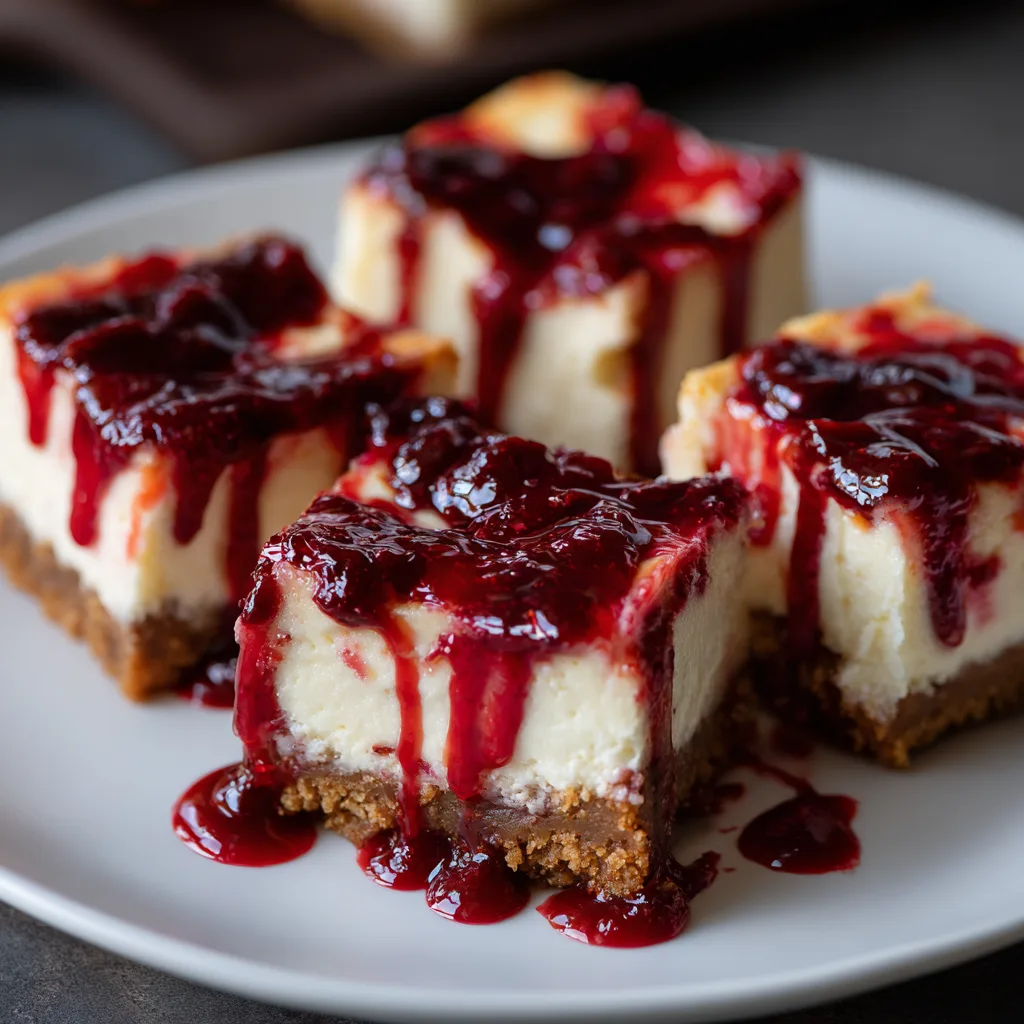
What Are Blood Drip Cheesecake Bars?
Blood Drip Cheesecake Bars are a striking twist on classic cheesecake, designed to captivate both the eyes and the palate. These desserts combine creamy cheesecake squares with a bold, red “blood” drip topping, making them a favorite for Halloween celebrations. The vivid red topping contrasts dramatically against the smooth, pale cheesecake base, creating a spooky and enticing visual effect. Their unique appearance often makes them the centerpiece of any dessert table during themed parties.
The appeal of Blood Drip Cheesecake Bars goes beyond looks. They offer the familiar rich texture and tangy flavor of traditional cheesecake, elevated by the theatrical red drip that simulates dripping blood. This design captures the imagination and perfectly fits the eerie, playful atmosphere of Halloween and other horror-themed events. Because of their eye-catching presentation and delicious taste, these bars have gained popularity rapidly among bakers and party hosts looking to impress guests with festive, creative desserts.
Origins and Evolution of Blood Drip Cheesecake Bars
The concept of themed desserts has flourished in recent years, with bakers experimenting to bring imagination into the kitchen. Blood Drip Cheesecake Bars emerged as part of this creative wave, combining classic baking with spooky artistry. Halloween’s growing influence on food trends encouraged bakers to develop desserts that tell a story and enhance party moods.
Inspired by horror aesthetics and the thrill of the season, bakers started adding dramatic touches like “blood” drips, which usually come from fruit syrups or colored gels. This idea evolved from the traditional cheesecake, where the focus shifted from simple flavors to bold visuals. Over time, the bars transformed from a simple dessert to a statement piece that balances taste and theatricality, delighting both kids and adults alike.
Essential Ingredients for Blood Drip Cheesecake Bars
Creating the perfect Blood Drip Cheesecake Bars starts with choosing the right ingredients. Each element plays a vital role in delivering the rich flavor and stunning visual impact that defines this dessert.
Crust Options: Traditional and Alternative Bases
The crust forms the foundation of these cheesecake bars. Traditional choices include graham cracker crusts, offering a sweet, buttery crunch that complements the creamy filling. Another popular option is an Oreo crust, which adds a rich chocolate flavor and striking dark color.
For those with dietary restrictions, alternative crusts work wonders. Gluten-free crusts, often made from gluten-free cookies or nuts, provide a safe and delicious base. Vegan crusts use plant-based ingredients like coconut oil and ground nuts to achieve the right texture and taste without animal products. These variations ensure everyone can enjoy the dessert without missing out on flavor or texture.
Cheesecake Filling: Classic and Flavorful Variations
The cheesecake filling is the star of the show. A traditional filling blends cream cheese, sugar, eggs, and vanilla extract to create a smooth, tangy texture. This mixture bakes into a luscious, dense cheesecake perfect for slicing into bars.
Flavor twists add personality to the filling. Vanilla remains a classic favorite, but many enjoy adding chocolate, fruit purees, or spices for added depth. For example, mixing in raspberry puree enhances the tartness, which pairs well with the blood drip topping. These customizations keep the dessert exciting and adaptable to different tastes.
Blood Drip Topping: Creating the Perfect Spooky Effect
The blood drip topping is what gives these bars their name and striking look. Commonly, red gel food coloring mixes with corn syrup or fruit syrups like raspberry or strawberry to create a thick, shiny liquid. This mixture mimics the appearance of dripping blood when applied carefully.
Achieving a realistic drip effect requires some technique. Pouring the mixture slowly along the edges allows it to flow naturally, creating uneven drips that enhance authenticity. Some bakers add a small amount of gelatin or pectin to help the topping hold its shape without running too far. The right balance produces a chillingly beautiful decoration that steals the spotlight.
Dietary Considerations for Blood Drip Cheesecake Bars
Blood Drip Cheesecake Bars can be adapted to fit various dietary needs, ensuring inclusivity without sacrificing flavor or appearance.
Gluten-Free Adaptations
Gluten-free crusts replace traditional graham crackers with gluten-free cookies or nut-based crusts. Ensuring all other ingredients are gluten-free, including flavorings and toppings, makes the dessert accessible to those with gluten sensitivities.
Vegan Alternatives
For vegan versions, plant-based cream cheese substitutes replace dairy cream cheese. Egg replacements like flaxseed or chia seeds mixed with water provide binding and moisture. Vegan crusts use coconut oil or vegan butter substitutes. The blood drip topping uses fruit syrups without gelatin to remain plant-based.
Nut-Free and Dairy-Free Options
Nut-free crusts avoid nuts by relying on seeds or gluten-free cookies. Dairy-free cheesecakes swap cream cheese for soy, almond, or coconut-based alternatives. The blood drip remains fruit-based and gelatin-free, catering to allergies and dietary restrictions.
These thoughtful ingredient swaps ensure everyone can enjoy Blood Drip Cheesecake Bars without compromising taste or texture.
Preparation: How to Make Blood Drip Cheesecake Bars
Creating Blood Drip Cheesecake Bars involves several steps, each crucial for achieving the perfect texture and striking appearance. Follow this step-by-step guide to bake or chill your way to a delicious, spooky treat.
Crust Preparation: Building a Solid Base
Start by making the crust. Combine your choice of crushed graham crackers, Oreos, or gluten-free cookies with melted butter and a bit of sugar. Mix these ingredients until the crumbs are evenly coated with butter, creating a damp, sandy texture.
Press the mixture firmly into the bottom of a lined baking pan. Use the bottom of a glass or measuring cup to smooth the surface and compact the crumbs. This step ensures the crust holds together during baking and slicing.
If your recipe calls for a baked crust, preheat the oven to 325°F (163°C) and bake the crust for about 8-10 minutes. Baking sets the crust and enhances its flavor. After baking, let the crust cool before adding the filling to prevent it from becoming soggy.
Cheesecake Filling: Mixing and Pouring
In a large bowl, beat softened cream cheese until smooth and creamy using a hand mixer or stand mixer. Gradually add sugar and continue mixing until fully combined. Incorporate eggs one at a time, beating well after each addition to maintain a smooth consistency. Finally, stir in vanilla extract or other flavorings.
Pour the filling over the cooled crust and spread it evenly with a spatula. Smooth the top to create a clean surface, which will serve as the canvas for the blood drip effect.
Baking or Chilling: Choose Your Method
For baked cheesecake bars, place the pan in the oven and bake at 325°F (163°C) for about 40-50 minutes. The edges should look set while the center remains slightly jiggly. Avoid overbaking to prevent cracking.
Remove the cheesecake from the oven and let it cool at room temperature for about an hour. Then refrigerate for at least 4 hours or overnight to fully set.
No-bake cheesecake bars skip the oven. Instead, pour the filling onto the crust and refrigerate for at least 6 hours or until firm. This method creates a lighter texture, perfect for warm climates or quick preparations.
Creating the Blood Drip Effect: Artistry in Dessert
The blood drip topping transforms simple cheesecake bars into a spooky masterpiece.
Preparing the “Blood” Mixture
Combine fruit puree—typically raspberry or strawberry—with corn syrup to create a thick, glossy liquid. Add red gel food coloring if you want a deeper, more vibrant red. Stir until the mixture is smooth and uniform in color.
To enhance thickness and prevent excessive running, some bakers add a small amount of powdered gelatin dissolved in water. This step helps the blood drip hold its shape once applied.
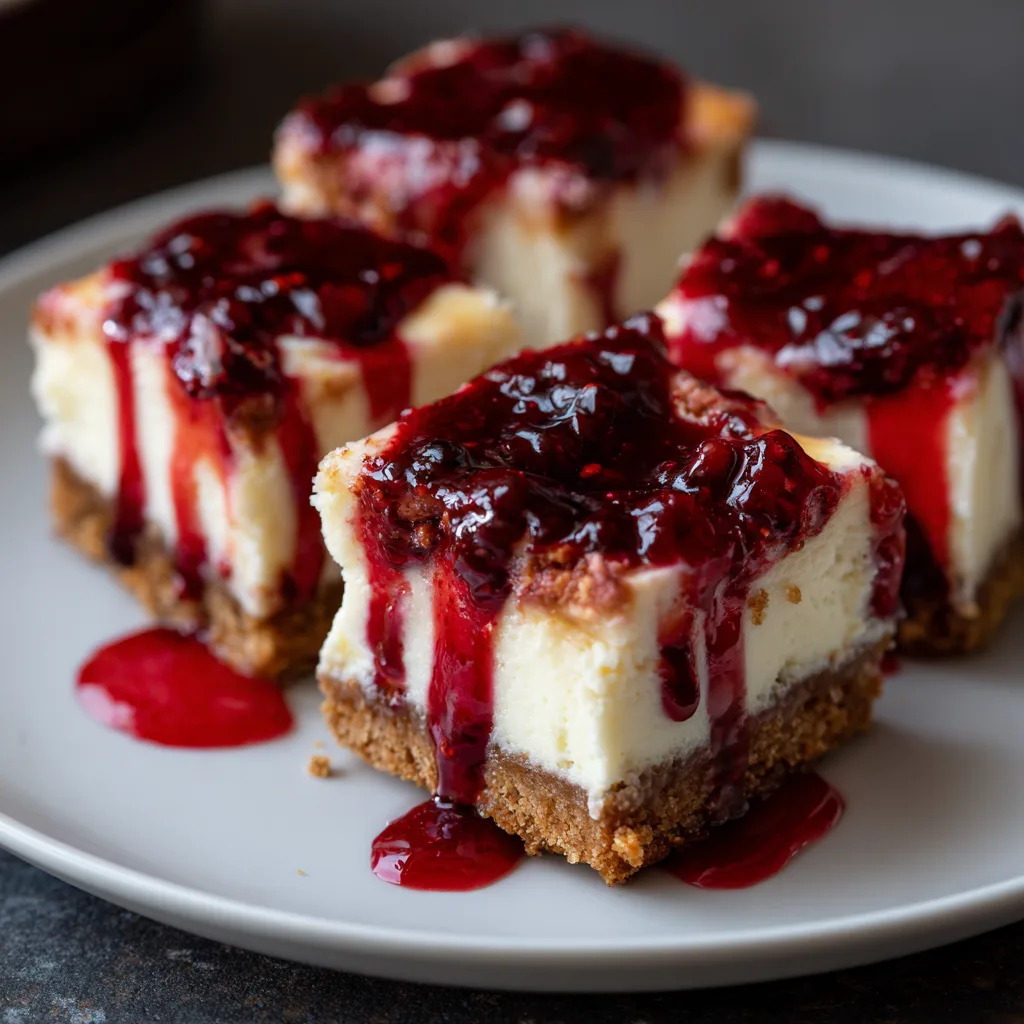
Techniques for Applying the Drip Effect
Using a spoon or squeeze bottle, apply the blood mixture along the edges of the chilled cheesecake bars. Work slowly, allowing the liquid to flow naturally down the sides. Vary drip lengths for a more authentic and dramatic look.
Fill in the center lightly if desired, but keep the main focus on the edges to simulate dripping blood. You can layer the topping after it sets to increase opacity and depth.
Tips for Achieving a Realistic Appearance
Keep the blood drip chilled before applying to maintain viscosity. Avoid applying when the cheesecake is warm, as heat will cause the topping to run excessively.
Use uneven drips and small puddles to mimic natural flow. Adding tiny spots or splatters around the edges enhances realism and adds visual interest.
Setting and Serving: Final Touches for Perfect Bars
Cooling and Setting Times
After applying the blood drip, return the cheesecake bars to the refrigerator for at least an hour. This chilling period allows the topping to firm up and the flavors to meld.
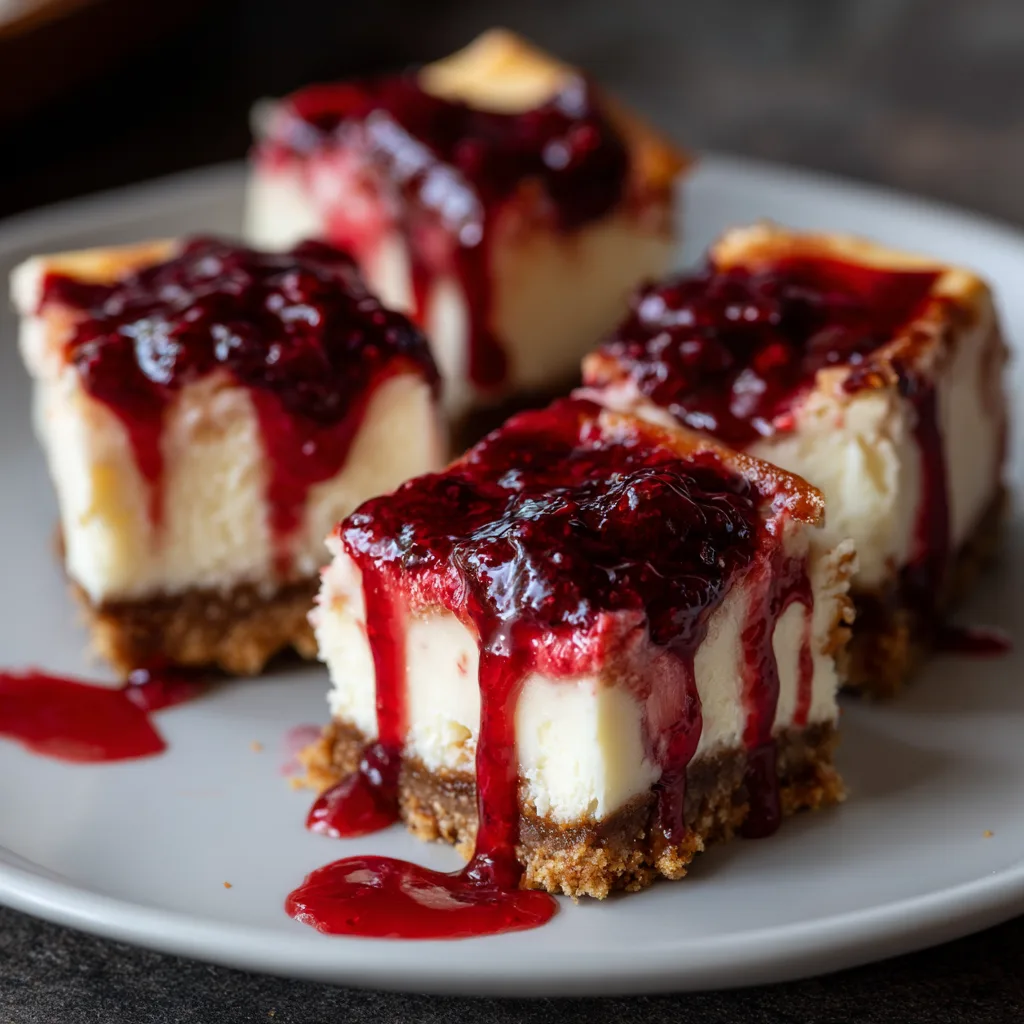
Cutting into Bars
Remove the cheesecake from the pan using the parchment paper overhang. Use a sharp knife dipped in hot water and wiped dry to cut clean, smooth slices. Wipe the knife between cuts to avoid smearing the blood topping.
Presentation Suggestions
Arrange the bars on a dark platter or themed plate to enhance the dramatic effect. Add Halloween-themed decorations like edible eyes, spider webs made from icing, or powdered sugar “dust” to complete the spooky vibe. Serve chilled for the best texture and flavor experience.
Following these detailed steps ensures your Blood Drip Cheesecake Bars will impress with both taste and appearance, making them the perfect dessert for any eerie celebration.
Flavor Variations: Customize Your Blood Drip Cheesecake Bars
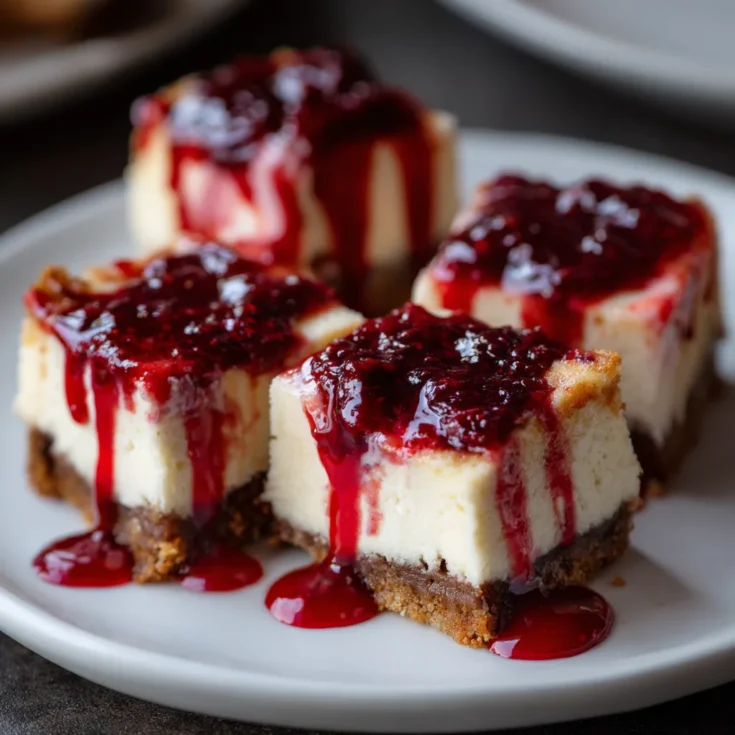
Blood Drip Cheesecake Bars offer a versatile base perfect for flavor experimentation. Incorporating different fruit purees into the blood drip topping can completely transform the taste and appearance. Instead of classic raspberry or strawberry, try blackberry, cherry, or pomegranate puree. Each adds its unique tartness and color intensity, giving your bars a fresh twist.
Beyond the topping, enhance the cheesecake filling with subtle spices or extracts. Adding cinnamon, nutmeg, or even pumpkin spice introduces warmth and complexity, making the dessert perfect for autumn celebrations. Vanilla extract is classic, but almond or orange extracts add an unexpected flavor boost that pairs beautifully with fruit toppings. These small tweaks create layers of flavor that delight the palate without overpowering the signature cheesecake taste.
Thematic Decorations: Elevate Your Halloween Dessert
To truly capture the Halloween spirit, decorate Blood Drip Cheesecake Bars with spooky, fun embellishments. Candy eyes placed strategically on the bars create an eerie effect, making the dessert interactive and playful. Edible glitter or shimmer dust adds a magical glow that contrasts beautifully with the blood-red topping.
Using silicone molds shaped like pumpkins, skulls, or bats allows you to craft themed bars or cheesecake bites. These shapes add a professional touch and make the dessert ideal for themed parties. You can also press Halloween-themed candies or chocolate pieces into the cheesecake surface before chilling, enhancing both texture and visual appeal.
Presentation Ideas: Impress Guests with Stunning Displays
How you present Blood Drip Cheesecake Bars can make a huge difference in guest experience. Arrange the bars on a dark platter or slate board to highlight their vivid red drips. Surround them with Halloween props like small plastic spiders, faux cobwebs, or autumn leaves to set the mood.
Garnishing bars with fresh berries, mint leaves, or edible flowers adds contrast and a touch of elegance. For parties, consider serving the bars alongside a simple fruit compote or whipped cream for extra indulgence. Using tiered serving trays or rustic wooden boards can also enhance the visual impact, turning your dessert into the centerpiece of any gathering.
These creative variations and presentation tips let you tailor Blood Drip Cheesecake Bars to your event’s theme and your personal taste, making every bite a memorable experience.
Common Inquiries About Blood Drip Cheesecake Bars
Can I Make These Bars Ahead of Time?
Yes, Blood Drip Cheesecake Bars can be prepared well in advance. After baking or chilling, store them in an airtight container in the refrigerator. Properly stored, they last up to five days while maintaining freshness and texture. For longer storage, wrap the bars tightly and freeze them for up to two months. Thaw in the fridge overnight before serving to preserve their flavor and consistency.
How Can I Adjust the Sweetness Level?
Adjusting sweetness is simple. Reduce granulated sugar in the filling or use natural sweeteners like honey or maple syrup for a milder taste. If you prefer sugar substitutes, opt for stevia or erythritol but keep in mind they may slightly alter texture. For the blood drip topping, balance fruit puree sweetness by adding more or less sugar or syrup to fit your preference.
Is It Possible to Make a No-Bake Version?
Absolutely. A no-bake Blood Drip Cheesecake Bar uses softened cream cheese mixed with whipped cream or gelatin substitutes for structure. Pour the filling over a prepared crust and refrigerate for at least six hours until firm. This method eliminates baking time and creates a lighter, mousse-like texture perfect for warmer weather or quick preparation.
Can I Use Store-Bought Crusts or Fillings?
Using pre-made crusts and fillings can save time but comes with trade-offs. Store-bought crusts provide convenience but may lack the fresh flavor and texture of homemade ones. Ready-made cheesecake fillings speed up assembly but often contain preservatives and artificial flavors. For best results, homemade components are recommended. However, pre-made options work well in a pinch or for beginner bakers aiming for simplicity.
Blood Drip Cheesecake Bars Recipe – Spooky & Delicious Halloween Treat
Creamy cheesecake bars topped with a spooky blood-red drizzle, perfect for Halloween celebrations.
Ingredients
- For the crust:
- 1 ½ cups graham cracker crumbs
- ¼ cup granulated sugar
- ½ cup melted butter
- For the filling:
- 3 packages (8 oz each) cream cheese, softened
- 1 cup granulated sugar
- 3 large eggs
- 1 tsp vanilla extract
- For the blood drip topping:
- ½ cup raspberry or strawberry puree
- 2 tbsp corn syrup
- Red food coloring (optional)
Instructions
Notes
