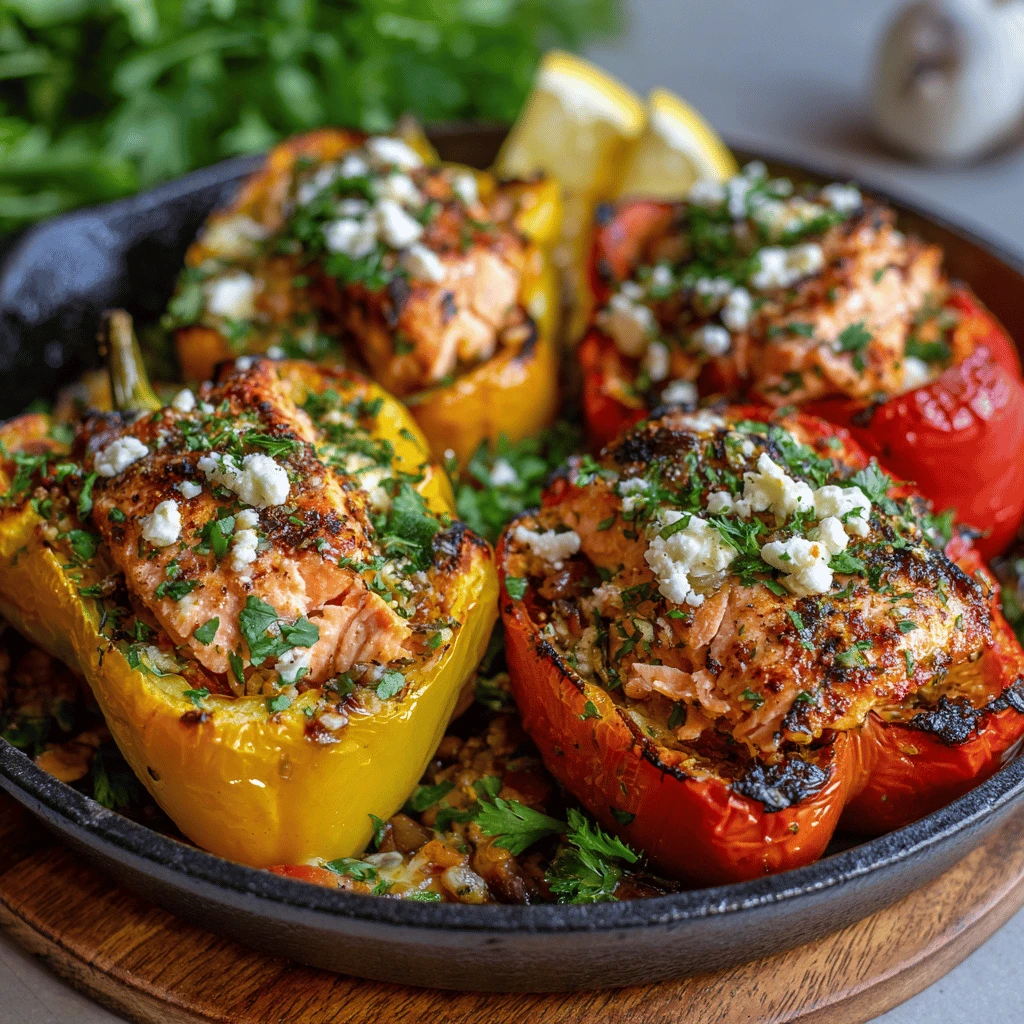
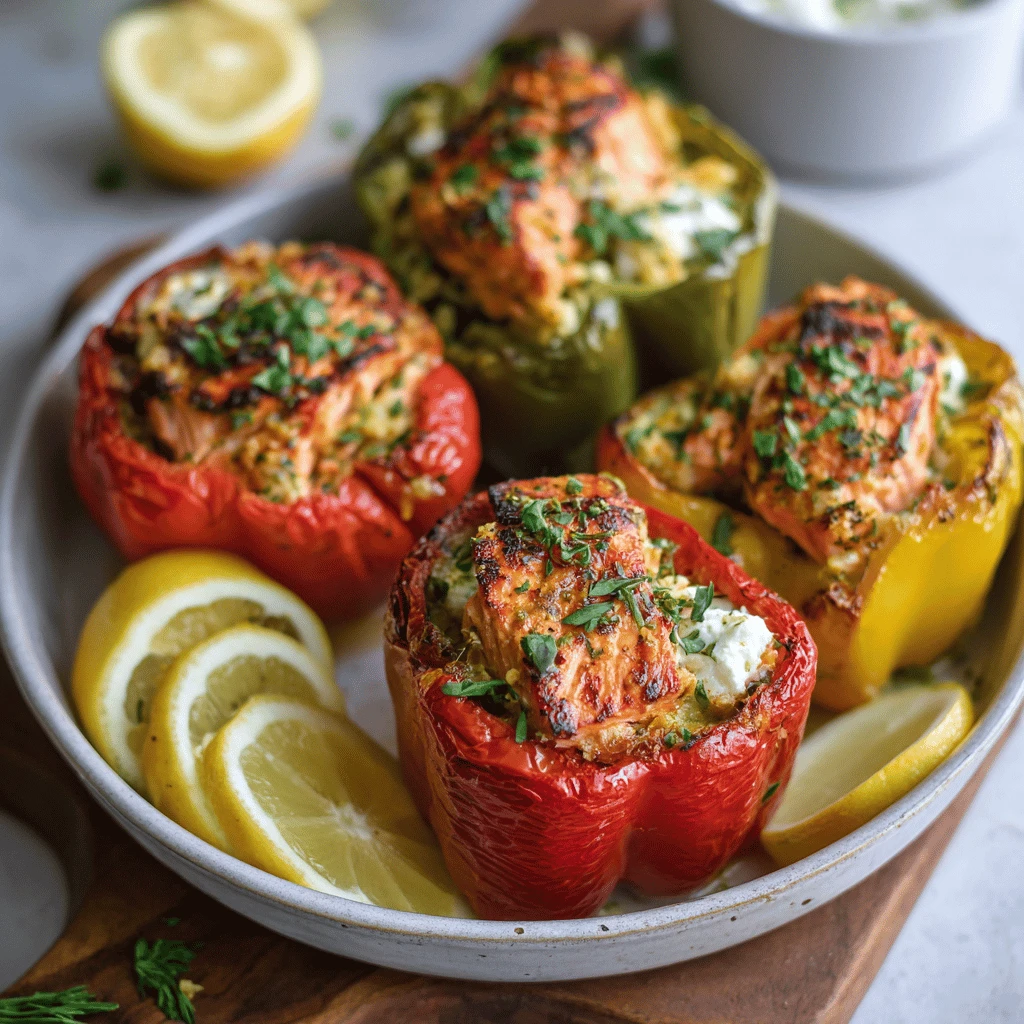
Meal Prep Mediterranean Salmon Stuffed Peppers
Meal prep is a game-changer for busy individuals seeking healthy, delicious meals without the daily grind of cooking. Enter the Mediterranean Salmon Stuffed Pepper: a vibrant, flavorful, and nutritious dish perfect for prepping ahead. Combining the heart-healthy benefits of salmon with the fresh flavors of the Mediterranean diet, all nestled within a colorful bell pepper, this recipe is a winner. Let’s dive into creating this culinary masterpiece.
Why Mediterranean Salmon Stuffed Peppers are Perfect for Meal Prep
The beauty of these stuffed peppers lies in their adaptability and suitability for meal prepping. Several factors contribute to their appeal:
- Nutrient-Rich: Salmon is packed with omega-3 fatty acids, protein, and essential vitamins. Bell peppers are loaded with vitamins A and C, as well as antioxidants. The Mediterranean influence adds healthy fats, fiber, and complex carbohydrates from ingredients like quinoa, vegetables, and herbs.
- Flavorful: The Mediterranean diet is renowned for its rich and diverse flavors, achieved through fresh herbs, lemon, garlic, and high-quality olive oil. These ingredients complement the salmon and peppers perfectly, creating a satisfying taste experience.
- Customizable: Feel free to adjust the ingredients to suit your taste preferences and dietary needs. Swap quinoa for couscous or rice, experiment with different vegetables, or add a touch of spice.
- Easy to Store and Reheat: These stuffed peppers can be easily stored in airtight containers in the refrigerator for up to four days. Reheat them in the oven, microwave, or even an air fryer for a quick and convenient meal.
- Visually Appealing: The vibrant colors of the peppers and the appealing presentation make this dish an enjoyable experience for both the eyes and the palate.
Crafting the Perfect Mediterranean Salmon Filling
The heart of this recipe is the delectable salmon filling. Here’s how to create a filling that’s bursting with flavor:
Ingredients
- 1 pound salmon fillet, skin removed
- 1 cup cooked quinoa (or couscous)
- 1/2 cup chopped red onion
- 1/2 cup chopped Kalamata olives
- 1/2 cup crumbled feta cheese
- 1/4 cup chopped fresh parsley
- 2 cloves garlic, minced
- 2 tablespoons olive oil
- 1 tablespoon lemon juice
- Salt and pepper to taste
- Optional: 1/4 cup sun-dried tomatoes (oil-packed, drained)
Preparation
1. Cook the Salmon: There are several ways to cook the salmon. You can bake it, grill it, pan-sear it, or even poach it. Baking is a simple and healthy option. Preheat your oven to 400°F (200°C). Place the salmon fillet on a baking sheet lined with parchment paper, drizzle with a little olive oil, and season with salt and pepper. Bake for 12-15 minutes, or until the salmon is cooked through and flakes easily with a fork.
2. Flake the Salmon: Once the salmon is cooked, let it cool slightly, then flake it into a bowl using a fork. Be sure to remove any remaining bones.
3. Sauté the Aromatics: In a skillet, heat olive oil over medium heat. Add the chopped red onion and minced garlic and sauté for 2-3 minutes, or until softened and fragrant.
4. Combine the Ingredients: In a large bowl, combine the flaked salmon, cooked quinoa (or couscous), sautéed onion and garlic, Kalamata olives, feta cheese, parsley, lemon juice, salt, and pepper. If using, add the sun-dried tomatoes. Mix well to ensure all ingredients are evenly distributed.
5. Taste and Adjust: Taste the filling and adjust the seasoning as needed. You may want to add more lemon juice for brightness, salt and pepper for flavor, or a pinch of red pepper flakes for a little heat.
Tips for a Flavorful Filling
- Don’t Overcook the Salmon: Overcooked salmon will be dry and tough. Aim for a flaky, moist texture.
- Use High-Quality Ingredients: Fresh herbs, good quality feta, and flavorful olives will significantly enhance the taste of the filling.
- Balance the Flavors: The combination of salty olives, tangy feta, bright lemon, and herbaceous parsley creates a well-balanced flavor profile.
- Consider Adding Spice: If you enjoy a little heat, add a pinch of red pepper flakes to the filling.
- Get Creative with Vegetables: Feel free to add other chopped vegetables to the filling, such as zucchini, bell peppers, or spinach.
Stuffing and Baking the Peppers
Once you’ve prepared the delicious filling, it’s time to stuff those peppers and get them ready for baking.
Selecting and Preparing the Peppers
- Choose Your Peppers: Select firm, brightly colored bell peppers. Red, yellow, and orange peppers are sweeter than green peppers. Look for peppers that are roughly the same size so they cook evenly.
- Clean and Prep: Wash the peppers thoroughly. Cut them in half lengthwise from stem to tip and remove the seeds and membranes. You can also cut off the very top of the pepper and hollow out the inside, leaving the pepper whole to be stuffed.
- Pre-Bake (Optional): For softer peppers, you can pre-bake them before stuffing. Place the pepper halves (cut-side up) on a baking sheet and bake at 350°F (175°C) for 15-20 minutes. This step isn’t necessary, but it will shorten the overall baking time.
Stuffing the Peppers
1. Fill Generously: Spoon the salmon filling into the pepper halves, packing it in firmly. Don’t be afraid to overstuff them slightly, as the filling will shrink a bit during baking.
2. Arrange on Baking Sheet: Place the stuffed peppers on a baking sheet lined with parchment paper.
3. Drizzle with Olive Oil (Optional): Drizzle the tops of the stuffed peppers with a little olive oil for added flavor and moisture.
4. Add a Topping (Optional): You can sprinkle the tops of the stuffed peppers with additional feta cheese, breadcrumbs, or a drizzle of balsamic glaze for extra flavor and visual appeal.
Baking Instructions
1. Preheat Oven: Preheat your oven to 375°F (190°C).
2. Bake: Bake the stuffed peppers for 25-30 minutes, or until the peppers are tender and the filling is heated through and slightly browned.
3. Check for Doneness: To check if the peppers are done, pierce them with a fork. They should be easily pierced and slightly softened. The internal temperature of the filling should reach 165°F (74°C).
4. Broil (Optional): For a browned and bubbly top, broil the stuffed peppers for the last 1-2 minutes of baking, keeping a close eye on them to prevent burning.
Tips for Perfect Stuffed Peppers
- Use a Variety of Peppers: A mix of red, yellow, and orange peppers will make your dish visually appealing.
- Don’t Overstuff: While you want to fill the peppers generously, avoid overstuffing them to the point where the filling spills out during baking.
- Add Moisture: If the filling seems dry, add a tablespoon or two of olive oil or chicken broth to the mixture before stuffing the peppers.
- Use a Thermometer: To ensure the filling is fully cooked, use a food thermometer to check the internal temperature.
- Let Rest: After baking, let the stuffed peppers rest for a few minutes before serving. This will allow the flavors to meld together and make them easier to handle.
Serving and Storing Your Mediterranean Salmon Stuffed Peppers
Once your Mediterranean Salmon Stuffed Peppers are baked to perfection, it’s time to serve and enjoy! Here’s how to make the most of this delicious and nutritious dish.
Serving Suggestions
- As a Main Course: These stuffed peppers make a satisfying and complete meal on their own. Serve them with a simple side salad for a light and healthy lunch or dinner.
- With a Side of Grains: Accompany the stuffed peppers with a side of quinoa, couscous, or brown rice for a more substantial meal.
- With Roasted Vegetables: Roasted vegetables such as asparagus, broccoli, or zucchini complement the Mediterranean flavors of the stuffed peppers.
- With a Sauce: Drizzle the stuffed peppers with a lemon-herb vinaigrette or a dollop of Greek yogurt for added flavor and moisture.
- Garnish: Garnish with fresh parsley, a sprinkle of feta cheese, or a drizzle of olive oil for a beautiful presentation.
Storing Leftovers
- Cool Completely: Allow the stuffed peppers to cool completely before storing them.
- Individual Containers: Place each stuffed pepper in an airtight container. This makes it easy to grab a single serving for lunch or dinner.
- Stacking: If you need to stack the containers, place a piece of parchment paper between the layers to prevent the peppers from sticking together.
- Refrigeration: Store the stuffed peppers in the refrigerator for up to four days.
- Freezing: For longer storage, you can freeze the stuffed peppers. Wrap each pepper individually in plastic wrap and then place them in a freezer-safe bag or container. They can be frozen for up to two months.
Reheating Instructions
- Oven: Preheat your oven to 350°F (175°C). Place the stuffed peppers on a baking sheet and bake for 15-20 minutes, or until heated through.
- Microwave: Place the stuffed pepper on a microwave-safe plate and microwave for 2-3 minutes, or until heated through.
- Air Fryer: Preheat your air fryer to 350°F (175°C). Place the stuffed pepper in the air fryer basket and cook for 5-7 minutes, or until heated through.
- Thawing Frozen Peppers: If reheating frozen stuffed peppers, thaw them in the refrigerator overnight before reheating.
Tips for Serving and Storing
- Reheat Gently: Avoid overheating the stuffed peppers, as this can dry them out.
- Add Moisture: If the stuffed peppers seem dry after reheating, add a tablespoon of water or broth to the plate or baking sheet.
- Use Parchment Paper: When reheating in the oven or air fryer, line the baking sheet or air fryer basket with parchment paper to prevent sticking.
- Label Containers: Label the containers with the date so you know when the stuffed peppers were made.
- Enjoy Cold: While they are best served warm, you can also enjoy these stuffed peppers cold, especially on a hot day.
Frequently Asked Questions
Can I use frozen salmon for this recipe?
Yes, you can use frozen salmon. Just make sure to thaw it completely before cooking. Pat it dry with paper towels to remove any excess moisture.
Can I make these vegetarian?
Absolutely! You can substitute the salmon with chickpeas, lentils, or crumbled tofu. Add some extra vegetables like chopped zucchini or mushrooms for added flavor and texture.
How long do these stuffed peppers last in the refrigerator?
They will last for up to four days in the refrigerator if stored properly in an airtight container.
Can I add other vegetables to the filling?
Yes, feel free to add other vegetables such as chopped zucchini, bell peppers, spinach, or mushrooms to the filling. This is a great way to customize the recipe and use up any leftover vegetables you have on hand.
Can I freeze these stuffed peppers?
Yes, you can freeze the stuffed peppers for up to two months. Wrap each pepper individually in plastic wrap and then place them in a freezer-safe bag or container. Thaw them in the refrigerator overnight before reheating.
What can I serve with these stuffed peppers?
These stuffed peppers make a complete meal on their own, but you can also serve them with a side salad, quinoa, couscous, or roasted vegetables.
Can I use different types of cheese?
Yes, you can substitute the feta cheese with other types of cheese such as goat cheese, mozzarella, or Parmesan.
How do I prevent the peppers from becoming soggy?
To prevent the peppers from becoming soggy, you can pre-bake them before stuffing. Also, make sure to remove any excess moisture from the filling by draining any excess liquid from the cooked quinoa or couscous.
Can I make these ahead of time?
Yes, you can prepare the filling ahead of time and store it in the refrigerator for up to 24 hours. When you’re ready to bake the stuffed peppers, simply fill the peppers with the prepared filling and bake as directed.
Are these stuffed peppers healthy?
Yes, these stuffed peppers are a healthy and nutritious meal. Salmon is packed with omega-3 fatty acids, protein, and essential vitamins, while bell peppers are loaded with vitamins A and C, as well as antioxidants. The Mediterranean influence adds healthy fats, fiber, and complex carbohydrates.