
Easy Baked Chicken Breast Wrap – Introduction
When it comes to quick and delicious meals, the Easy Baked Chicken Breast Wrap stands out as a top choice. This wrap combines health, simplicity, and flavor in one convenient package. Unlike fried or heavily breaded options, baking chicken breasts keeps the protein juicy and tender while cutting down on unnecessary fats. It offers a lighter alternative without sacrificing taste. Plus, it suits busy lifestyles and varied diets, making it an incredibly versatile meal.
Many people love fried or crispy chicken wraps for their crunch, but these often come with extra calories and grease. Grilled wraps bring smoky flavors but can be time-consuming and require special equipment. Buffalo chicken wraps offer a spicy kick but sometimes rely heavily on sauces that add hidden sugars or fats. The baked chicken breast wrap hits the perfect balance by being straightforward, healthier, and easy to customize.
This article dives deep into every aspect of creating the perfect baked chicken breast wrap. You’ll discover the best ingredients, cooking techniques, assembly tips, and even flavorful variations to suit your preferences. Whether you want a quick lunch, a nutritious dinner, or a meal prep option, this guide has you covered. By the end, you’ll know how to make wraps that are juicy, tasty, and packed with wholesome goodness, all baked to perfection.
Ingredients Overview for Easy Baked Chicken Breast Wraps
The star of this wrap is the chicken breast—choose boneless, skinless cuts for quick cooking and easy wrapping. Opt for pieces that are roughly equal in size and thickness, about 1 to 1.5 inches thick. Uniform thickness ensures even baking and prevents dry edges or undercooked centers. If your breasts vary in size, gently pound them to an even thickness using a meat mallet or rolling pin. This step helps the chicken cook evenly and remain juicy.
Seasoning transforms simple chicken into a flavorful delight. Basic spices such as salt, pepper, garlic powder, and paprika form a solid base. Add Italian seasoning or oregano to introduce earthy, aromatic notes. These blends complement the chicken without overpowering its natural taste. Avoid heavy sauces before baking to maintain a tender texture.
Decide whether to bread your chicken. A coating of panko breadcrumbs adds a satisfying crunch while baking, giving a crisp texture without deep frying. Alternatively, skip the breading for a leaner option focused on the pure chicken flavor. Both methods work well, so choose based on your dietary needs or taste preferences.
Selecting the right wrap is just as important. Flour tortillas provide a soft, neutral base, while whole-wheat adds fiber and a nutty flavor. Low-carb and protein-enriched wraps suit health-conscious eaters. For those with gluten sensitivities, spinach or gluten-free tortillas offer nutritious, tasty alternatives. Each wrap type pairs differently with the fillings you select.
Speaking of fillings, the options are endless. Crisp lettuce and fresh tomatoes add crunch and moisture. Cheese—whether shredded cheddar, mozzarella, or pepper jack—brings richness. Sauces such as BBQ, ranch, or spicy Buffalo create layers of flavor. Don’t forget avocado for creaminess and onions for a touch of sharpness. Combining these ingredients allows for customizable wraps tailored to your taste.
Prep Tips for Perfect Baked Chicken Breast Wraps
Start by patting your chicken breasts dry with paper towels. Removing surface moisture helps seasonings stick and encourages even browning during baking. Next, pound the breasts gently to an even thickness, around 1 inch. This step avoids overcooking thin parts while waiting for thicker ones to finish.
Use parchment paper or a wire rack when baking. Placing chicken on parchment keeps clean-up easy and prevents sticking. A wire rack lets hot air circulate under the chicken, helping it crisp evenly and retain juiciness.
Bake chicken breasts until they reach an internal temperature of 165°F (74°C). Use a reliable meat thermometer to check doneness precisely. Once out of the oven, allow the chicken to rest for at least 5 minutes. Resting lets juices redistribute, keeping the meat moist and tender when sliced or shredded for your wraps.
Following these prep tips ensures your chicken breast stays juicy, flavorful, and perfectly cooked every time—ready to be the star ingredient in your baked chicken breast wrap.
Step-by-Step Baking Method for Juicy Chicken Breast
Begin by preheating your oven to 400–425°F (200–220°C). This temperature range allows the chicken to cook through quickly while forming a slight crust. Season your chicken breasts generously with salt, pepper, garlic powder, and your choice of herbs. Place the breasts on a wire rack set over a baking sheet, or use parchment paper directly on the baking tray. The wire rack promotes even heat circulation, helping the chicken cook evenly and develop a subtle crisp on the outside.
Bake the chicken for 17 to 30 minutes, depending on thickness. Thinner breasts usually take around 17–20 minutes, while thicker cuts may require up to 30 minutes. The key is to monitor internal temperature carefully. Use a meat thermometer to check for 165°F (74°C) at the thickest part. When the chicken reaches this temperature, remove it from the oven immediately to avoid drying out. Let it rest for at least five minutes; this resting period lets the juices redistribute for tender, moist chicken perfect for slicing or shredding.
Breading Option for Crispy Chicken Wraps
For those craving a crispy texture, breading baked chicken offers a delightful crunch without frying. Start by preparing an egg-mayo wash: whisk one egg with a tablespoon of mayonnaise. This mixture helps panko breadcrumbs stick evenly to the chicken. Dip each breast into the wash, then coat thoroughly with panko breadcrumbs seasoned lightly with salt and pepper.
Place the breaded chicken on a wire rack over a baking sheet. Baking on a rack allows hot air to circulate all around, producing a crispy crust. Bake at 400°F for about 20–25 minutes, checking for the safe internal temperature. This method achieves golden, crunchy chicken with far less oil than frying.
If you prefer quicker cooking, consider using an air fryer. It crisps breaded chicken in about 15 minutes with minimal oil, but baking remains a hands-off, crowd-pleasing approach for larger batches.
Sheet-Pan Method: Chicken and Veggies for Meal Prep
For easy meal prep, try the sheet-pan method. Arrange chicken breasts alongside chopped vegetables such as bell peppers, zucchini, and cherry tomatoes on a baking sheet. Season everything with olive oil, salt, pepper, and your favorite spices. Bake at 400°F for 20–25 minutes until the chicken reaches 165°F internally and the veggies are tender.
This method creates a complete meal with minimal cleanup. You can vary flavors by using Mediterranean herbs like oregano and thyme or Tex-Mex spices like cumin and chili powder. Add cheese before wrapping for extra richness. When cooled, slice the chicken and veggies, then assemble into wraps that you can quickly crisp on a grill or pan before serving.
Assembly and Finishing Touches for the Perfect Wrap
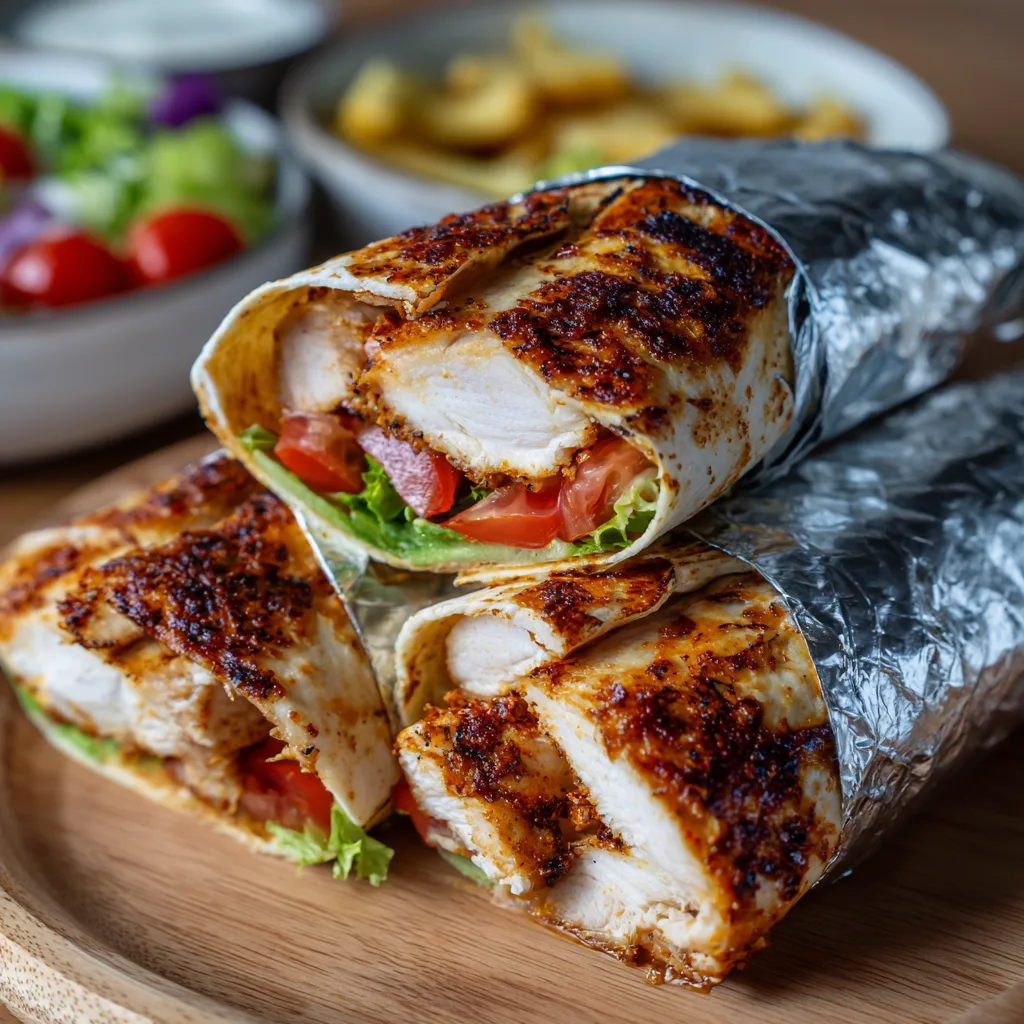
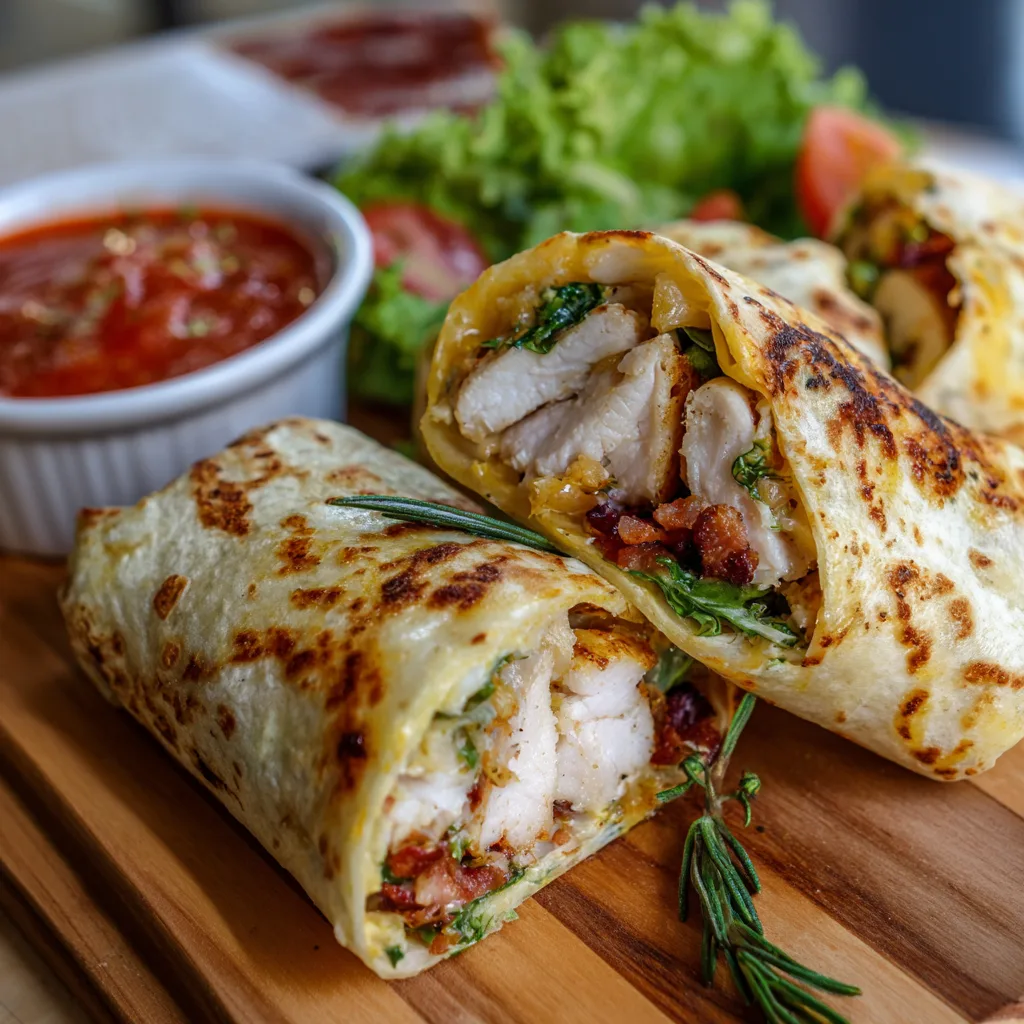
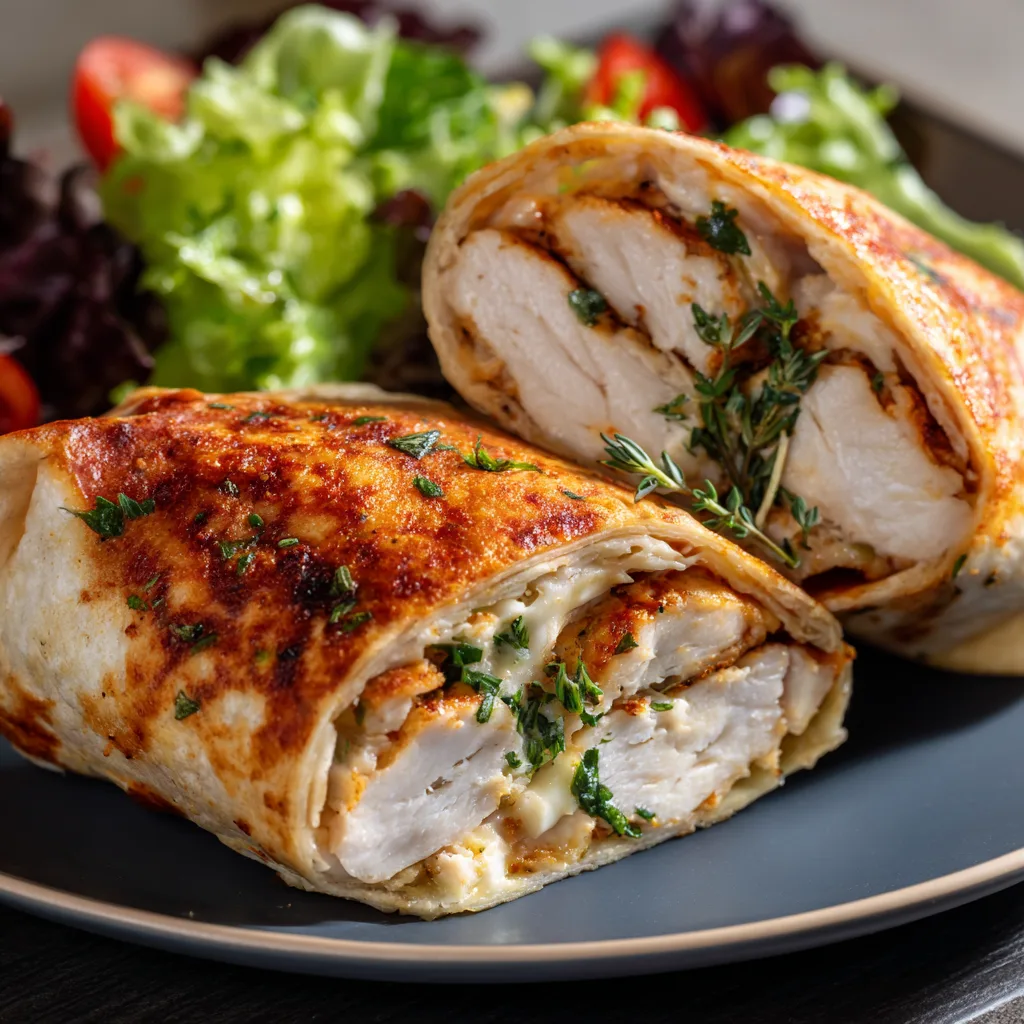
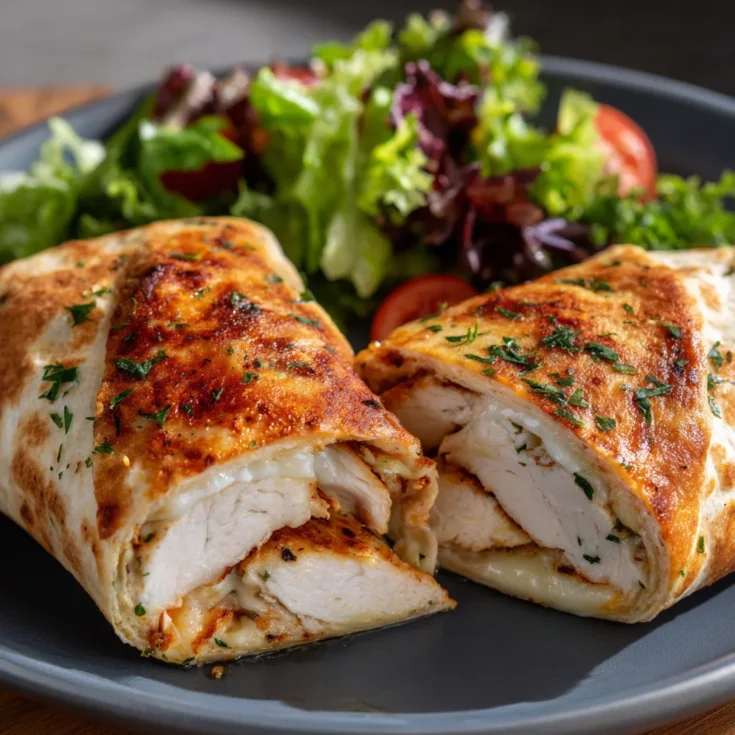
Start by warming your tortilla or wrap slightly; a warm wrap rolls more easily and seals better. Layer fresh greens such as romaine or spinach first, followed by sliced or shredded baked chicken. Add cheese—shredded cheddar, mozzarella, or crumbled feta work well depending on your flavor profile. Drizzle your chosen sauce, like ranch, BBQ, or Buffalo, over the filling.
Roll the wrap tightly, folding in the sides as you go. For extra flavor and texture, toast or grill the wrapped sandwich for 1–2 minutes on each side. This step warms the fillings, melts the cheese, and crisps the tortilla edges.
If preparing ahead, wrap each sandwich tightly in foil or parchment paper. Store them in the refrigerator with an ice pack for up to three days. To serve, reheat gently on a grill or in the oven to restore that fresh-baked texture.
With these baking and assembly tips, you can create versatile, delicious baked chicken breast wraps perfect for any meal.
Flavor Variations and Serving Styles for Baked Chicken Breast Wraps
Explore exciting ways to change up your baked chicken breast wrap by switching flavors and fillings. The Buffalo chicken version delivers a spicy kick. Bake the chicken until tender, then toss it in tangy buffalo sauce. Wrap it with fresh lettuce and a cooling ranch dressing for balance. This combo adds bold flavor while keeping the wrap light and satisfying.
For a classic twist, try the Caesar chicken wrap style. Season the chicken with oregano and garlic, then top with crisp romaine lettuce and shaved Parmesan cheese. Drizzle Caesar dressing inside before rolling. This variation offers a rich, savory taste perfect for fans of traditional chicken salads.
A BBQ chicken wrap adds smoky sweetness. Use shredded baked chicken mixed with your favorite BBQ sauce. Add cheese and a creamy sweetcorn filling made from cream cheese and corn kernels. This combination creates a hearty wrap with contrasting textures and vibrant flavor.
Dietary Adaptations to Suit Every Lifestyle
Adapting baked chicken wraps to specific diets is simple. For a gluten-free option, use gluten-free tortillas or swap wraps for crunchy lettuce leaves. Avoid breading with panko breadcrumbs to keep the meal gluten-free and light.
Low-carb eaters can select low-carb or protein-enriched tortillas. The sheet-pan method with chicken and veggies works great here, offering a balanced, nutrient-dense meal with fewer carbs.
For dairy-free diets, skip the cheese altogether. Instead, use dairy-free sauces or avocado spreads to add creaminess without dairy. These small tweaks make the wraps accessible and enjoyable for all dietary needs.
Suggested Side Dishes and Perfect Pairings
Complement your baked chicken breast wrap with fresh sides to round out your meal. A crisp green salad or roasted vegetables bring extra fiber and nutrients. For a satisfying crunch, serve with baked chips or a side of fresh fruit.
Dips enhance flavor and add moisture. Ranch dressing pairs well with mild wraps, while buffalo sauce adds heat for spice lovers. Pesto or tzatziki offers Mediterranean flair, especially if your wrap uses herbs and cheese. Choose dips based on your wrap style to elevate every bite.
Nutrition Overview: Calories, Protein, and Tips
Each baked chicken breast wrap contains approximately 400 to 600 calories, depending on the fillings and sauces you use. Chicken breast remains the protein powerhouse, delivering 30 to 40 grams per serving. This makes the wrap a great option for muscle maintenance and satiety.
Watch the sodium content when using pre-made sauces or seasoning blends. Opt for low-sodium spices and homemade dressings when possible. Adjust fat content by moderating cheese and sauce amounts. Using fresh vegetables adds volume and nutrients without extra calories.
This flexible meal combines health, flavor, and convenience in every bite. With thoughtful ingredient choices, your baked chicken breast wrap can fit many nutrition goals.
Frequently Asked Questions About Easy Baked Chicken Breast Wraps
Can I bake chicken breast so it stays juicy?
Absolutely. To keep chicken breast juicy, bake it on a wire rack or parchment paper. This allows air to circulate and prevents sogginess. Always remove the chicken from the oven once it reaches an internal temperature of 165°F (74°C). After baking, let it rest for at least five minutes. Resting lets the juices redistribute, resulting in tender, moist chicken perfect for wraps.
How long should I bake chicken breast for wraps?
Thin chicken breasts typically bake in 17 to 22 minutes at 425°F (220°C). Thicker breasts may take up to 30 minutes. Use a meat thermometer to check for an internal temperature of 165°F (74°C) to ensure safety without overcooking. Baking times vary by oven and breast size, so monitoring temperature is the best practice.
Can wraps be made ahead and stored?
Yes, wraps can be prepared ahead of time. Wrap each sandwich individually in foil or parchment paper and store them in the refrigerator for up to three days. For longer storage or transport, freeze the wraps or use an ice pack to keep them fresh. When ready to eat, reheat gently on a grill or in the oven to restore flavor and texture.
What are some healthy variations or vegetarian options?
For a vegetarian twist, substitute baked chicken with roasted chickpeas, tofu, or grilled vegetables like bell peppers and zucchini. Use whole-grain or gluten-free wraps to boost fiber and cater to dietary needs. Add plenty of fresh greens, avocado, and flavorful sauces to keep wraps satisfying and nutritious without meat.
Can I make the wraps low-carb or gluten-free?
Absolutely. Choose low-carb or protein-enriched tortillas to reduce carbohydrates. For gluten-free options, select gluten-free wraps or swap tortillas for large lettuce leaves. These alternatives keep the wrap light while maintaining great taste and texture.
How should I store leftover baked chicken for wraps?
Store leftover cooked chicken in an airtight container in the refrigerator for up to four days. Reheat gently before assembling your wrap to maintain moisture. Avoid overheating to prevent drying out the chicken.
These answers cover common concerns, helping you create delicious, healthy, and convenient baked chicken breast wraps every time.
Easy Baked Chicken Breast Wrap – Healthy, Quick & Flavor-Packed
A healthier baked chicken breast wrap that stays juicy and flavorful. Customize fillings and sauces for a quick, easy meal perfect for lunch or dinner.
Ingredients
- 1 lb boneless, skinless chicken breasts (about 2 breasts)
- Salt, pepper, garlic powder, paprika, or your favorite seasoning blend
- Optional: panko breadcrumbs, egg + mayo wash for breading
- 4 large tortillas (flour, whole-wheat, low-carb, or gluten-free)
- Fillings: lettuce, tomato, cheese, sauces (ranch, BBQ, Buffalo, or others)
Instructions
☐ Preheat oven to 400–425°F (200–220°C).
☐ Pat chicken dry, pound evenly to about 1 inch thickness, then season (and bread if desired).
☐ Place chicken on a wire rack or parchment-lined baking sheet; bake until internal temperature reaches 165°F (~17–30 minutes).
☐ Remove chicken from oven; let rest for 5 minutes, then slice or shred.
☐ Warm tortillas; layer lettuce, chicken, cheese, and your preferred sauce.
☐ Roll wraps tightly; optionally grill or toast for 1–2 minutes per side for extra crispness.
Notes
