
Cake Pop Brains – Spooky & Sweet Halloween Treats
Halloween calls for treats that thrill and delight, and cake pop brains fit the bill perfectly. These eerie yet adorable desserts combine creepy visuals with irresistible sweetness. Their popularity has soared, making them a staple at Halloween parties and gatherings. The appeal lies in their unique shape—a miniature brain—paired with flavors that satisfy every sweet tooth. Whether for kids, adults, or festive events, these cake pops captivate with their spooky charm and delicious taste. In this article, you’ll discover what cake pop brains are, why they make ideal Halloween treats, and how to create them step by step.
What Are Cake Pop Brains?
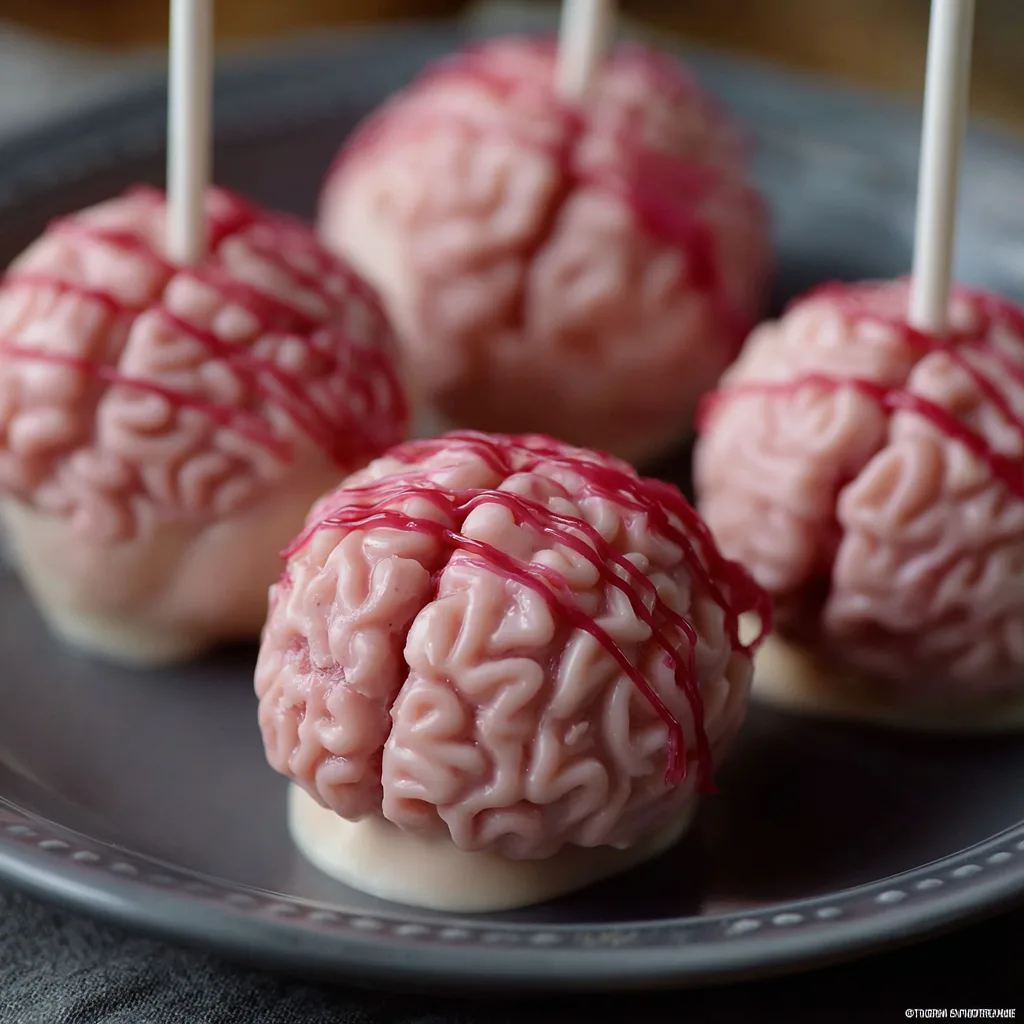
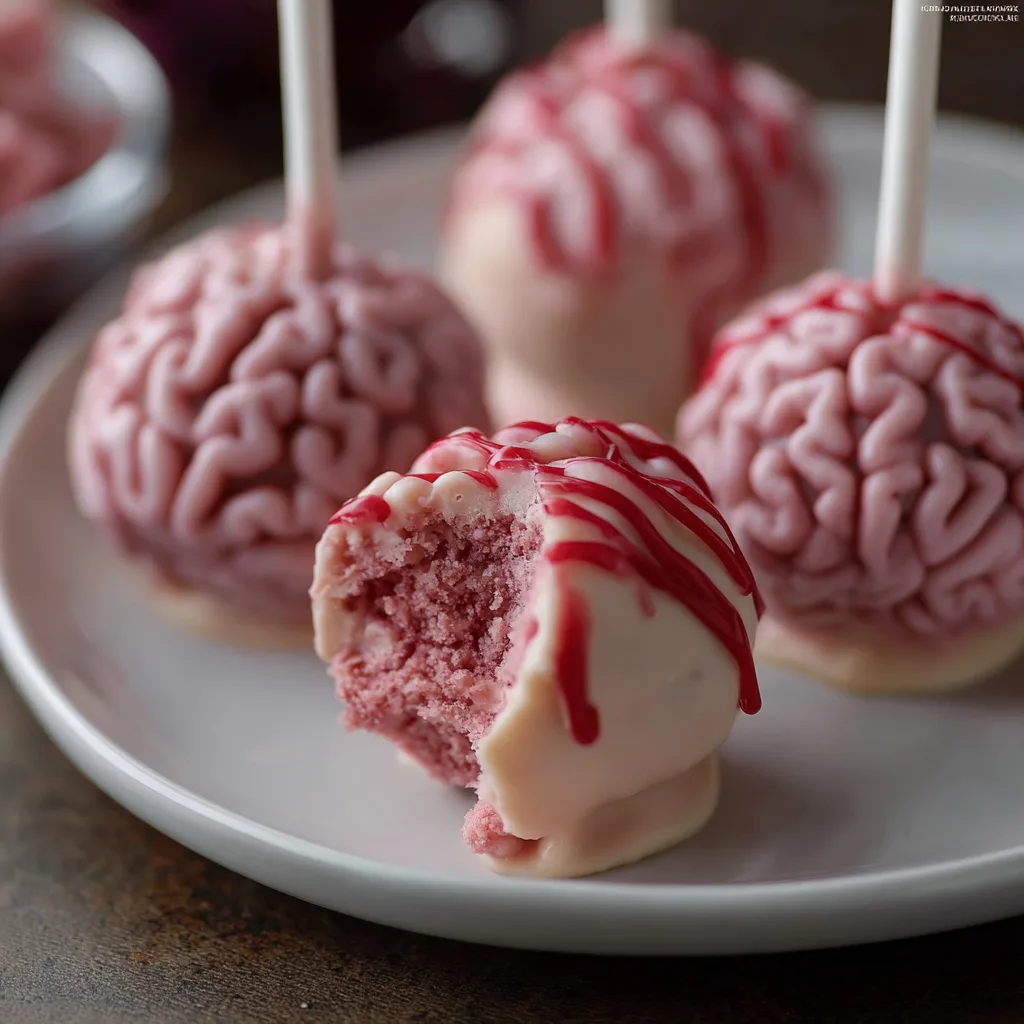
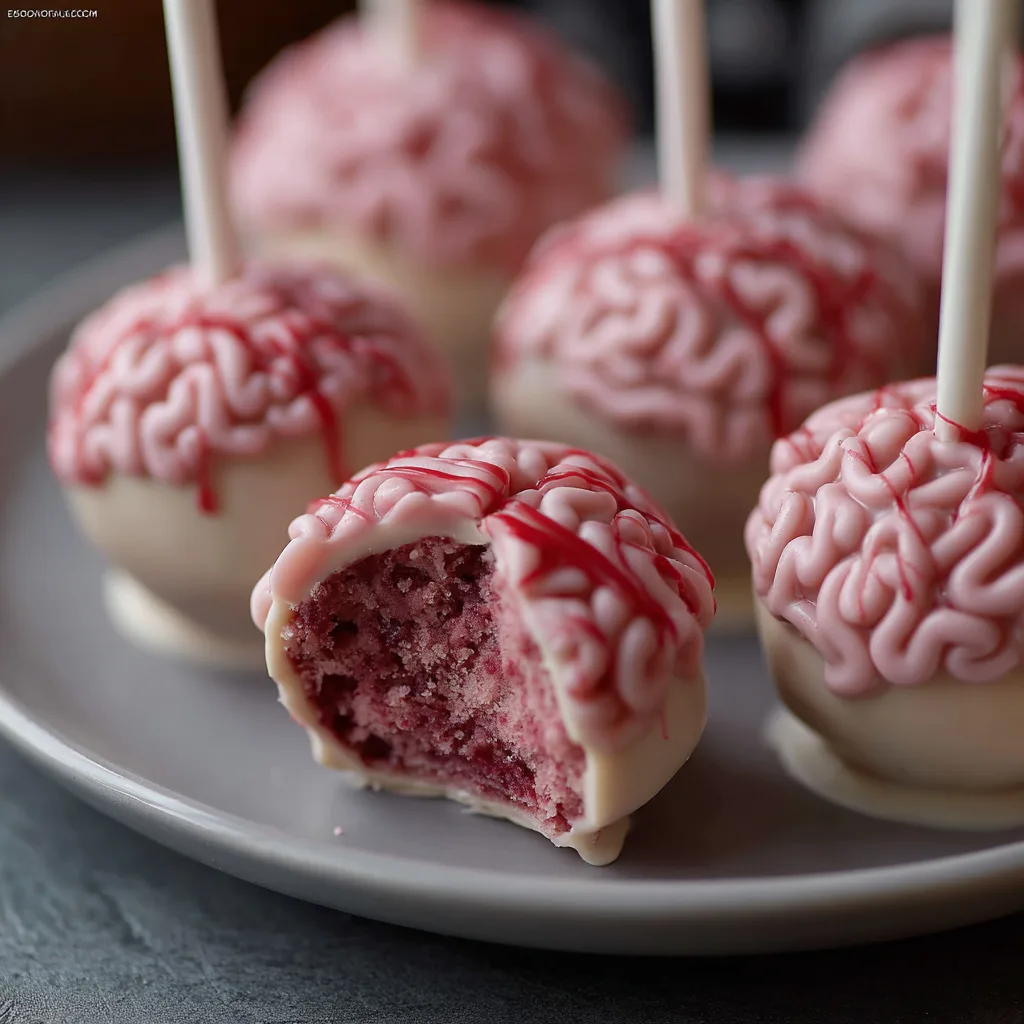
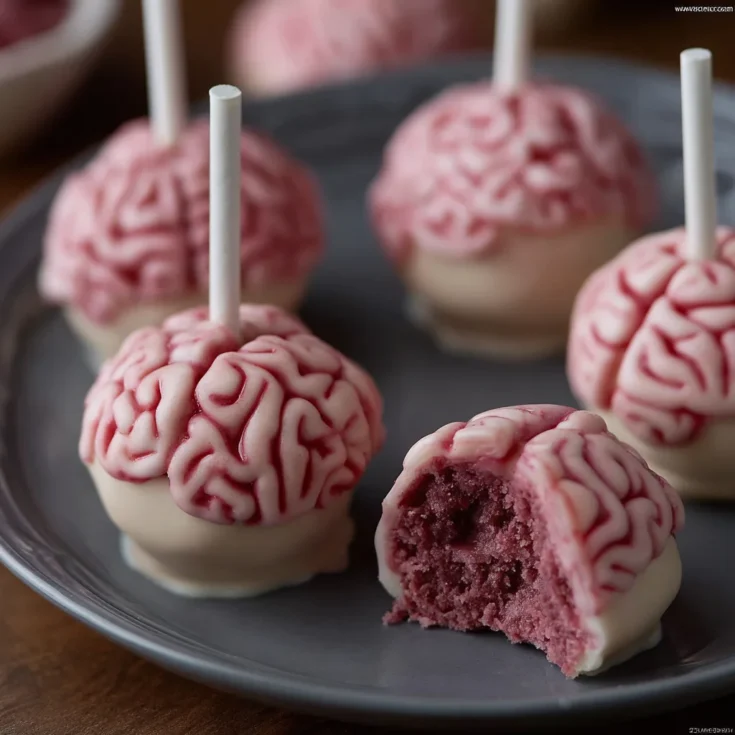
Cake pop brains are bite-sized desserts shaped like miniature brains, crafted from crumbled cake mixed with frosting. Commonly, bakers use red velvet or chocolate cake as the base, lending rich flavor and color. The mixture is molded into a brain shape, then coated with candy melts or chocolate for a smooth, shiny finish. To enhance their eerie look, many add a “bloody” jam filling that oozes slightly, mimicking real brains. Candy coating is often piped to create ridges that resemble the folds of a brain’s surface. These sweet treats balance creepy visuals with familiar flavors, making them fun to eat and share.
Why They Make Perfect Halloween Treats
Cake pop brains combine striking visuals with delicious taste, capturing Halloween’s spooky spirit. Their gruesome appearance intrigues guests while the sweet cake inside pleases all ages. Making them is a fun, creative activity perfect for families or party hosts. Their size and shape make them easy to serve and enjoy at gatherings. Versatile and visually impressive, cake pop brains transform any Halloween event into a memorable celebration.
Base Ingredients for Cake Pop Brains
Start with crumbled cake as the foundation, choosing red velvet or chocolate for rich flavor and appealing color. Red velvet adds a deep red hue that complements the spooky theme, while chocolate offers a classic, crowd-pleasing taste. Next, blend the cake crumbs with frosting, using vanilla or cream cheese varieties. Frosting acts as a binder, helping the cake mixture hold its shape when molded. Finally, add a filling that mimics blood. Raspberry, cherry, or strawberry jam works perfectly to create a gooey, “bloody” effect inside each brain-shaped pop. This combination balances moisture and sweetness, giving the treats both texture and flavor.
Candy Coating and Coloring Essentials
For coating, white candy melts provide a smooth and glossy finish. Ruby chocolate adds a natural pinkish tint that fits the brain look well. Colored wafers in lime green, purple, or orange offer fun variations for a more playful Halloween palette. Use oil-based food coloring to tint the coating, creating pink ridges that mimic brain folds or to intensify the red “blood” effect. This coloring ensures vibrant hues without seizing the candy melts, making decorating easier and the final product visually striking.
Special Equipment and Molds Needed
To shape the cake pop brains precisely, silicone brain molds are highly recommended. They capture the intricate folds and curves of a real brain effortlessly. For a hands-on approach, use a knife to hand-shape the cake balls, carving grooves to mimic brain ridges. Insert lollipop sticks into each pop for easy handling and display. A Styrofoam or foam block helps hold the pops upright while drying. Use small pastry bags fitted with piping tips #4 or #5 to add detailed decorations like brain folds or dripping “blood.” These tools allow fine control over designs, enhancing the spooky and realistic look of the cake pop brains.
Preparing the Cake Pop Mixture
Begin by crumbling your baked red velvet or chocolate cake into fine pieces. The texture should be soft but not crumbly to the point of falling apart. Gradually add frosting—vanilla or cream cheese—to the crumbs, mixing thoroughly. Aim for a mixture that holds its shape when scooped but remains pliable enough to mold. Avoid adding too much frosting, as it can make the cake mixture overly sticky. Achieving the right balance ensures your cake pops will hold their form and be enjoyable to eat.
Forming the Brain Shape
Once your mixture is ready, press it firmly into silicone brain molds to capture the detailed folds and curves. If molds are unavailable, shape the mixture into oval forms by hand. Use a small knife to carve shallow hemispheres and grooves that resemble brain ridges. Take your time with carving to enhance the realistic appearance. Firmly packed shapes will help the cake pops maintain structure through the coating and decoration stages.
Coating with Candy Shell
Melt your chosen candy coating, whether white candy melts or ruby chocolate, using a double boiler or microwave in short bursts. Stir frequently to ensure smooth consistency. Use a small brush to coat the inside of your brain molds with a thin layer of melted candy. Chill the molds in the refrigerator until the candy shell sets firmly. This process creates a sturdy shell that will contain the filling and cake mixture while providing a glossy, attractive finish.
Adding the “Blood” Filling
Prepare the “blood” by mixing your chosen jam—raspberry, cherry, or strawberry—with a drop or two of red food coloring. Thin the jam slightly with water or juice if needed, so it fills the cavity smoothly without overflowing. Spoon the blood mixture into the center of each candy shell cavity. Press the prepared cake mixture over the filling, ensuring it seals the jam inside. Finally, add a layer of melted candy over the top to seal everything in and chill again until fully set.
Decorating the Exterior
Use a piping bag fitted with a fine tip (#4 or #5) to drizzle pink or red candy coating lines across the surface. These lines mimic the intricate folds and ridges of a brain, enhancing the spooky look. Keep your strokes deliberate and smooth to create a realistic texture. Drizzling adds dimension and completes the eerie effect without overwhelming the overall design.
Final Unmolding & Presentation
Carefully remove the cake pops from their molds once fully chilled and set. Allow them to rest at room temperature for a few minutes to avoid condensation. Arrange the brain pops on a decorative platter or insert them into skewers for an eye-catching Halloween display. This presentation invites guests to enjoy a creepy yet sweet treat that stands out at any gathering.
Pro Tips for Best Cake Pop Brain Results
Use high-quality cake to ensure moist, flavorful pops. Let all ingredients reach room temperature before mixing; this improves texture and consistency. Chill silicone molds between coating steps to help candy shells set smoothly and prevent cracking. To avoid jam leakage, adjust its thickness by thinning slightly or cooking to reduce moisture. Layer fillings carefully: first coat the mold with candy, chill, then add jam, followed by cake mixture, and seal with more candy. These steps help keep your cake pop brains neat, sturdy, and visually impressive.
Flavor and Visual Variations for Unique Cake Pop Brains
Experiment with different base cakes beyond red velvet or chocolate. Vanilla offers a light flavor, while matcha brings an earthy twist. For spice lovers, chai-spiced cake adds warmth and complexity. Vary your candy coating colors: ruby chocolate creates naturally pink brains, while vibrant green or orange wafers add a playful Halloween vibe. Switch up fillings too—try strawberry or cherry jam for fruity “blood,” or get creative with peanut-butter fudge paired with jelly. For a spooky twist, create zombie cake pops featuring cracked skull designs or surprise guests with jello “brains” inside. These variations keep your treats exciting and tailor them to your Halloween theme.
Serving and Pairing Suggestions for Halloween Events
Place cake pop brains prominently on your Halloween dessert table. They pair beautifully alongside cupcakes, cookies, and other themed sweets. Their small size makes them perfect finger food for parties. For a full sensory experience, serve them with spooky, kid-friendly beverages like fruit punch or themed milkshakes. This pairing creates a cohesive festive spread that delights guests visually and palate-wise.
Storage and Make-Ahead Advice for Convenience
Store cake pop brains in an airtight container and refrigerate for up to five days. For longer storage, freeze them individually wrapped in plastic wrap or parchment paper for up to three weeks. When ready to serve, thaw pops gently at room temperature to maintain their shape and texture. Proper storage ensures your spooky treats stay fresh, making them ideal for preparing ahead of busy Halloween celebrations.
Frequently Asked Questions About Cake Pop Brains
How do I ensure the cake pop mixture binds well?
Mix your crumbled cake with enough frosting to create a cohesive and pliable dough. If the mixture feels crumbly or falls apart, gradually add more frosting until it holds together firmly but isn’t too sticky. Proper binding is key for shaping and coating.
What type of coating works best for cake pop brains?
Candy wafers and white or ruby chocolate melts work best. They melt smoothly and provide a glossy, firm shell that’s easy to decorate. These coatings harden nicely, protecting the cake inside while allowing for vibrant colors and detailed designs.
Can I use other cake or filling flavors?
Absolutely! You can swap red velvet for chocolate, vanilla, or even carrot cake bases. Fillings aren’t limited to jam either—strawberry, cherry, or fudge make delicious alternatives. Feel free to customize flavors to suit your taste or party theme.
Do I need a special mold, or can I shape cake pops by hand?
While silicone brain molds produce the most detailed results, you can shape the cake balls by hand. Use a small knife to carve grooves and piping bags for adding ridges, mimicking brain folds. Hand shaping requires patience but works well with practice.
How far ahead can I make cake pop brains?
You can prepare these treats several days in advance. Store them in an airtight container in the refrigerator for up to five days. For longer storage, wrap each pop individually and freeze for up to three weeks. Thaw at room temperature before serving to maintain texture and flavor.
Cake Pop Brains – Spooky & Sweet Halloween Treats
These creepy-cute cake pops look like miniature brains. Made from crumbled cake mixed with frosting, they hide a gooey jam “blood” center. Coated in candy melts and decorated with pink and red lines, they deliver spooky fun with every bite.
Ingredients
- 3–4 cups crumbled red velvet or chocolate cake
- ¼–½ cup vanilla or cream cheese frosting
- ~½ cup seedless raspberry or cherry jam + red food coloring
- 6–8 oz white candy melts or colored wafers (ruby, green, pink)
- Oil-based food coloring (pink and red)
- Lollipop sticks
- Silicone brain mold (or knife for hand shaping)
Instructions
Notes
