
Best Ever Creamy Lemon Cheesecake Crumb Bars: Your New Favorite Dessert!
My earliest memories of baking always involve a hint of lemon. It’s a scent that instantly takes me back to my grandmother’s kitchen, where every Sunday brought a new delicious adventure. One particularly rainy afternoon, we were craving something bright and comforting, and that’s when the idea for these Creamy Lemon Cheesecake Crumb Bars Everyone Will Enjoy was born. They quickly became a family favorite, a go-to easy dessert that brings smiles to every face.
There’s something truly magical about the combination of tangy lemon, rich cream cheese, and a buttery, crumbly crust. It’s pure comfort food, elevated, yet still incredibly simple to make. This tested and perfected recipe is more than just a dessert; it’s a little ray of sunshine in every bite, promising to brighten any day, rain or shine.
You’re about to discover why these bars have earned their permanent spot in my recipe box and why they’ll soon be in yours too. Get ready to bake up a batch of happiness!
Why You’ll Love This Recipe
- Irresistible Flavor Combination: Experience the perfect harmony of bright, zesty lemon and rich, tangy cream cheese. It’s a refreshingly vibrant taste that never feels too heavy, making it perfect for any season or occasion.
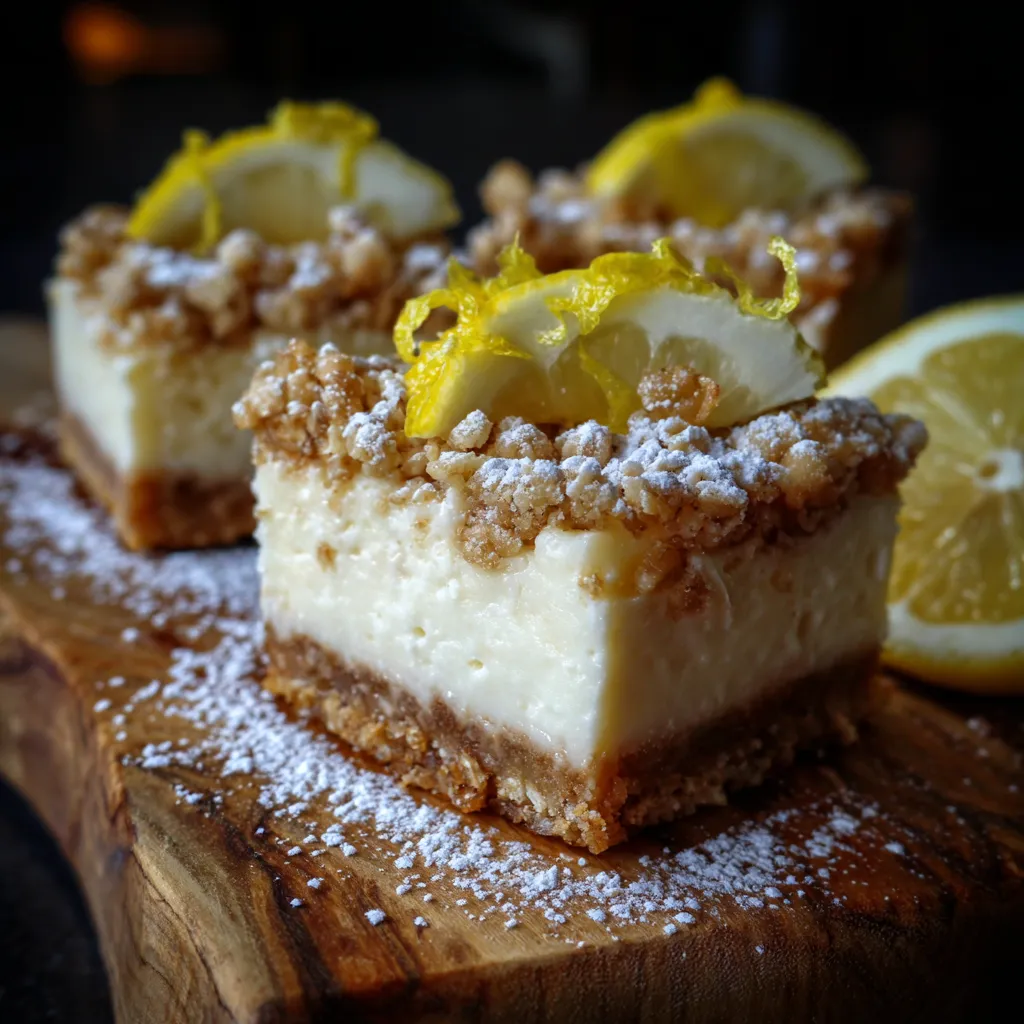
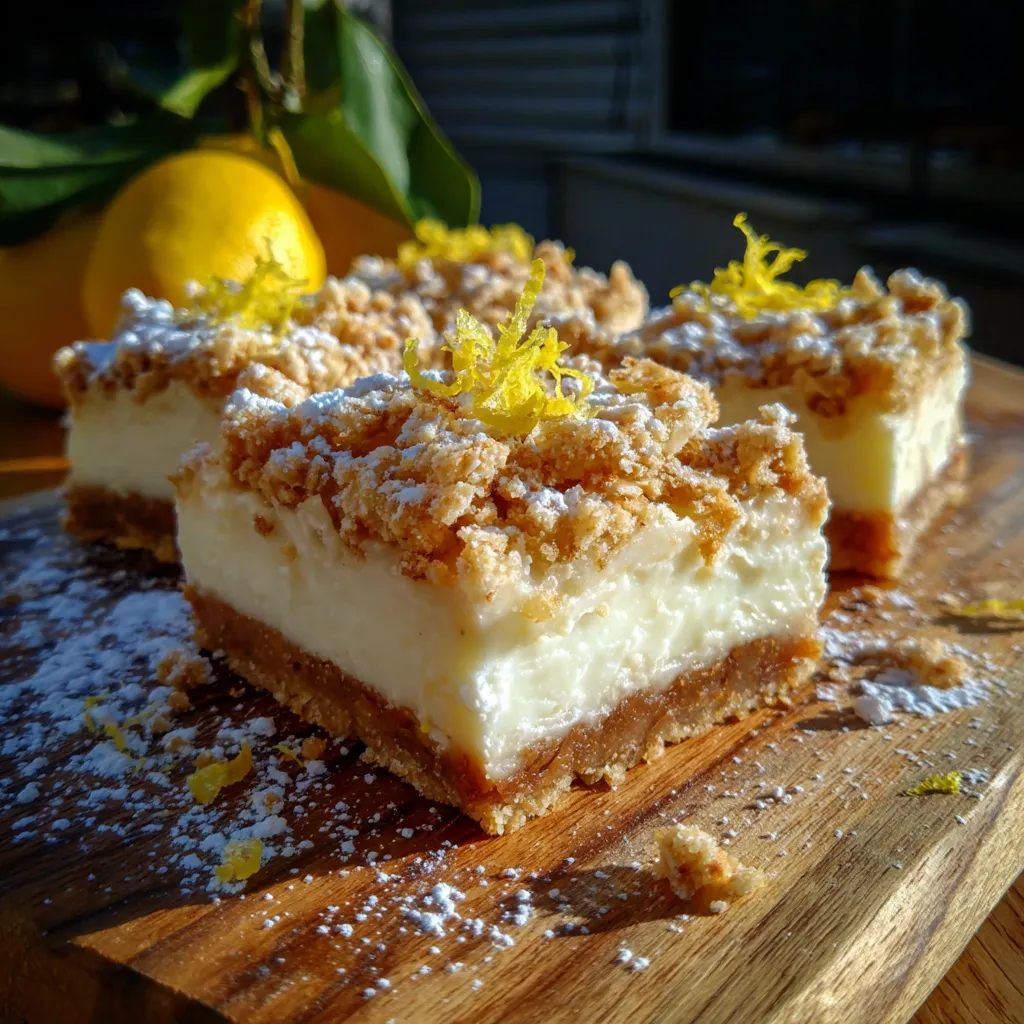
- Amazing Texture Play: Prepare for a delightful journey for your palate! You get the buttery, slightly crisp, and chewy golden crumb base, a silky-smooth, creamy cheesecake layer, and then another sprinkle of that glorious crumb topping for an extra crunch. Every bite is a textural masterpiece.
- Deceptively Easy to Make: Don’t let the elegant appearance fool you – these bars are incredibly straightforward. With a simple press-in crust and topping, and a fuss-free cheesecake filling, even novice bakers can achieve spectacular results. Most of the work is done in a food processor or with a mixer!
- Perfect for Sharing: Whether it’s a casual potluck, a family gathering, a backyard BBQ, or a sophisticated brunch, these bars are always a showstopper. They cut beautifully, making them ideal for feeding a crowd or for easy portion control.
- Make-Ahead Friendly: These bars actually taste even better the next day once the flavors have had a chance to meld and the cheesecake has fully set. This makes them an excellent option for entertaining, as you can prepare them in advance and simply slice and serve when ready.
- Highly Customizable: While the lemon cheesecake is divine, the base recipe is a canvas for creativity! You can easily swap out citrus, add berries, or even drizzle with chocolate (more on variations below!).
- Portable & Picnic-Ready: Forget messy slices of cake! These sturdy bars are easy to transport, pack for lunchboxes, or take on a picnic. They hold their shape wonderfully, staying neat and delicious on the go.
- Instant Mood Booster: The bright lemon flavor and the sheer joy of biting into one of these delicious bars are guaranteed to lift your spirits. It’s a truly comforting and satisfying dessert that brings a little bit of sunshine to your day.
What You Need
You only need a few simple pantry staples for this recipe! Think flour, sugar, butter, oats, cream cheese, and, of course, fresh lemons. Check the full printable recipe card below for detailed measurements and a complete list of ingredients.

Expert Tips
- Use Cold Butter for the Crumb: For the best crumb texture, ensure your butter is very cold and cut into small pieces when making the crust and topping. This prevents overmixing and ensures a flaky, tender crumble rather than a dense cookie-like crust.
- Don’t Overmix the Cheesecake Filling: Mix the cream cheese, sugar, egg, and lemon juice just until smooth and combined. Overmixing can incorporate too much air, leading to cracks in your cheesecake layer during baking or cooling. Gentle is key here!
- Room Temperature Cream Cheese: This is crucial for a lump-free, silky-smooth cheesecake filling. Take your cream cheese out of the fridge at least an hour (or two!) before you plan to bake. This helps it cream easily with the sugar.
- Fresh Lemon Zest and Juice: Bottled lemon juice simply doesn’t compare. Freshly zested lemon provides an intense, aromatic citrus punch that elevates the flavor profile significantly. Don’t skip the zest – it’s where most of the lemon flavor resides!
- Press the Crust Firmly: When pressing the initial crumb mixture into the pan, make sure to press it down firmly and evenly. This creates a solid base that won’t crumble apart when you slice the bars later. A flat-bottomed glass or the back of a measuring cup works wonders for this.
- Parchment Paper is Your Best Friend: Lining your baking pan with parchment paper, leaving an overhang on the sides, makes lifting the entire slab of bars out of the pan incredibly easy once cooled. This results in perfectly clean cuts and no stuck-on edges.
- Chill Thoroughly: Patience is a virtue, especially with cheesecake! These bars must be fully chilled for at least 4 hours, or ideally overnight, before slicing. This allows the cheesecake layer to firm up completely, ensuring clean, beautiful slices and the best texture.
- Test for Doneness: The cheesecake layer should have a slight jiggle in the very center when gently shaken, but the edges should appear set. Overbaking can lead to a dry or cracked cheesecake. Remember, it will continue to set as it cools.
- Cool Gradually: After baking, let the bars cool on a wire rack at room temperature before transferring to the refrigerator. Sudden temperature changes can sometimes cause cracking.
- Clean Slices: For perfectly neat bars, use a sharp, warm knife. Run your knife under hot water, wipe it clean, and then make a cut. Repeat this process for each slice to prevent sticking and dragging crumbs.
Variations & Substitutions
These Creamy Lemon Cheesecake Crumb Bars are fantastic as is, but they’re also wonderfully versatile!
- Gluten-Free: Simply swap the all-purpose flour for a 1:1 gluten-free baking blend (ensure it contains xanthan gum) and use certified gluten-free oats.
- Other Citrus: Try lime zest and juice for a Key Lime pie vibe, or orange for a sweeter, warmer citrus note.
- Add Berries: Fold 1/2 cup of fresh blueberries, raspberries, or chopped strawberries into the cheesecake filling before pouring, or sprinkle them over the top before adding the final crumbs.
- Nutty Crumb: Add 1/4 to 1/2 cup of finely chopped pecans, walnuts, or almonds to the crumb mixture for an extra layer of flavor and crunch.
- Chocolate Drizzle: For a decadent twist, once the bars are fully chilled, drizzle melted white chocolate or dark chocolate over the top before serving.
- Vegan Option (Advanced): This would require more significant substitutions. You’d need a plant-based butter alternative, a flax egg or similar binder, and a high-quality vegan cream cheese and vegan condensed milk alternative for the filling. The crumb is easier to adapt than the cheesecake layer.

Storage & Freezing
These delicious bars store beautifully, making them perfect for meal prepping your desserts!
- Refrigerator: Store leftover Creamy Lemon Cheesecake Crumb Bars in an airtight container in the refrigerator for up to 5-7 days. The flavors actually deepen beautifully overnight!
- Freezing: Yes, you can freeze them! Once completely cooled and chilled, cut the bars into individual servings. Wrap each bar tightly in plastic wrap, then place them in a freezer-safe bag or container. They can be frozen for up to 1-2 months. Thaw in the refrigerator overnight or at room temperature for about 30-60 minutes before serving.
- Countertop: Due to the cream cheese filling, these bars should not be left at room temperature for more than 2 hours. Always refrigerate for safety and best quality.
FAQ
Q: Can I use bottled lemon juice instead of fresh?
A: While you technically can, I strongly recommend using fresh lemon juice and zest. The vibrant, complex flavor of fresh lemon is crucial for this recipe‘s “wow” factor and simply cannot be replicated by bottled alternatives. The zest also adds a lovely aroma and visual appeal.
Q: My crumb topping isn’t very crumbly; it’s more like a solid crust. What went wrong?
A: This usually happens if the butter wasn’t cold enough or if the crumb mixture was overmixed. Cold butter, cut into small pieces, helps create those distinct crumbly bits. When mixing, stop as soon as a coarse meal forms; you don’t want to develop the gluten too much.
Q: How do I know when the cheesecake layer is done baking?
A: The edges of the cheesecake layer should appear set, but the very center (about a 1-2 inch circle) should still have a slight jiggle when you gently shake the pan. It will continue to firm up as it cools. Overbaking will make it dry and potentially cause cracks.
Q: Can I make these bars ahead of time for a party?
A: Absolutely! These bars are an excellent make-ahead dessert. In fact, they often taste even better the next day after the flavors have had a chance to fully meld and the cheesecake has completely set in the refrigerator. Just cover them tightly once cooled and chilled.
There you have it – your new favorite way to enjoy a classic. These Creamy Lemon Cheesecake Crumb Bars are truly something special, combining the best of tangy lemon and rich cheesecake with an irresistible crumb. Whether you’re baking for a crowd or just for yourself, I promise these bars will bring a little bit of sunshine to your day. Don’t forget to pin this recipe for later so you can revisit this deliciousness again and again! Happy baking!
Creamy Lemon Cheesecake Crumb Bars: Your New Favorite Dessert!
Ingredients
- For the Crumb:
- 1 ½ cups all-purpose flour
- ¾ cup rolled oats
- ½ cup granulated sugar
- ½ cup packed light brown sugar
- 1 teaspoon lemon zest
- ½ teaspoon baking soda
- ¼ teaspoon salt
- ¾ cup (1 ½ sticks) cold unsalted butter, cut into cubes
- For the Cheesecake Filling:
- 16 ounces (2 blocks) cream cheese, softened
- ½ cup granulated sugar
- 1 large egg
- ¼ cup fresh lemon juice
- 1 tablespoon lemon zest
- 1 teaspoon vanilla extract
- Optional: powdered sugar for dusting
Instructions
- Step 1 1. Prepare the Crumb: In a food processor, pulse together flour, oats, sugars, lemon zest, baking soda, and salt. Add cold butter and pulse until a coarse, crumbly mixture forms.
- Step 2 2. Press the Base: Press about 2/3 of the crumb mixture firmly into the bottom of a parchment-lined 9x13 inch baking pan. Bake at 350°F (175°C) for 10-12 minutes until lightly golden.
- Step 3 3. Make the Filling: While the base bakes, beat softened cream cheese and sugar until smooth. Beat in egg, lemon juice, lemon zest, and vanilla extract until just combined.
- Step 4 4. Assemble: Pour the cheesecake filling over the hot crust. Crumble the remaining 1/3 of the crumb mixture evenly over the cheesecake layer.
- Step 5 5. Bake: Return to the oven and bake for another 25-30 minutes, or until the edges are set and the center has a slight jiggle.
- Step 6 6. Cool & Chill: Let cool completely on a wire rack, then refrigerate for at least 4 hours, or preferably overnight, before slicing and serving. Dust with powdered sugar if desired.
