
The Ultimate Quick & Easy Chicken Caesar Wraps
My kitchen has always been the heart of my home, a place where memories are made and delicious food brings everyone together. I still remember those busy weeknights when my kids were younger, after-school activities and homework leaving little time for elaborate meals. That’s when I first perfected these Chicken Caesar Wraps (Quick & Easy).
They quickly became a family favorite, a go-to for an effortless yet incredibly satisfying dinner. My secret? Keep it simple, fresh, and bursting with flavor. These wraps are more than just a meal; they’re a testament to how quick, easy dinner recipes can still be wholesome and utterly delicious.
This tested recipe is a lifesaver for busy weeknight meals, perfect for packed lunches, or even a light, refreshing dinner on a warm evening. Get ready to transform your mealtime with this ultimate comfort food that everyone will adore!
Why You’ll Love This Recipe
❤️ Here are just a few reasons why these Chicken Caesar Wraps will become your new go-to meal:
- Lightning Fast: Perfect for those hectic weeknights when time is of the essence. You can have a gourmet-tasting meal on the table in under 30 minutes, freeing up your evenings for family time or relaxation. No more ordering takeout out of desperation!
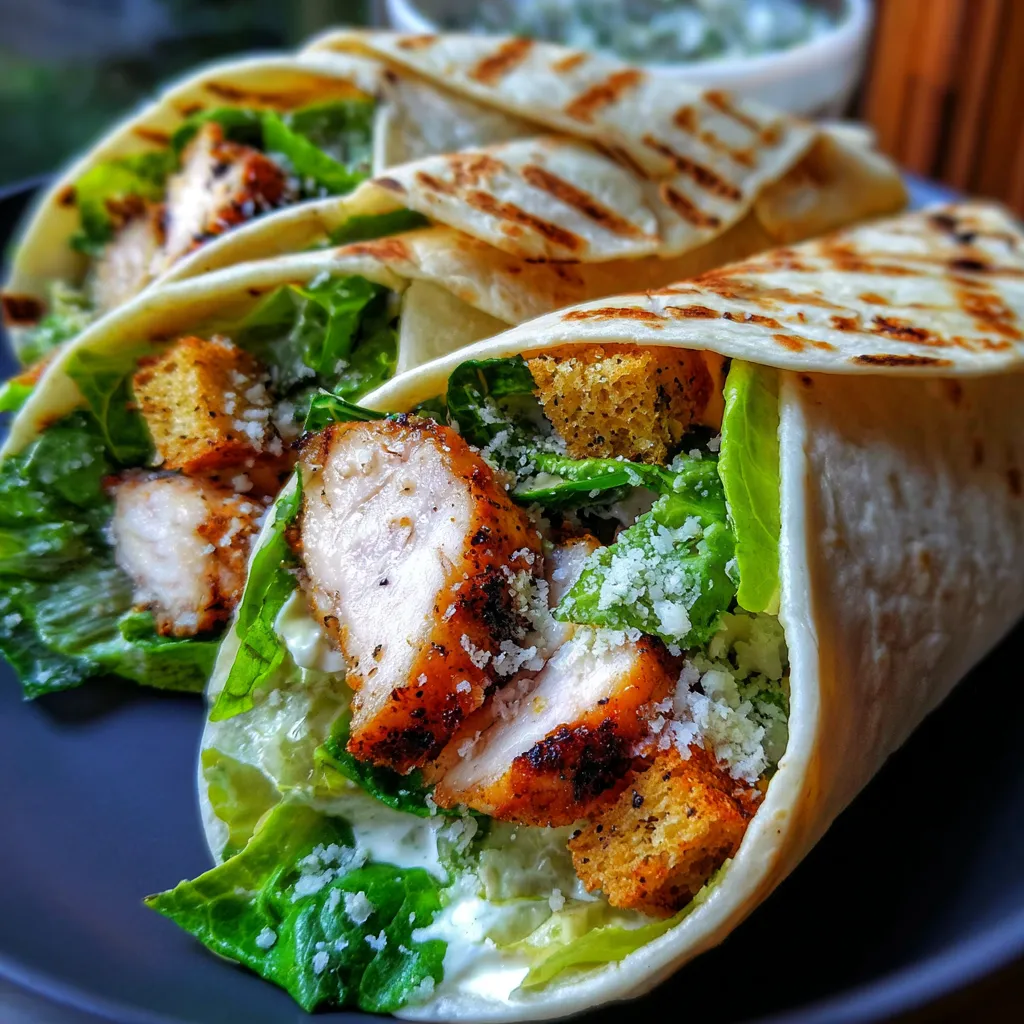
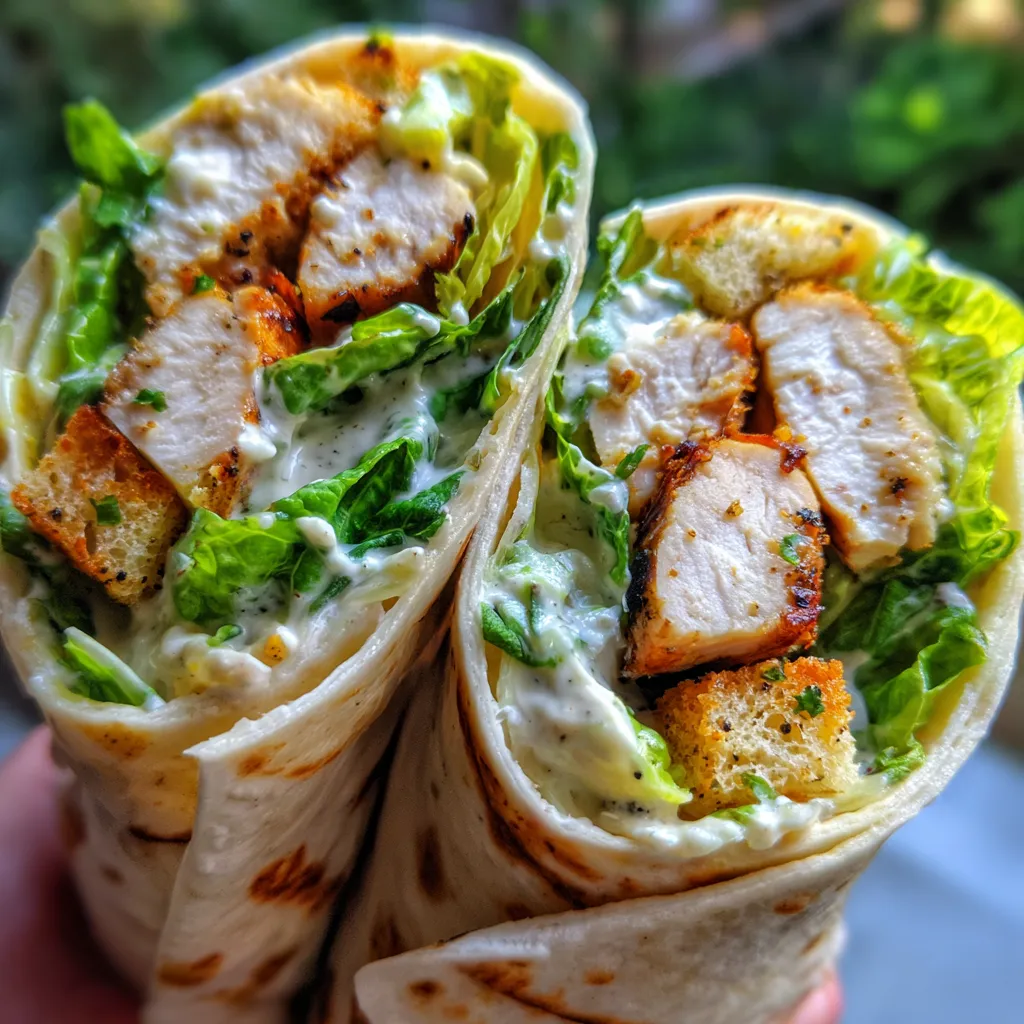
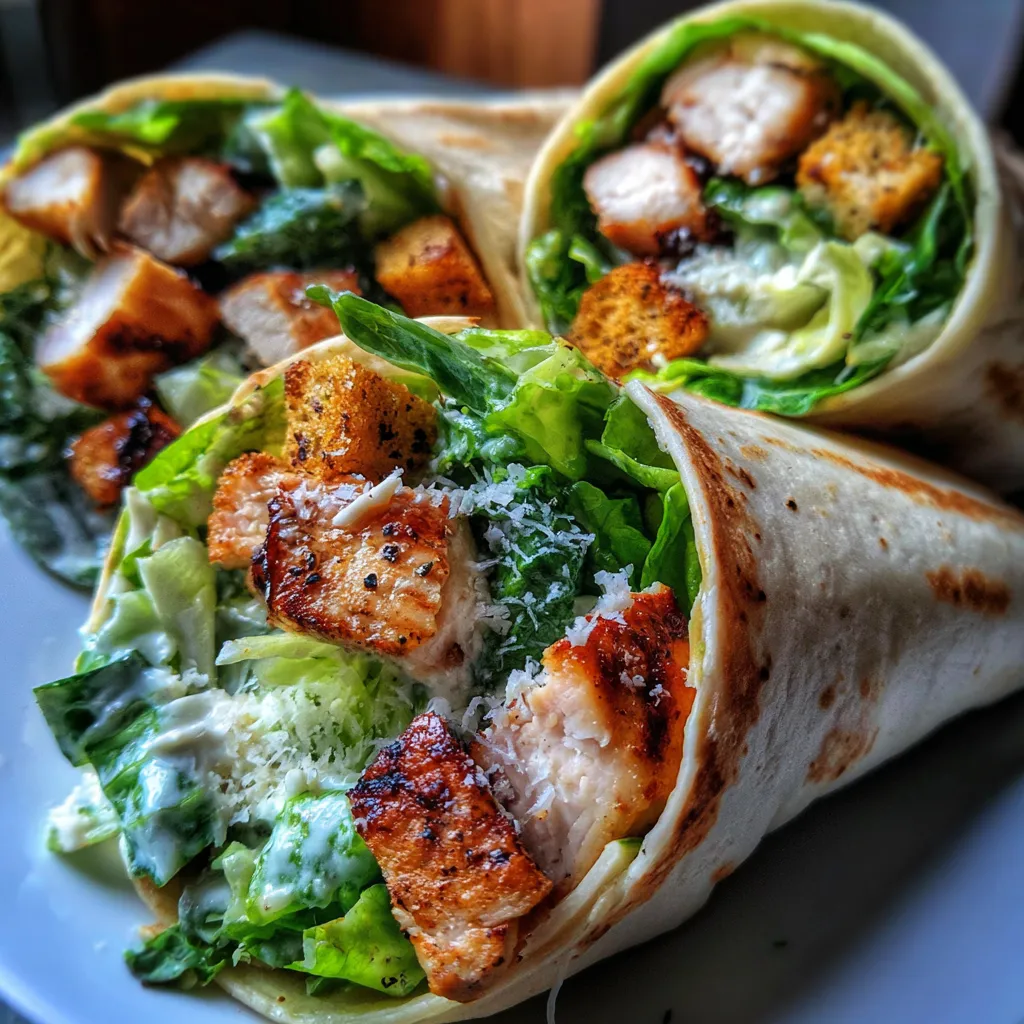
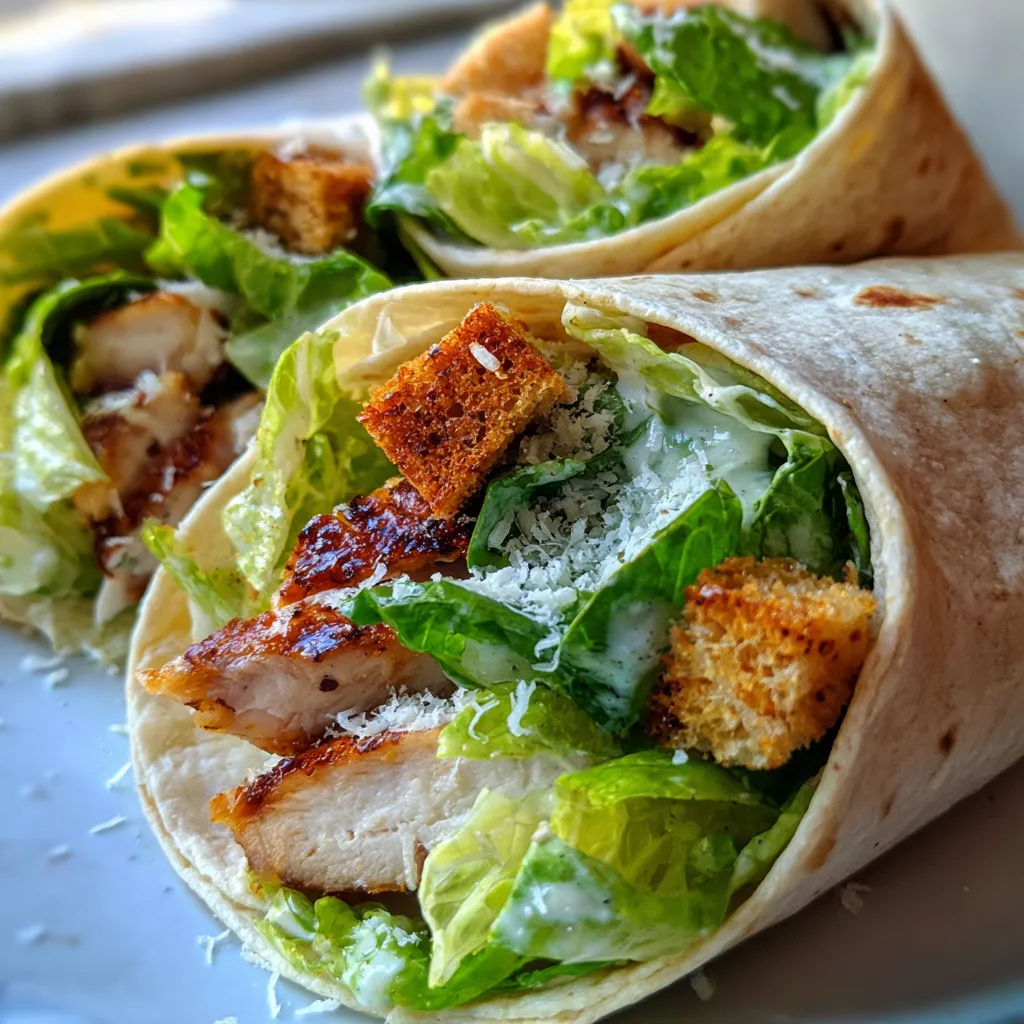
- Incredibly Flavorful: Layers of tender, seasoned chicken, crisp romaine, savory Parmesan, and a tangy Caesar dressing come together in a symphony of taste. Each bite is a delightful burst of classic Caesar goodness, elevated in a convenient wrap format.
- Customizable for Everyone: Easily adapt this recipe to fit various dietary needs or preferences. Go low-carb with lettuce wraps, add extra veggies, or swap out the protein. It’s a versatile canvas for your culinary creativity, making it a hit with picky eaters and foodies alike.
- Meal Prep Friendly: These wraps are fantastic for preparing ahead! Assemble the components individually, and then quickly build your wrap when you’re ready to eat. They make for perfect grab-and-go lunches throughout the week, saving you time and money.
- Portable & Perfect for On-the-Go: Whether you’re packing lunch for work or school, heading out for a picnic, or need a quick bite after a workout, these wraps are your best friend. They hold up beautifully, making them an ideal, mess-free option for any adventure.
- Healthier Takeaway Alternative: Skip the drive-thru and enjoy a fresh, homemade meal that tastes far superior and is much better for you. You control the ingredients, ensuring quality and freshness in every single wrap.
- Simple Ingredients, Big Impact: You don’t need exotic items to create an extraordinary meal. This recipe uses readily available ingredients that, when combined, create a truly memorable and satisfying dish that feels both comforting and fresh.
What You Need
You only need a few simple pantry staples for this recipe! Check the full printable recipe card below for detailed measurements.
Expert Tips
💡 Unlock the full potential of your Chicken Caesar Wraps with these invaluable tips from my kitchen:
- Perfecting Your Chicken:
- Cook Ahead: If you’re really short on time, use pre-cooked rotisserie chicken. Shredding it warm makes it easier to mix with seasonings.
- Season Generously: Don’t be shy with your seasonings. A good pinch of salt, freshly ground black pepper, garlic powder, and onion powder will elevate the chicken’s flavor, making it sing even before it meets the dressing.
- Moisture is Key: Whether grilling, baking, or pan-frying, ensure your chicken remains juicy. Overcooked chicken can make your wraps dry. A meat thermometer is your best friend here – aim for 165°F (74°C).
- The Dressing Dilemma:
- Homemade vs. Store-Bought: While a good quality store-bought Caesar dressing works wonders for speed, consider whipping up your own for an unparalleled fresh taste. Many recipes are surprisingly simple and taste infinitely better.
- Don’t Drench: Apply dressing sparingly at first. You can always add more, but you can’t take it away! Too much dressing can make your wraps soggy and overpowering.
- Choosing the Right Wrap:
- Size Matters: Opt for large, pliable tortillas (about 10-12 inches) that can comfortably hold all your fillings without tearing. Flour tortillas are generally the most flexible.
- Warm ‘Em Up: Briefly warming your tortillas in a dry skillet or microwave makes them much more pliable and less likely to crack when rolling. This small step makes a huge difference in the final product.
- The Art of Rolling:
- Don’t Overfill: This is a common mistake! Spread your fillings evenly but leave about an inch border around the edges. Overstuffing leads to messy, unmanageable wraps.
- Tight & Tidy: Fold in the sides of the tortilla over the filling first, then tightly roll from the bottom upwards. A firm, even roll keeps everything snug and prevents spillage.
- Cut Smart: Once rolled, cut your wrap on a diagonal. This not only looks professional but also makes it easier to eat and showcases all those beautiful layers inside.
- Adding Crunch and Texture:
- Croutons Inside? Maybe Not: While Caesar salad often features croutons, adding them directly into a wrap can make them soggy over time. Instead, consider adding them just before serving or serving them on the side for maximum crunch.
- Beyond Romaine: While romaine is classic, don’t hesitate to add other crisp veggies like thinly sliced cucumbers, bell peppers, or shredded carrots for extra texture and nutrition.
Variations & Substitutions
- Keto/Low-Carb: Swap traditional tortillas for large lettuce leaves (butter lettuce or iceberg work great) or low-carb tortillas. Ensure your Caesar dressing is sugar-free and omit croutons entirely.
- Vegetarian/Vegan: Replace chicken with grilled halloumi, roasted chickpeas, seasoned tempeh, or pan-fried portobello mushrooms. Use a plant-based Caesar dressing and dairy-free Parmesan alternatives.
- Gluten-Free: Use gluten-free tortillas, which are widely available in most grocery stores. Double-check that your Caesar dressing is gluten-free (some contain malt vinegar or other hidden gluten).
- Spice It Up: Add a pinch of red pepper flakes to your chicken seasoning or a drizzle of sriracha mayo to the wrap.
- Extra Veggies: Include finely diced red onion, cherry tomatoes, or shredded carrots for added color and nutrients.
Storage & Freezing
To Store: If prepping ahead, store the cooked chicken, shredded lettuce, and dressing separately in airtight containers in the refrigerator. Assemble the wraps just before eating to prevent sogginess. Cooked chicken will last 3-4 days.
Assembled Wraps: Best enjoyed fresh. If you must store an assembled wrap, wrap it tightly in plastic wrap or foil and refrigerate for up to 1 day. The tortilla may become slightly soft, but it will still be delicious.
Freezing: Not recommended for assembled wraps due to the fresh vegetables and dressing, which will become watery and lose texture upon thawing. Cooked, plain chicken can be frozen for up to 3 months.
FAQ
Q: Can I use different types of chicken?
A: Absolutely! While grilled or pan-fried chicken fillets work best, you can use shredded rotisserie chicken for extra convenience, or even leftover baked or roasted chicken. Just make sure it’s well-seasoned.
Q: How do I prevent my wraps from getting soggy?
A: The key is to keep your ingredients as dry as possible. Thoroughly drain your romaine lettuce after washing. Apply dressing just before assembling, or, for meal prep, store components separately and assemble right before serving. A thin layer of cheese or even a bit of hummus can act as a barrier if you’re assembling slightly ahead.
Q: What if I don’t have Caesar dressing?
A: A simple alternative is a mix of mayonnaise, lemon juice, a touch of Dijon mustard, garlic powder, salt, and pepper. It won’t be exactly Caesar, but it will be a delicious and creamy substitute that complements the chicken and lettuce well.
Q: Can these wraps be made spicy?
A: Yes, easily! Add a dash of hot sauce to your Caesar dressing, sprinkle some red pepper flakes over the chicken, or include finely diced jalapeños for a kick.
There you have it – the ultimate guide to creating perfect Chicken Caesar Wraps (Quick & Easy) that will revolutionize your mealtime! I truly hope this recipe brings as much joy and ease to your kitchen as it has to mine. Don’t forget to pin this recipe for later and share your creations with me! Happy wrapping!
Quick & Easy Chicken Caesar Wraps – Ultimate Recipe
Ingredients
- 2 large chicken fillets (about 1 lb total)
- 1 tbsp olive oil
- 1/2 tsp garlic powder
- 1/2 tsp onion powder
- Salt and freshly ground black pepper to taste
- 6 large (10-12 inch) flour tortillas
- 6 cups chopped romaine lettuce
- 1/2 cup good quality Caesar dressing (store-bought or homemade)
- 1/4 cup grated Parmesan cheese
- Optional: 1/4 cup croutons (crushed or on the side)
- Optional: thinly sliced red onion or cherry tomatoes
Instructions
- Step 1 Pat chicken fillets dry. Season generously with garlic powder, onion powder, salt, and pepper.
- Step 2 Heat olive oil in a large skillet over medium-high heat. Cook chicken for 5-7 minutes per side, or until cooked through (internal temperature reaches 165°F / 74°C). Remove from heat, let rest for a few minutes, then slice or shred into bite-sized pieces.
- Step 3 Lightly warm tortillas in a dry skillet for 10-15 seconds per side, or microwave briefly, to make them more pliable.
- Step 4 Lay a warm tortilla flat. Spoon a line of Caesar dressing down the center, leaving about an inch from the edges.
- Step 5 Layer with chopped romaine lettuce, cooked chicken pieces, and grated Parmesan cheese. (Add optional croutons or other veggies here if desired).
- Step 6 To roll: Fold in the left and right sides of the tortilla over the filling, then starting from the bottom, tightly roll the tortilla upwards to form a secure wrap.
- Step 7 Repeat with remaining tortillas. Serve immediately, cut in half diagonally for easy eating.
