
The Ultimate Banana Pear Bread with Irresistible Brown Sugar Topping
There’s nothing quite like the smell of fresh-baked bread wafting through the house on a chilly morning, is there? For me, it instantly transports me back to my grandmother’s kitchen. She had a knack for turning simple ingredients into pure magic, and her banana bread was legendary. One crisp autumn afternoon, looking for a new twist on her classic, I decided to experiment with a bounty of ripe pears from the farmer’s market.
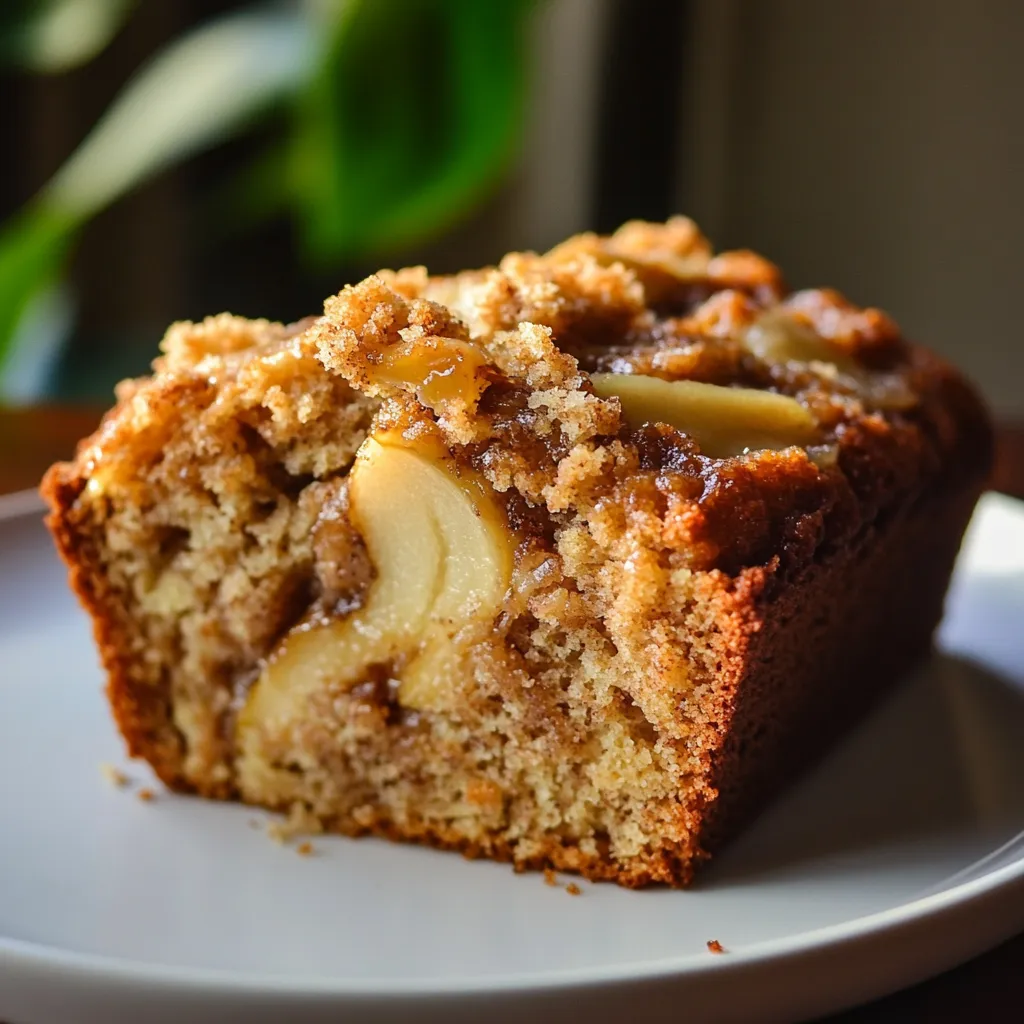
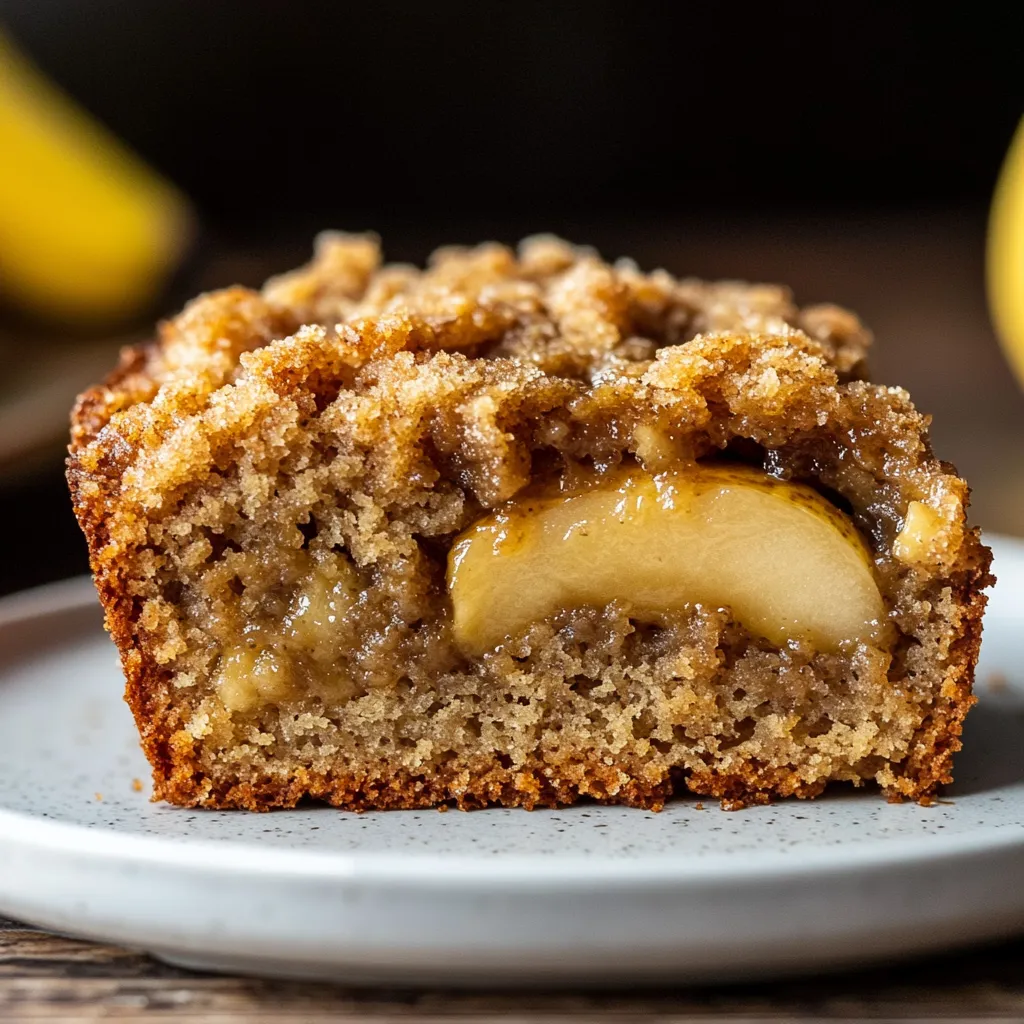
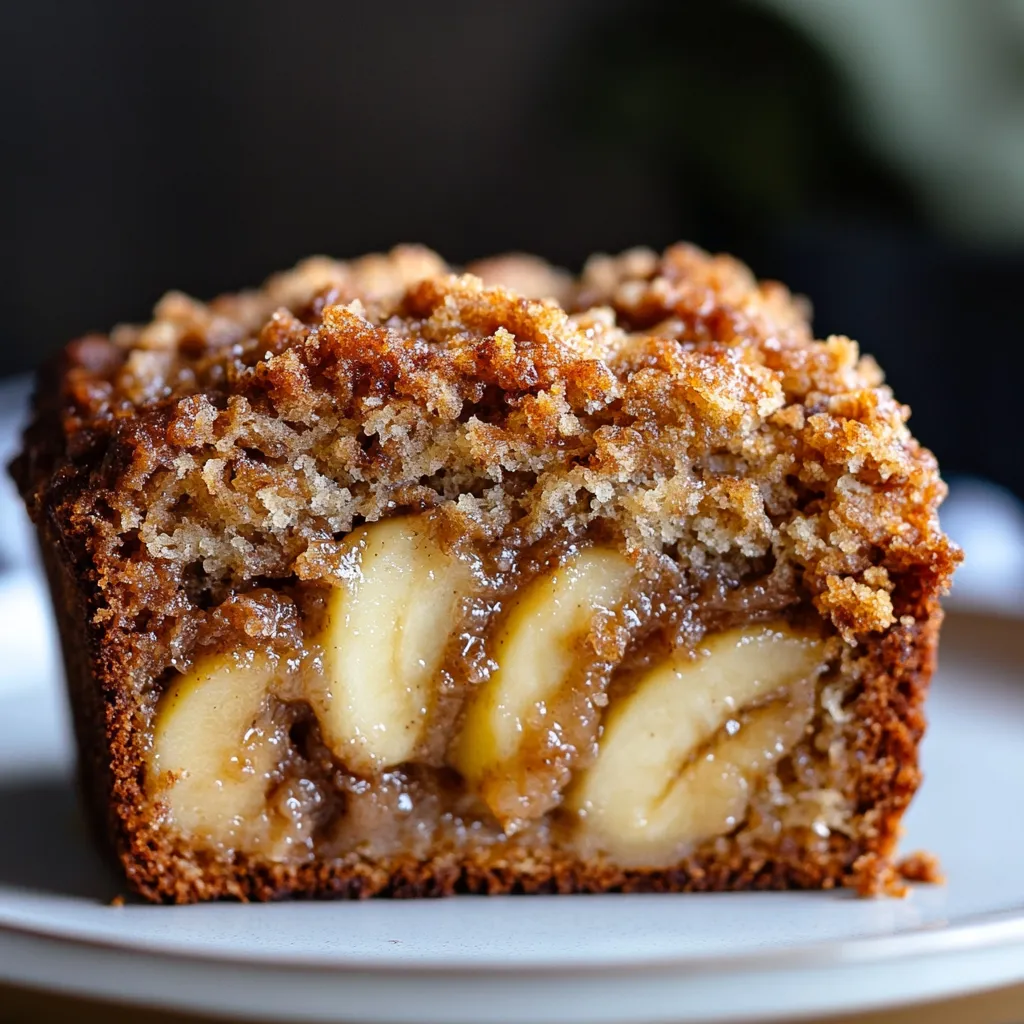
What emerged from my oven that day was this incredible creation: Banana Pear Bread with Brown Sugar Topping. It’s a truly comforting food, perfect for an easy breakfast or a cozy afternoon treat. This recipe became an instant family favorite, a go-to for potlucks, and a cherished gift during the holidays. Every single time I make it, it gets rave reviews!
This bread isn’t just delicious; it’s a testament to simple, wholesome baking. It’s thoroughly tested and perfected, promising a moist, tender crumb every time, crowned with that utterly addictive, crisp brown sugar topping. Get ready to fill your home with the most delightful aromas and your belly with pure happiness. You absolutely need to make this now!
Why You’ll Love This Recipe
❤️ Here’s why this Banana Pear Bread will become a cherished recipe in your kitchen:
- Perfectly Moist & Tender: The combination of ripe bananas and juicy pears ensures an incredibly moist, melt-in-your-mouth crumb that stays fresh for days.
- Irresistible Brown Sugar Topping: That crisp, caramelized streusel topping isn’t just decoration; it adds a delightful texture and an extra layer of sweet, buttery flavor that makes every bite heavenly.
- Warm, Comforting Flavors: Infused with just the right amount of cinnamon and nutmeg, this bread embodies the cozy, inviting essence of home baking, making it a perfect addition to any fall or winter gathering.
- Easy to Make: Despite its gourmet taste, this recipe is surprisingly simple, requiring basic baking skills and common pantry staples. It’s a fantastic choice for both novice and experienced bakers alike.
- Versatile & Adaptable: Enjoy it for breakfast with your morning coffee, as a delightful snack, or even a simple dessert. It’s fantastic on its own or warmed slightly with a pat of butter.
- Crowd-Pleasing Favorite: This bread consistently receives glowing reviews! It’s an excellent choice for holiday brunches, potlucks, or simply to share with friends and family, always leaving them asking for the recipe.
- Customizable: Feel free to experiment with additional mix-ins like chocolate chips, walnuts, or a touch of ginger to personalize it to your taste.
- Makes Your Home Smell Amazing: The aroma of baking bananas, pears, and warm spices will fill your kitchen, creating an inviting and cozy atmosphere that’s truly unbeatable.
- Budget-Friendly: Utilizing ripe bananas (a common ingredient often saved from being thrown away) and seasonal pears makes this an economical yet luxurious treat.
- Great for Gifting: Baked goods make the best gifts! Package a loaf in cellophane with a ribbon, and you have a thoughtful, homemade present that everyone will appreciate.
What You Need
You only need a few simple pantry staples for this recipe, alongside some ripe bananas and fresh pears! The magic happens when these humble ingredients come together to create something truly spectacular. Check the full printable recipe card below for detailed measurements and exact quantities – it’s all laid out for your convenience!
Expert Tips
💡 Elevate your Banana Pear Bread to professional levels with these insider tips:
- Use Ripe Bananas: The riper your bananas are (think brown spots, even almost black!), the sweeter and more flavorful your bread will be. They also mash easier and contribute to a moister crumb. Don’t be afraid to use bananas that seem ‘too ripe’ – they’re perfect!
- Choose Firm Pears: While you want ripe pears for flavor, make sure they are still relatively firm. Overly soft pears can release too much moisture and make the bread soggy. Bosc or Anjou pears work wonderfully for their texture and sweetness.
- Don’t Overmix: Mix your wet and dry ingredients just until combined. Overmixing develops the gluten in the flour, leading to a tough, dense bread rather than a tender, fluffy one. A few lumps are perfectly fine!
- Proper Pan Preparation: Grease and flour your loaf pan thoroughly, or line it with parchment paper leaving an overhang on the sides. This ensures easy removal and prevents sticking, which can be frustrating after all your hard work.
- Achieve the Perfect Topping: When making the brown sugar topping, use cold butter. This helps create those wonderful, crumbly streusel bits that melt beautifully while baking, forming a crispy, sweet crust. Use your fingertips to cut the butter into the dry ingredients.
- Check for Doneness: A wooden skewer or toothpick inserted into the center of the loaf should come out with a few moist crumbs, but not wet batter. If it comes out completely clean, your bread might be slightly overbaked. Remember, oven temperatures can vary, so keep an eye on it.
- Cool Completely Before Slicing: It’s tempting, but resist the urge to slice into your warm bread immediately. Allowing it to cool in the pan for 10-15 minutes, then on a wire rack until completely cool, allows the internal structure to set and prevents it from falling apart.
- Enhance Flavors with Spices: Don’t skip the cinnamon and nutmeg! These warm spices perfectly complement the fruit flavors, adding depth and a comforting aroma that truly makes this bread special. A pinch of ground ginger can also be a delightful addition.
- Room Temperature Ingredients: Ensure your eggs and butter are at room temperature. This helps them emulsify better with other ingredients, resulting in a smoother, more uniform batter and a better overall texture.
- Customize Your Crumb: If you love extra texture, consider adding 1/2 cup of chopped walnuts or pecans to the batter. For a touch of decadence, chocolate chips or white chocolate chunks are also fantastic additions that pair beautifully with banana and pear.
Variations & Substitutions
This Banana Pear Bread recipe is wonderfully flexible! Feel free to get creative and adapt it to your dietary needs or flavor preferences:
- Gluten-Free: Swap out the all-purpose flour for a 1:1 gluten-free baking flour blend (ensure it contains xanthan gum) for a delicious GF version.
- Dairy-Free: Replace the butter with a plant-based butter alternative or coconut oil, and use a non-dairy milk like almond or oat milk.
- Vegan: Combine the dairy-free substitutions with a flax egg (1 tbsp ground flaxseed + 3 tbsp water, let sit for 5 mins) for each egg called for in the recipe.
- Spice It Up: Add a pinch of ground ginger or cardamom to the batter for a more complex flavor profile.
- Nutty Boost: Fold in 1/2 cup of chopped walnuts, pecans, or almonds for added crunch and flavor.
- Chocolate Lover’s Dream: Swirl in 1/2 cup of chocolate chips or chopped dark chocolate for an extra indulgent treat.
- Different Fruits: While bananas and pears are a perfect match, you could experiment with apples, cranberries, or even shredded zucchini for other moist bread variations. Adjust spices as needed.
- Healthier Twist: Reduce the sugar by 1/4 cup in the batter and use whole wheat pastry flour for a slightly healthier, yet still delicious, option.

Storage & Freezing
Want to enjoy this delightful bread for longer? Here’s how to store it properly:
- At Room Temperature: Store the cooled bread in an airtight container or wrap it tightly in plastic wrap at room temperature for up to 3-4 days. The moisture from the bananas and pears helps keep it fresh!
- In the Refrigerator: For a slightly longer shelf life, you can store it in an airtight container in the refrigerator for up to a week.
- Freezing Instructions: This bread freezes beautifully! Once completely cooled, wrap the entire loaf or individual slices tightly in plastic wrap, then again in aluminum foil. Place in a freezer-safe bag or container. It will keep well in the freezer for up to 3 months.
- To Reheat: Thaw frozen bread at room temperature or in the refrigerator overnight. You can warm individual slices in the microwave for 15-30 seconds, or toast them lightly for a crispier edge. A whole loaf can be reheated in a 300°F (150°C) oven, loosely covered with foil, for about 15-20 minutes until warmed through.
FAQ
Q: Can I use overripe pears for this recipe?
A: It’s best to use ripe but still relatively firm pears. Overly soft or mushy pears can release too much water during baking, potentially making the bread soggy. Firm pears will hold their shape better and contribute to the overall texture.
Q: My brown sugar topping melted completely. What went wrong?
A: The key to a crumbly topping is using cold butter and not overmixing it into the dry ingredients. If your butter was too soft or the mixture was overworked, it might melt too quickly. Also, ensure your oven temperature is accurate – too hot might cause it to melt rather than crisp.
Q: Can I make this into muffins?
A: Absolutely! This batter works beautifully for muffins. Fill muffin liners about two-thirds full, sprinkle with the brown sugar topping, and bake at 375°F (190°C) for about 20-25 minutes, or until a toothpick inserted comes out clean. Yield will be approximately 12-18 muffins, depending on size.
Q: How do I prevent my quick bread from having a gummy texture?
A: A gummy texture often results from overmixing the batter, which overdevelops the gluten. Mix only until the wet and dry ingredients are just combined. Also, ensure you’re using the correct flour type (all-purpose) and don’t add too much liquid. Measuring your flour by weight (using a kitchen scale) is always more accurate than by volume.
Conclusion
There you have it – a truly special recipe for Banana Pear Bread with Brown Sugar Topping that’s guaranteed to bring warmth and joy to your kitchen. Whether it’s for a special occasion or just a quiet afternoon with a cup of tea, this bread is sure to become a cherished part of your recipe collection. Don’t forget to Pin this recipe for later so you can easily find it whenever a craving strikes!
Happy baking!
Ultimate Banana Pear Bread with Brown Sugar Topping
Ingredients
- 1 3/4 cups all-purpose flour
- 1 tsp baking soda
- 1/2 tsp salt
- 1 tsp ground cinnamon
- 1/4 tsp ground nutmeg
- 1/2 cup (1 stick) unsalted butter, softened
- 1/2 cup granulated sugar
- 1/2 cup packed light brown sugar
- 2 large eggs, room temperature
- 1 tsp vanilla extract
- 1 cup mashed ripe bananas (about 2-3 medium)
- 1 cup diced firm ripe pears (about 2 medium)
- For the Brown Sugar Topping:
- 1/4 cup packed light brown sugar
- 2 tbsp all-purpose flour
- 1/4 tsp ground cinnamon
- 2 tbsp unsalted butter, cold and cubed
Instructions
- Step 1 Preheat oven to 350°F (175°C). Grease and flour a 9x5 inch loaf pan, or line with parchment paper.
- Step 2 In a medium bowl, whisk together flour, baking soda, salt, cinnamon, and nutmeg. Set aside.
- Step 3 In a large bowl, cream together softened butter, granulated sugar, and 1/2 cup brown sugar until light and fluffy.
- Step 4 Beat in eggs one at a time, then stir in vanilla extract.
- Step 5 Add mashed bananas and diced pears to the wet ingredients, mixing until just combined.
- Step 6 Gradually add the dry ingredients to the wet ingredients, mixing on low speed or by hand until just combined. Do not overmix; a few lumps are okay.
- Step 7 Prepare the topping: In a small bowl, combine 1/4 cup brown sugar, 2 tbsp flour, and 1/4 tsp cinnamon. Cut in the cold, cubed butter with a fork or your fingertips until crumbly.
- Step 8 Pour the batter into the prepared loaf pan and sprinkle the brown sugar topping evenly over the top.
- Step 9 Bake for 55-65 minutes, or until a wooden skewer or toothpick inserted into the center comes out with moist crumbs (not wet batter).
- Step 10 Let the bread cool in the pan for 10-15 minutes before transferring it to a wire rack to cool completely. Slice and serve.
