
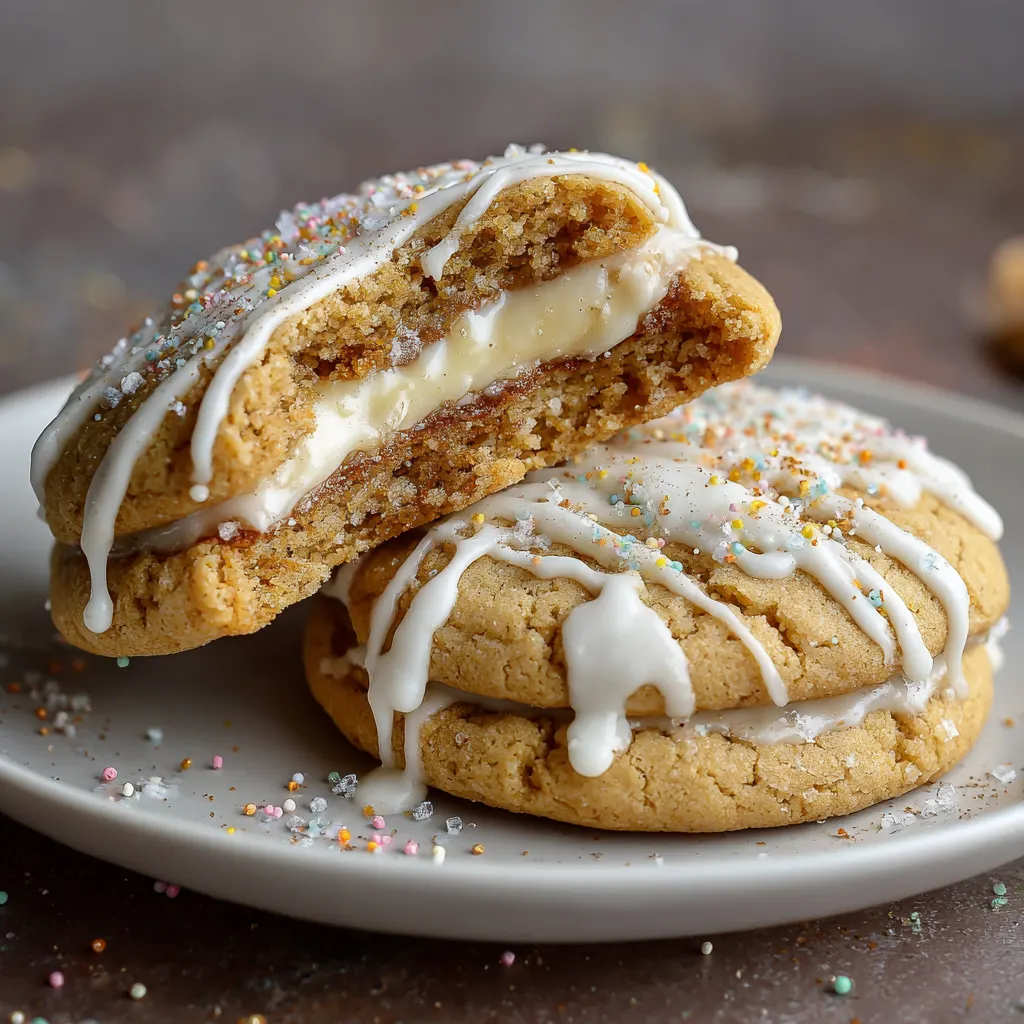
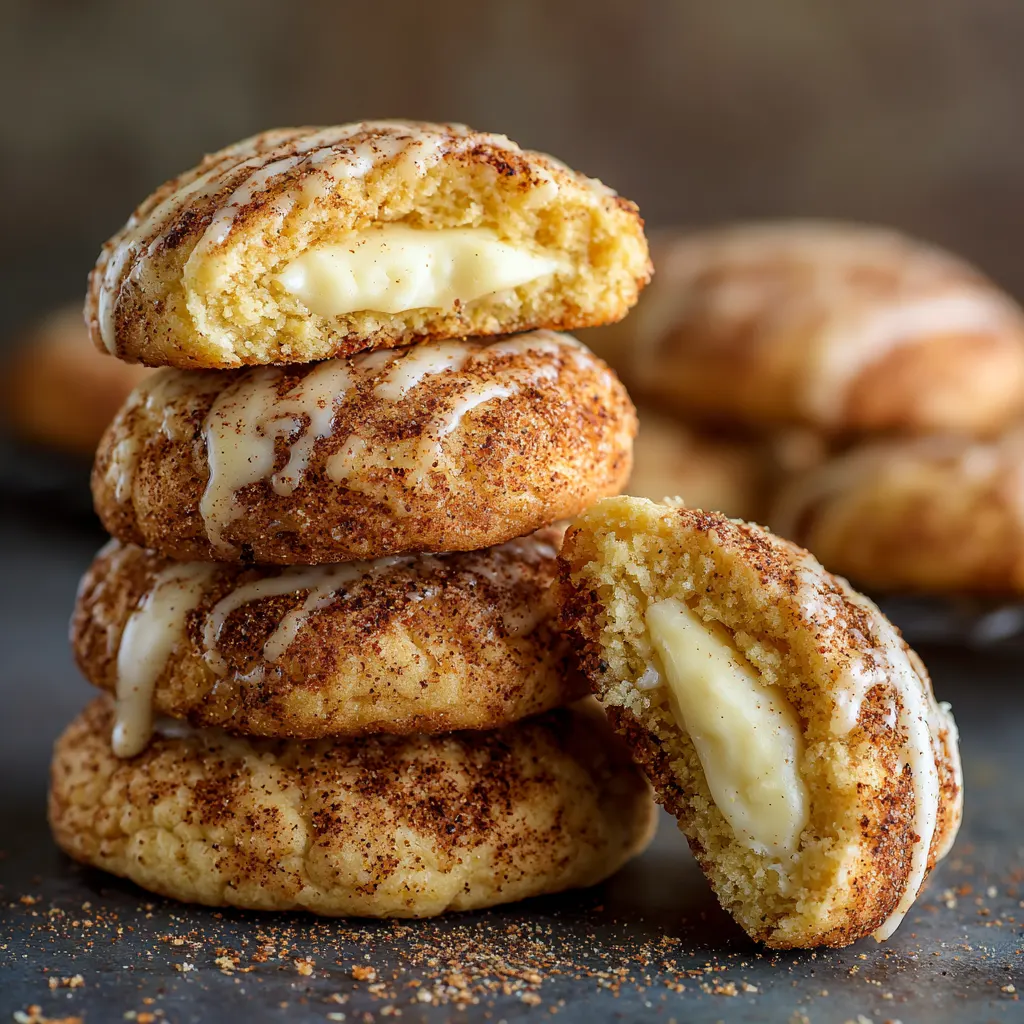
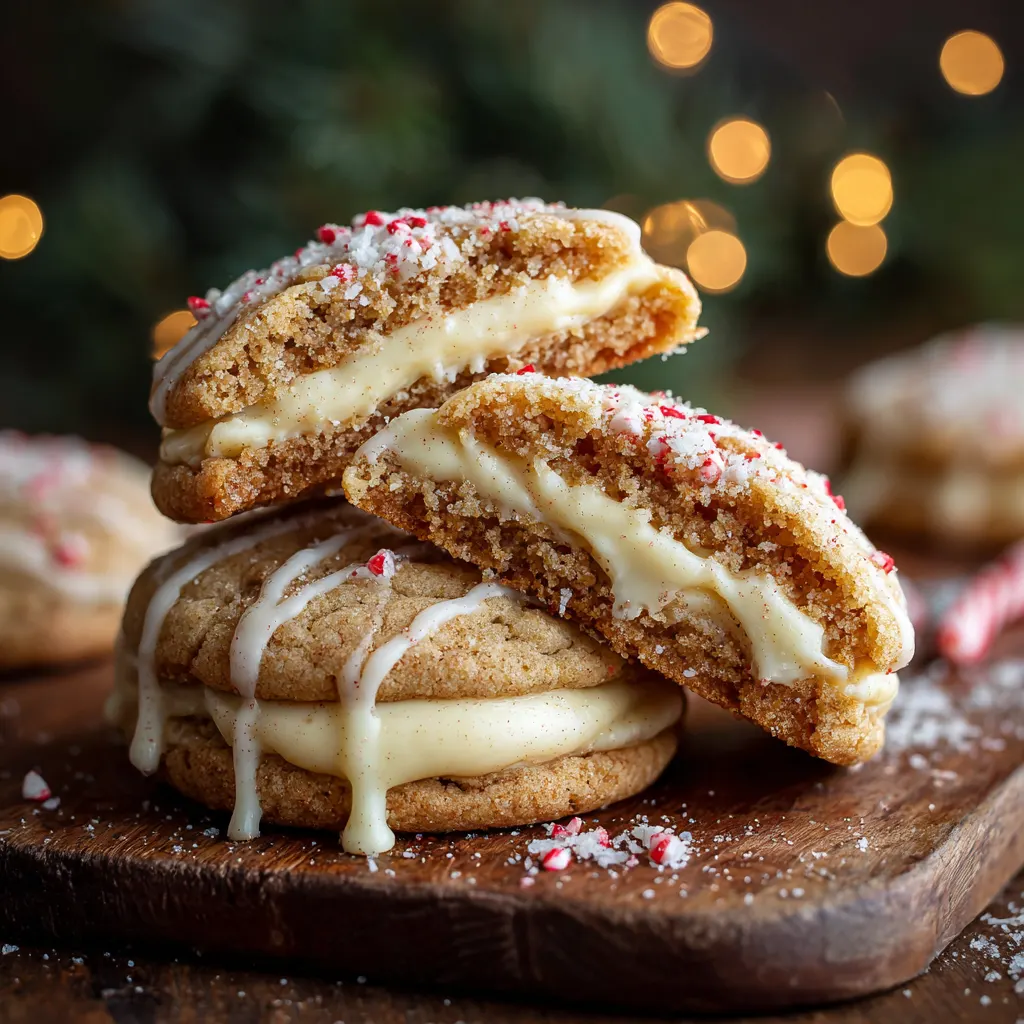
The holidays are defined by iconic flavors, and few are more distinct or comforting than the creamy, spiced richness of eggnog. When this seasonal classic is fused with the indulgent tang of cheesecake and wrapped in a warm, soft-baked cookie shell, the result is a truly unforgettable dessert. The Eggnog Cheesecake Stuffed Cookie elevates the simple cookie into a sophisticated, two-bite holiday experience, delivering a moist, chewy exterior that gives way to a decadent, molten cheesecake center bursting with nutmeg, cinnamon, and a hint of rum. This recipe requires careful attention to chilling times but rewards the baker with a perfectly optimized treat, ideal for gifting, cookie exchanges, or crowning any festive dessert table.
Ingredients
Eggnog Cheesecake Filling (Must be prepared first)
-
8 oz. (1 block) full-fat cream cheese, softened
-
1/4 cup granulated sugar
-
3 tablespoons full-fat eggnog
-
1 large egg yolk (acts as a stabilizer)
-
1/2 teaspoon rum extract (or 1 teaspoon spiced rum, if preferred)
-
1/4 teaspoon ground nutmeg
-
Pinch of salt
Spiced Sugar Cookie Dough
-
2 3/4 cups all-purpose flour
-
1 teaspoon baking soda
-
1/2 teaspoon salt
-
1 teaspoon ground cinnamon
-
1/2 teaspoon ground nutmeg
-
1 cup (2 sticks) unsalted butter, softened
-
1 cup packed light brown sugar
-
1/2 cup granulated sugar
-
2 large eggs, room temperature
-
1 teaspoon vanilla extract
For Garnish
-
Powdered sugar, for dusting
-
Freshly grated nutmeg
Step-by-Step Instructions
1. Prepare the Cheesecake Filling (The Night Before is Best): In a medium bowl, use an electric mixer to beat the softened cream cheese until perfectly smooth. Gradually add the granulated sugar and beat until fully combined and light. Mix in the eggnog, egg yolk, rum extract (or rum), nutmeg, and salt until the mixture is uniform and creamy. Line a small baking sheet with parchment paper. Using a small cookie scoop (about 1 teaspoon or 0.5 oz of mixture), scoop out 24 uniform balls of the cheesecake filling. Place them on the lined sheet. Freeze for at least 3 hours, or preferably overnight, until rock solid.
2. Prepare the Cookie Dough: In a medium bowl, whisk together the flour, baking soda, salt, cinnamon, and nutmeg. Set aside. In the bowl of a stand mixer fitted with the paddle attachment, cream together the softened butter, brown sugar, and granulated sugar on medium speed until the mixture is light and fluffy (about 2-3 minutes). Beat in the eggs one at a time, followed by the vanilla extract. Reduce the mixer speed to low and gradually add the dry ingredients, mixing only until just combined. Do not overmix.
3. Chill the Cookie Dough: Wrap the dough in plastic wrap and flatten it slightly into a disc. Refrigerate the dough for at least 30 minutes. This step is critical for preventing the cookies from spreading too much in the oven.
4. Stuff and Seal the Cookies: Preheat your oven to 350°F (175°C) and line two large baking sheets with parchment paper or silicone mats. Use a medium cookie scoop (about 3 tablespoons) to portion the cookie dough. Take one portion and flatten it in the palm of your hand to a 3-inch disc. Remove a frozen cheesecake ball from the freezer and place it directly in the center of the dough disc. Carefully fold the edges of the dough up and over the filling, pinching and sealing the dough completely to enclose the cheesecake ball. Ensure there are no cracks or exposed filling, as this will cause the filling to leak during baking. Roll the sealed dough into a smooth ball and place it on the prepared baking sheet. Repeat for all remaining dough and filling.
5. Bake and Cool: Bake the stuffed cookies for 11 to 13 minutes, or until the edges are lightly golden brown and the tops look set, but still soft. Do not overbake, as this will dry out the cookie and toughen the filling. The center filling will soften and slightly puff up. Allow the cookies to cool on the baking sheet for 5 minutes before carefully transferring them to a wire rack to cool completely.
6. Garnish and Serve: Once cool, dust the cookies generously with powdered sugar and a light sprinkle of freshly grated nutmeg just before serving.
The Art of the Eggnog Cheesecake Filling
The filling is the star of this dessert, delivering the essential flavor contrast that makes the “stuffed” concept successful. Unlike traditional baked cheesecakes, the filling in this recipe must be formulated to maintain a semi-stable, creamy texture after a relatively short bake time, while being robust enough to withstand being wrapped and handled.
Ingredient Selection for Texture and Flavor:
-
Full-Fat Cream Cheese: This is non-negotiable. Using low-fat or whipped cream cheese results in a watery, runny filling that will leak out and ruin the cookie structure. Full-fat, brick-style cream cheese provides the necessary richness and density.
-
The Stabilizer (Egg Yolk): A small amount of egg yolk, as included in the recipe, is key to giving the filling just enough structure to set during the baking process without becoming rubbery. Without a stabilizer, the filling would likely remain too liquid.
-
Eggnog vs. Extract: To achieve a rich, authentic eggnog flavor while controlling the filling’s moisture, we use a combination. The heavy spices (nutmeg and sometimes cinnamon) are crucial. A small amount of actual full-fat eggnog provides the unmistakable dairy-rich base, while rum extract is often used to impart the signature liquor note without adding excess liquid or alcohol content that could affect the bake.
The Crucial Step of Freezing:
For any “stuffed” cookie, the filling must be frozen solid before wrapping. This allows the cookie dough shell to begin setting in the oven before the filling starts to heat up. If the filling is merely chilled, it will melt and leak out almost instantly, causing the cookies to blow out and spread into a flat mess. The quick-frozen core ensures the filling remains intact and contained until the cookie structure is firm.
Mastering the Stuffed Cookie Technique
Successful stuffed cookies depend entirely on precise dough handling and thermal control. The goal is to create a perfect seal around the cold filling and bake the assembly just long enough to set the cookie shell and warm the filling to a luxurious, molten state.
Handling the Dough:
-
Chilling is Paramount: The 30-minute chill time for the cookie dough prevents excess spread. The cold dough takes longer to melt in the oven, giving the internal structure time to develop.
-
The Scoop and Flatten Method: Using a measured cookie scoop (3 tablespoons) ensures every cookie is uniform in size, which is important for even baking. When flattening the dough, aim for an even thickness all around, especially at the edges, which will become the seal. A disc size of about 3 inches is ideal for a 1-teaspoon filling ball.
-
Sealing the Deal: The seal must be perfect. If any cream cheese filling is exposed, it will liquify and bubble out, leaving a hole in your cookie. After folding the dough over the frozen filling, gently roll the sphere in your hands to create a seamless, smooth ball. This step also warms the exterior slightly, helping to fuse the dough edges.
Baking Environment and Timing:
-
Oven Temperature: Baking at 350°F (175°C) is standard for cookies. Use an oven thermometer to ensure accuracy, as temperature fluctuations can cause the cookies to spread or brown unevenly.
-
The Visual Cue: The cookies are done when the edges are set and a light gold, and the surface looks matte. The center will still look soft and slightly pale. Resist the urge to bake until fully golden, as the latent heat on the cooling sheet will complete the cooking process (carryover cooking). Overbaking will result in a hard cookie and a dry, firm filling, losing the desired “cheesecake” texture.
-
Cooling Process: Leaving the cookies on the hot baking sheet for 5 minutes is crucial. The residual heat sets the base and makes them sturdy enough to transfer without breaking, ensuring the warm, soft filling stays securely inside.
The Holiday Fusion: History and Flavor Profile
The Eggnog Cheesecake Stuffed Cookie is a modern culinary mash-up that owes its rich flavor profile to centuries of tradition. Understanding the origin of its components enhances appreciation for the final product.
The Spice Heritage of Eggnog:
Eggnog itself is a centuries-old beverage, evolving from a medieval European drink called a “posset,” made from hot milk curdled with wine or ale. By the 17th century, it became associated with wealth and celebration, thanks to its expensive ingredients: eggs, milk, sugar, and, critically, spirits like brandy or rum.
The defining flavor of eggnog is its distinct spice blend. Nutmeg is the predominant note, often grated fresh for maximum aroma, giving the dessert its characteristic warmth. Cinnamon and sometimes a hint of cloves or ginger round out the profile, mirroring the spices found in holiday baking favorites like gingerbread. By incorporating these spices directly into both the cookie dough and the cheesecake filling, the resulting stuffed cookie achieves a deep, resonant holiday flavor that is instantly recognizable and comforting.
The Cheesecake Contrast:
The inclusion of cream cheese adds a necessary counterpoint to the richness of the eggnog and the sweetness of the sugar cookie. The slight tang and acidity of the cream cheese cut through the heavy spice and dairy, ensuring the cookie remains balanced and avoids becoming cloying. This creamy, tart center is what elevates the dessert from a simple holiday cookie to a complex, celebratory confection.
Serving, Storage, and Optimization
To truly shine, these cookies must be handled properly after they leave the oven. Proper storage is essential due to the cream cheese filling, and thoughtful presentation completes the experience.
Presentation and Garnish:
The elegance of this cookie is in its simplicity. After cooling, a light dusting of powdered sugar resembles fresh fallen snow. For a more sophisticated look, use a microplane to finish each cookie with a tiny, fresh grating of whole nutmeg. This releases the nutmeg’s most potent oils right before serving, amplifying the signature eggnog aroma. Other garnishes can include a fine sprinkle of cinnamon sugar, or a small white chocolate drizzle.
Pairing Suggestions:
These cookies pair wonderfully with traditional holiday beverages. Serve them alongside a warm cup of coffee, a robust Earl Grey tea, or, for a thematic experience, a small glass of chilled, homemade eggnog. The cookies are also rich enough to stand up to a dark, fruity port or a spiced rum cocktail.
Storage and Shelf Life:
Due to the cream cheese filling, these cookies are perishable and require refrigeration.
-
Refrigerated: Store the cooled, finished cookies in an airtight container in the refrigerator for up to 3 to 4 days. They are best enjoyed after sitting at room temperature for about 15 minutes to allow the filling to soften slightly.
-
Freezing: For long-term storage, flash-freeze the cooled, unfrosted cookies on a tray until solid, then transfer them to a freezer-safe zip-top bag or container. They can be frozen for up to 2 months. Thaw overnight in the refrigerator and garnish just before serving. It is generally not recommended to freeze cookies that have already been dusted with powdered sugar, as the moisture during thawing can cause the sugar to dissolve.
Troubleshooting Common Issues:
-
Cookie Spreading: This is usually due to butter that was too warm, dough that was not chilled long enough, or using low-fat ingredients. Ensure butter is softened, not melted, and always chill the dough.
-
Filling Leaking (Blowouts): This is the most common issue. The filling must be frozen solid, and the dough seal must be absolutely perfect, with no cracks or visible seams. If a small amount of filling leaks, gently use a knife or spatula to push it back toward the cookie as soon as it comes out of the oven.
