
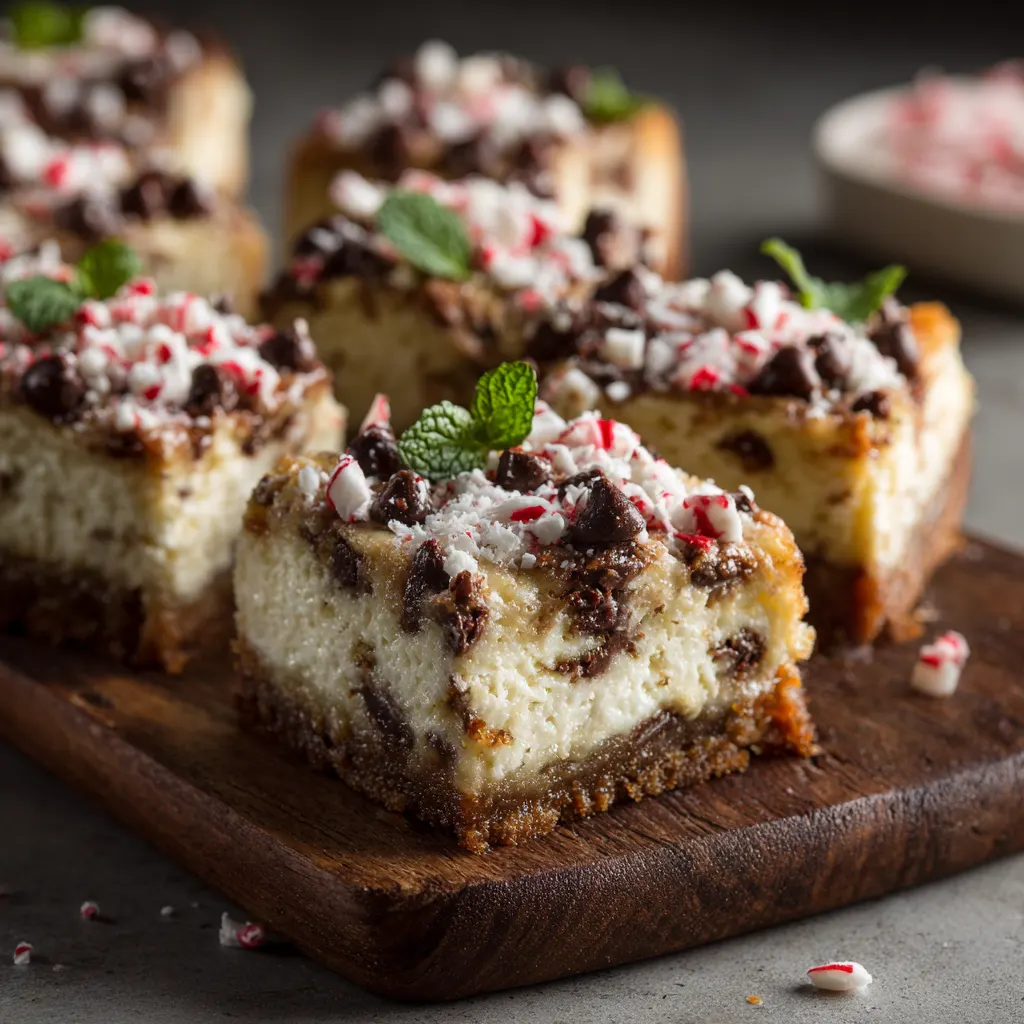
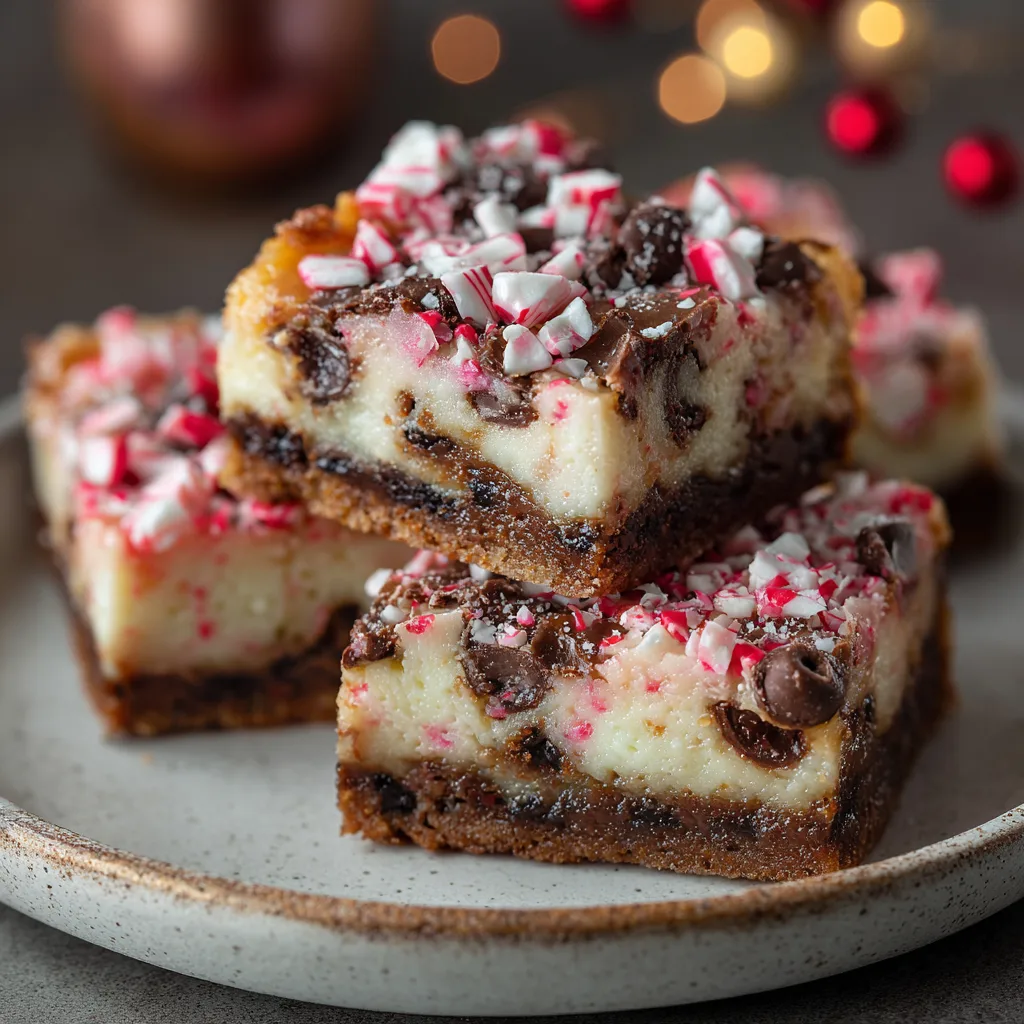
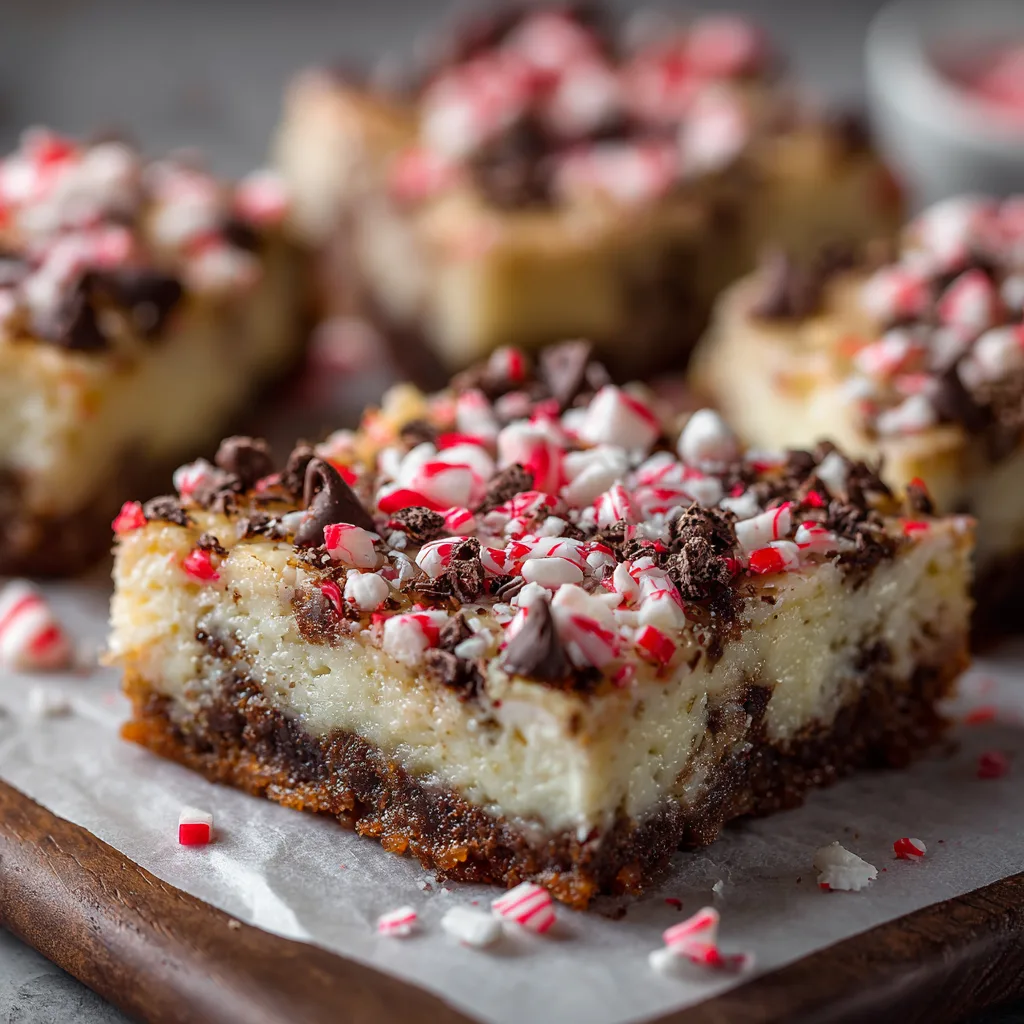
Few desserts capture the festive spirit quite like the marriage of rich, dark chocolate and cool, vibrant peppermint, and when this iconic pairing is layered into a creamy, tangy cheesecake bar, the result is truly irresistible. These bars feature a satisfyingly crisp chocolate cookie crust, a velvety mint-infused cheesecake filling studded with chocolate chips, and a glossy, decadent chocolate ganache crown sprinkled with crunchy candy cane pieces. They are significantly easier to prepare than a traditional whole cheesecake, requiring no water bath and delivering perfect, portable slices that are ideal for holiday gatherings, cookie exchanges, or a special winter treat.
Ingredients
For the Chocolate Cookie Crust
-
1 ½ cups (about 20) finely crushed chocolate sandwich cookie crumbs (such as Oreos, filling removed or included based on preference)
-
3 tablespoons granulated sugar
-
5 tablespoons unsalted butter, melted
For the Peppermint Cheesecake Filling
-
16 oz (two 8-oz blocks) full-fat cream cheese, completely softened to room temperature
-
⅔ cup granulated sugar
-
¼ cup sour cream or heavy cream, room temperature (optional, for extra richness)
-
2 large eggs, room temperature
-
1 to 1 ½ teaspoons pure peppermint extract (adjust to desired strength)
-
½ teaspoon vanilla extract
-
⅛ teaspoon salt
-
½ cup mini semi-sweet chocolate chips (or finely chopped Andes mints)
-
2-4 drops green food coloring (optional, for festive color)
For the Chocolate Ganache Topping
-
½ cup (5 oz) semi-sweet or bittersweet baking chocolate, finely chopped
-
⅓ cup heavy cream
-
¼ teaspoon peppermint extract (optional, for an extra mint punch)
-
¼ teaspoon vanilla extract
For Garnish
-
3-4 crushed candy canes or peppermint candies
Step-by-Step Instructions
1. Prepare the Crust
Preheat the oven to 350°F (175°C). Line an 8×8-inch or 9×9-inch baking pan with parchment paper, allowing enough overhang on two sides to easily lift the bars out later. In a medium bowl, combine the cookie crumbs, 3 tablespoons of sugar, and melted butter. Mix until the crumbs are evenly moistened. Press the mixture firmly and evenly into the bottom of the prepared pan. Bake the crust for 8 to 10 minutes. Remove from the oven and set aside to cool slightly while preparing the filling.
2. Mix the Cheesecake Filling
In the bowl of a stand mixer fitted with the paddle attachment (or using an electric hand mixer), beat the softened cream cheese on medium-low speed until it is completely smooth and fluffy, ensuring no lumps remain. Gradually add the granulated sugar and beat until fully incorporated and the mixture is creamy. Scrape down the sides of the bowl frequently. Add the sour cream (if using), vanilla extract, peppermint extract, and salt, mixing on low speed until combined.
3. Incorporate Eggs and Chocolate Chips
Add the eggs, one at a time, mixing only until each egg is just incorporated. Do not overmix once the eggs are added, as this can incorporate too much air and lead to cracks during baking. If using green food coloring, gently mix it in now. Gently fold in the mini chocolate chips with a spatula.
4. Bake the Bars
Pour the cheesecake mixture evenly over the warm crust in the prepared pan. Reduce the oven temperature to 325°F (160°C). Bake for 30 to 40 minutes, or until the edges of the cheesecake are set and the center is almost set but still has a slight wiggle when the pan is gently nudged.
5. Cool and Chill
Turn the oven off and prop the door open slightly (about an inch) using a wooden spoon. Allow the cheesecake bars to cool in the residual heat of the oven for 30 minutes. This slow cooling helps prevent the cheesecake from shrinking and cracking. Remove the pan from the oven and cool completely to room temperature on a wire rack (this usually takes 1-2 hours). Once completely cooled, cover the pan and transfer it to the refrigerator to chill for at least 4 hours, but preferably overnight, before attempting to slice.
6. Prepare the Ganache and Garnish
Once the bars are fully chilled, prepare the ganache. Place the chopped chocolate in a heatproof bowl. In a separate microwave-safe bowl, heat the heavy cream until it is hot and just beginning to simmer around the edges (about 60-90 seconds in a microwave). Pour the hot cream over the chopped chocolate. Let it stand undisturbed for 5 minutes, then gently whisk until the ganache is smooth, glossy, and lump-free. Stir in the optional peppermint and vanilla extracts. Let the ganache cool slightly until it thickens to a spreadable consistency (about 15-20 minutes).
7. Finish and Serve
Lift the chilled cheesecake out of the pan using the parchment paper overhang. Pour the cooled ganache over the top of the cheesecake block and spread it into an even layer with an offset spatula. Immediately sprinkle the crushed candy canes over the ganache before it sets. Return the bars to the refrigerator for 30 minutes to set the ganache. Use a sharp, hot knife (run under hot water and wiped dry between cuts) to slice the cheesecake into bars.
Mastering the Foundations: Tips for a Perfect Cheesecake Crust and Filling
Achieving a creamy, crack-free cheesecake filling and a structurally sound crust are the hallmarks of a successful cheesecake bar. While bar recipes are generally less temperamental than whole cheesecakes, observing a few key techniques ensures a professional-level result every time.
The most critical step is ensuring all dairy ingredients—the cream cheese, eggs, and sour/heavy cream—are at true room temperature. Cold cream cheese will not incorporate smoothly with the sugar, resulting in a lumpy batter that must be overmixed to compensate. This overmixing incorporates excess air, and when that air escapes during baking, it causes the cheesecake to rise rapidly and inevitably crack upon cooling. To expedite the softening process, cube the cream cheese and let it sit for at least an hour. Eggs can be quickly warmed by placing them in a bowl of warm (not hot) water for five minutes.
For the crust, the choice of cookie is pivotal. Most recipes leverage the oil and deep flavor of chocolate sandwich cookies, but for a slightly dryer, more chocolate-intense crust, you can opt for chocolate wafer crumbs mixed with cocoa powder. The crust must be pressed firmly into the pan, extending slightly up the sides for structure. The pre-baking step (blind baking) sets the crust so it doesn’t become soggy when the moist filling is added.
Baking temperature control is another non-negotiable step. Notice the recipe calls for preheating to 350°F for the crust, but reducing the temperature to 325°F for the actual cheesecake. This lower, gentler heat is essential for a slow, even bake. The bars are finished when they look almost set around the edges, but the very center still has a slight jiggle. This slight under-baking is key; the residual heat will finish cooking the center as the cheesecake cools, ensuring maximum creaminess without dryness.
Deepening the Flavor: Customizing the Chocolate and Peppermint Balance
The iconic pairing of chocolate and peppermint offers numerous avenues for flavor customization, allowing the baker to adjust the intensity of both the mint and the cocoa notes to their preference. The base recipe provides a balanced flavor profile, but subtle ingredient swaps can dramatically shift the final taste.
Peppermint Intensity: Pure peppermint extract is powerful, and its concentration can vary between brands. The recommended starting amount of 1 to 1.5 teaspoons is often ideal for cutting through the richness of the cheesecake. For a subtle, background mint, use 1 teaspoon. For a sharp, forward, intense holiday punch, increase the extract up to 2 teaspoons, especially if you are using a chocolate-based crust and topping. Alternatively, if you prefer a subtle herbaceous note, try substituting half of the peppermint extract with vanilla.
Chocolate Integration: The primary chocolate in this recipe comes from the crust, the mini chips folded into the filling, and the ganache topping. For a chocolate peppermint cheesecake bar (rather than a peppermint chocolate chip bar), you can incorporate cocoa directly into the filling. Melt about 4 ounces of high-quality semi-sweet chocolate and blend it into the cream cheese mixture before adding the eggs. This technique transforms the filling into a rich, brown chocolate cheesecake base, offering a deeper contrast to the bright mint flavor. Conversely, using white chocolate chips instead of semi-sweet in the filling and ganache creates a beautiful contrast, yielding a visually striking and uniquely sweet White Chocolate Peppermint Cheesecake Bar.
Finally, consider the inclusion of pre-made mint chocolates, such as finely chopped Andes mints or seasonal peppermint bark. Folding these into the filling instead of standard chocolate chips introduces a complex texture and an immediate mint flavor that melts beautifully into the creamy base.
Creative Toppings and Presentation for a Festive Look
A significant part of the appeal of Peppermint Chocolate Chip Cheesecake Bars is their stunning holiday appearance. While crushed candy canes are the classic garnish, elevating the topping and presentation can transform a simple bar into a show-stopping centerpiece.
The chocolate ganache provides a smooth, rich canvas for decoration. It is essential to ensure the heavy cream is hot enough to fully melt the chocolate and that the mixture is whisked until perfectly smooth. Allowing the ganache to cool slightly to a thick, honey-like consistency prevents it from running off the sides of the bars before it sets. For a two-tone topping, consider melting white chocolate separately and drizzling stripes or zigzags across the cooling dark chocolate ganache before adding the final garnishes.
Garnish Options Beyond the Candy Cane:
-
Chocolate Curls: Use a vegetable peeler on the side of a large block of tempered chocolate to create elegant, airy curls.
-
Peppermint Whipped Cream: Omit the ganache and top the chilled bars with a dollop of fresh whipped cream, flavored with a drop of peppermint extract, and pipe it onto each bar just before serving.
-
Cocoa Dusting: If you opt for a white chocolate filling or topping, a light dusting of high-quality Dutch-processed cocoa powder adds a layer of sophistication.
-
Edible Glitter: For a truly festive and sparkling look, gently brush or sprinkle edible gold or silver glitter onto the ganache surface.
When slicing, a professional presentation hinges on precision. Once the bars are fully chilled and the ganache is set, use the parchment paper overhang to gently lift the entire block out of the pan. Place it on a clean cutting board. For clean cuts, use a large, sharp chef’s knife. Dip the knife in hot water, wipe it completely dry, and make a single, decisive cut. Repeat the hot-water-and-wipe process before every single cut. This technique prevents the creamy filling and sticky ganache from tearing or adhering to the blade, ensuring every bar has sharp, bakery-quality edges.
Make-Ahead Magic: Baking, Cooling, and Storage Strategies
Cheesecake bars are an ideal dessert for advance preparation, a distinct advantage during the busy holiday season. Proper cooling and storage not only preserve the texture and flavor but are absolutely critical steps in the baking process itself.
The Importance of Chilling: The final texture of cheesecake bars is determined by the mandatory cooling period. The initial slow cool-down in the turned-off oven prevents rapid temperature shock, which minimizes cracking. However, the lengthy refrigeration period (4 hours minimum, 8+ hours is best) is where the magic happens. During this time, the fats in the cream cheese solidify, allowing the filling to fully set and achieving the dense, rich texture expected of cheesecake. Trying to slice the bars before they are fully chilled will result in a messy, crumbly, and misshapen dessert.
Making Ahead: These bars can be completely prepared, including the crust, filling, and initial chill, up to three days in advance. Add the ganache and candy cane topping 12 to 24 hours before serving. If adding a fresh whipped cream topping, wait until just a few hours before presentation. Store finished bars in an airtight container in the refrigerator to prevent them from absorbing ambient odors.
Freezing for Longer Storage: Cheesecake bars freeze beautifully, making them excellent for long-term preparation.
-
Preparation: Slice the fully chilled and decorated bars.
-
Initial Freeze: Place the individual bars on a parchment-lined baking sheet and freeze for 1 to 2 hours until solid.
-
Wrapping: Once firm, wrap each bar tightly in plastic wrap, followed by a layer of aluminum foil. This dual-layer protection prevents freezer burn.
-
Storage: Place the wrapped bars in a large, heavy-duty freezer bag or airtight container. They can be stored for up to 2 months.
-
Thawing: To serve, transfer the desired number of bars from the freezer to the refrigerator and allow them to thaw overnight, or let them sit at cool room temperature for 30 to 45 minutes for a quicker thaw.
This make-ahead flexibility ensures a stunning holiday dessert is always ready to go, removing kitchen stress when entertaining guests.
